> ## Documentation Index
> Fetch the complete documentation index at: https://docs.msportal.ai/llms.txt
> Use this file to discover all available pages before exploring further.
# Planner
> Organize tasks, projects, and strategic initiatives with timeline-based planning tools
The Planner module provides a visual timeline for managing tasks, projects, and strategic initiatives across your client companies. Plan work, track progress, and align team efforts with business goals.
 ## Overview
The Planner displays work items on a timeline, allowing you to:
* **Plan strategic initiatives** - Schedule projects and tasks across months or years
* **Track progress** - Monitor status and completion of planned work
* **Allocate resources** - Estimate hours, costs, and assign to companies
* **Link to findings** - Connect planner items to compliance findings or security actions
* **Collaborate** - Share notes, use templates, and leverage AI assistance
## Timeline Views
The Planner offers three timeline views to help you plan at different scales. Use the view switcher in the toolbar to change between them.
### Monthly View
## Overview
The Planner displays work items on a timeline, allowing you to:
* **Plan strategic initiatives** - Schedule projects and tasks across months or years
* **Track progress** - Monitor status and completion of planned work
* **Allocate resources** - Estimate hours, costs, and assign to companies
* **Link to findings** - Connect planner items to compliance findings or security actions
* **Collaborate** - Share notes, use templates, and leverage AI assistance
## Timeline Views
The Planner offers three timeline views to help you plan at different scales. Use the view switcher in the toolbar to change between them.
### Monthly View
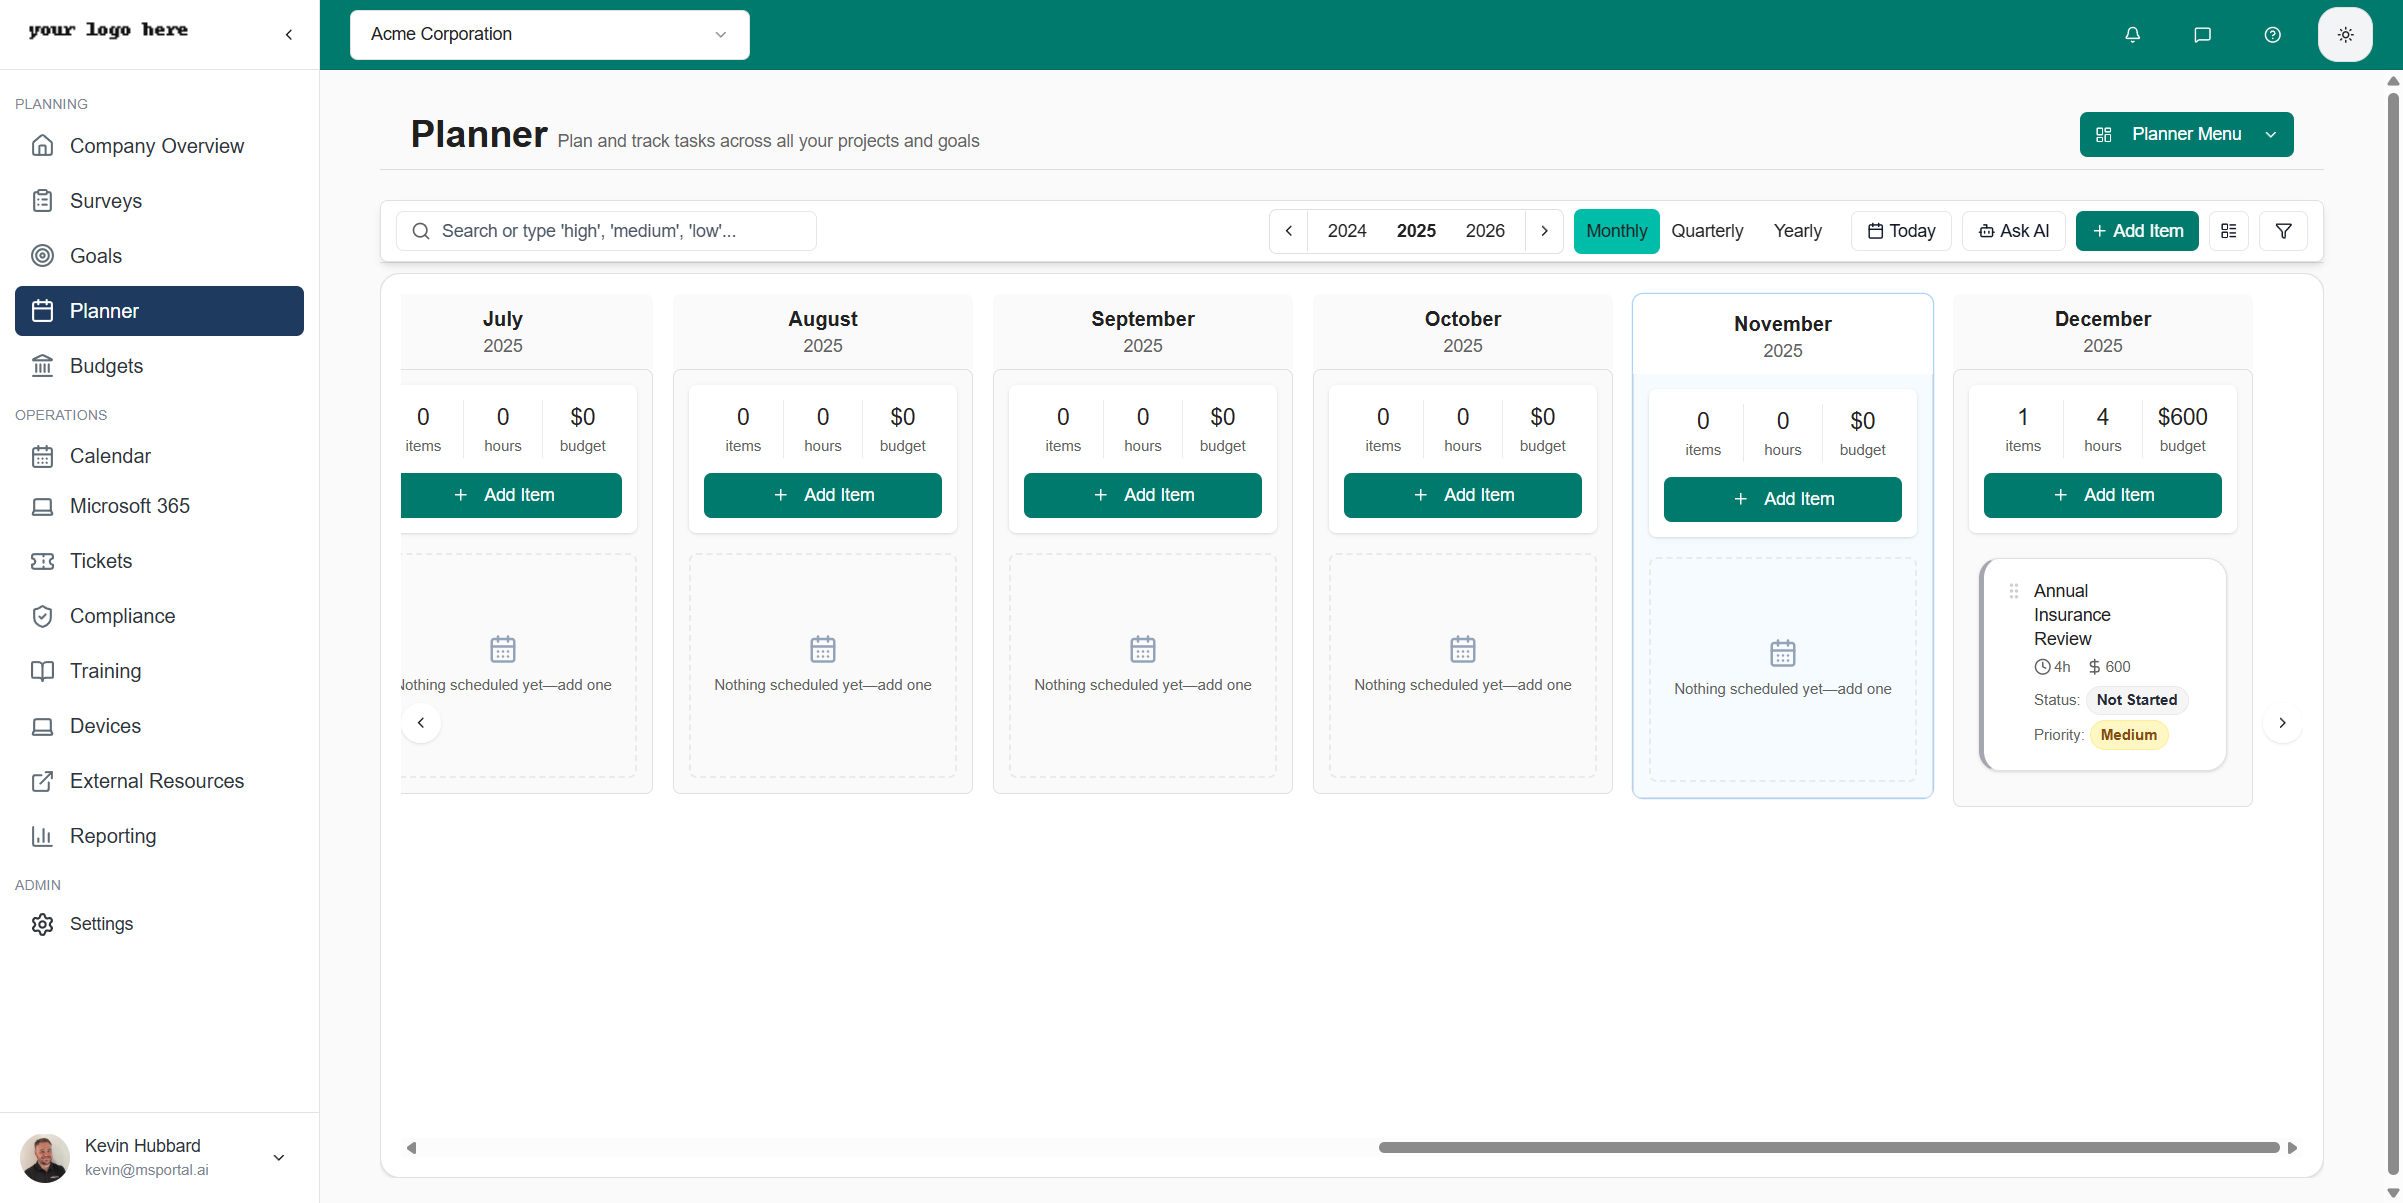 The monthly view shows a detailed day-by-day breakdown for the current month. Best for:
* Short-term planning and scheduling
* Viewing specific due dates
* Managing immediate priorities
### Quarterly View
The monthly view shows a detailed day-by-day breakdown for the current month. Best for:
* Short-term planning and scheduling
* Viewing specific due dates
* Managing immediate priorities
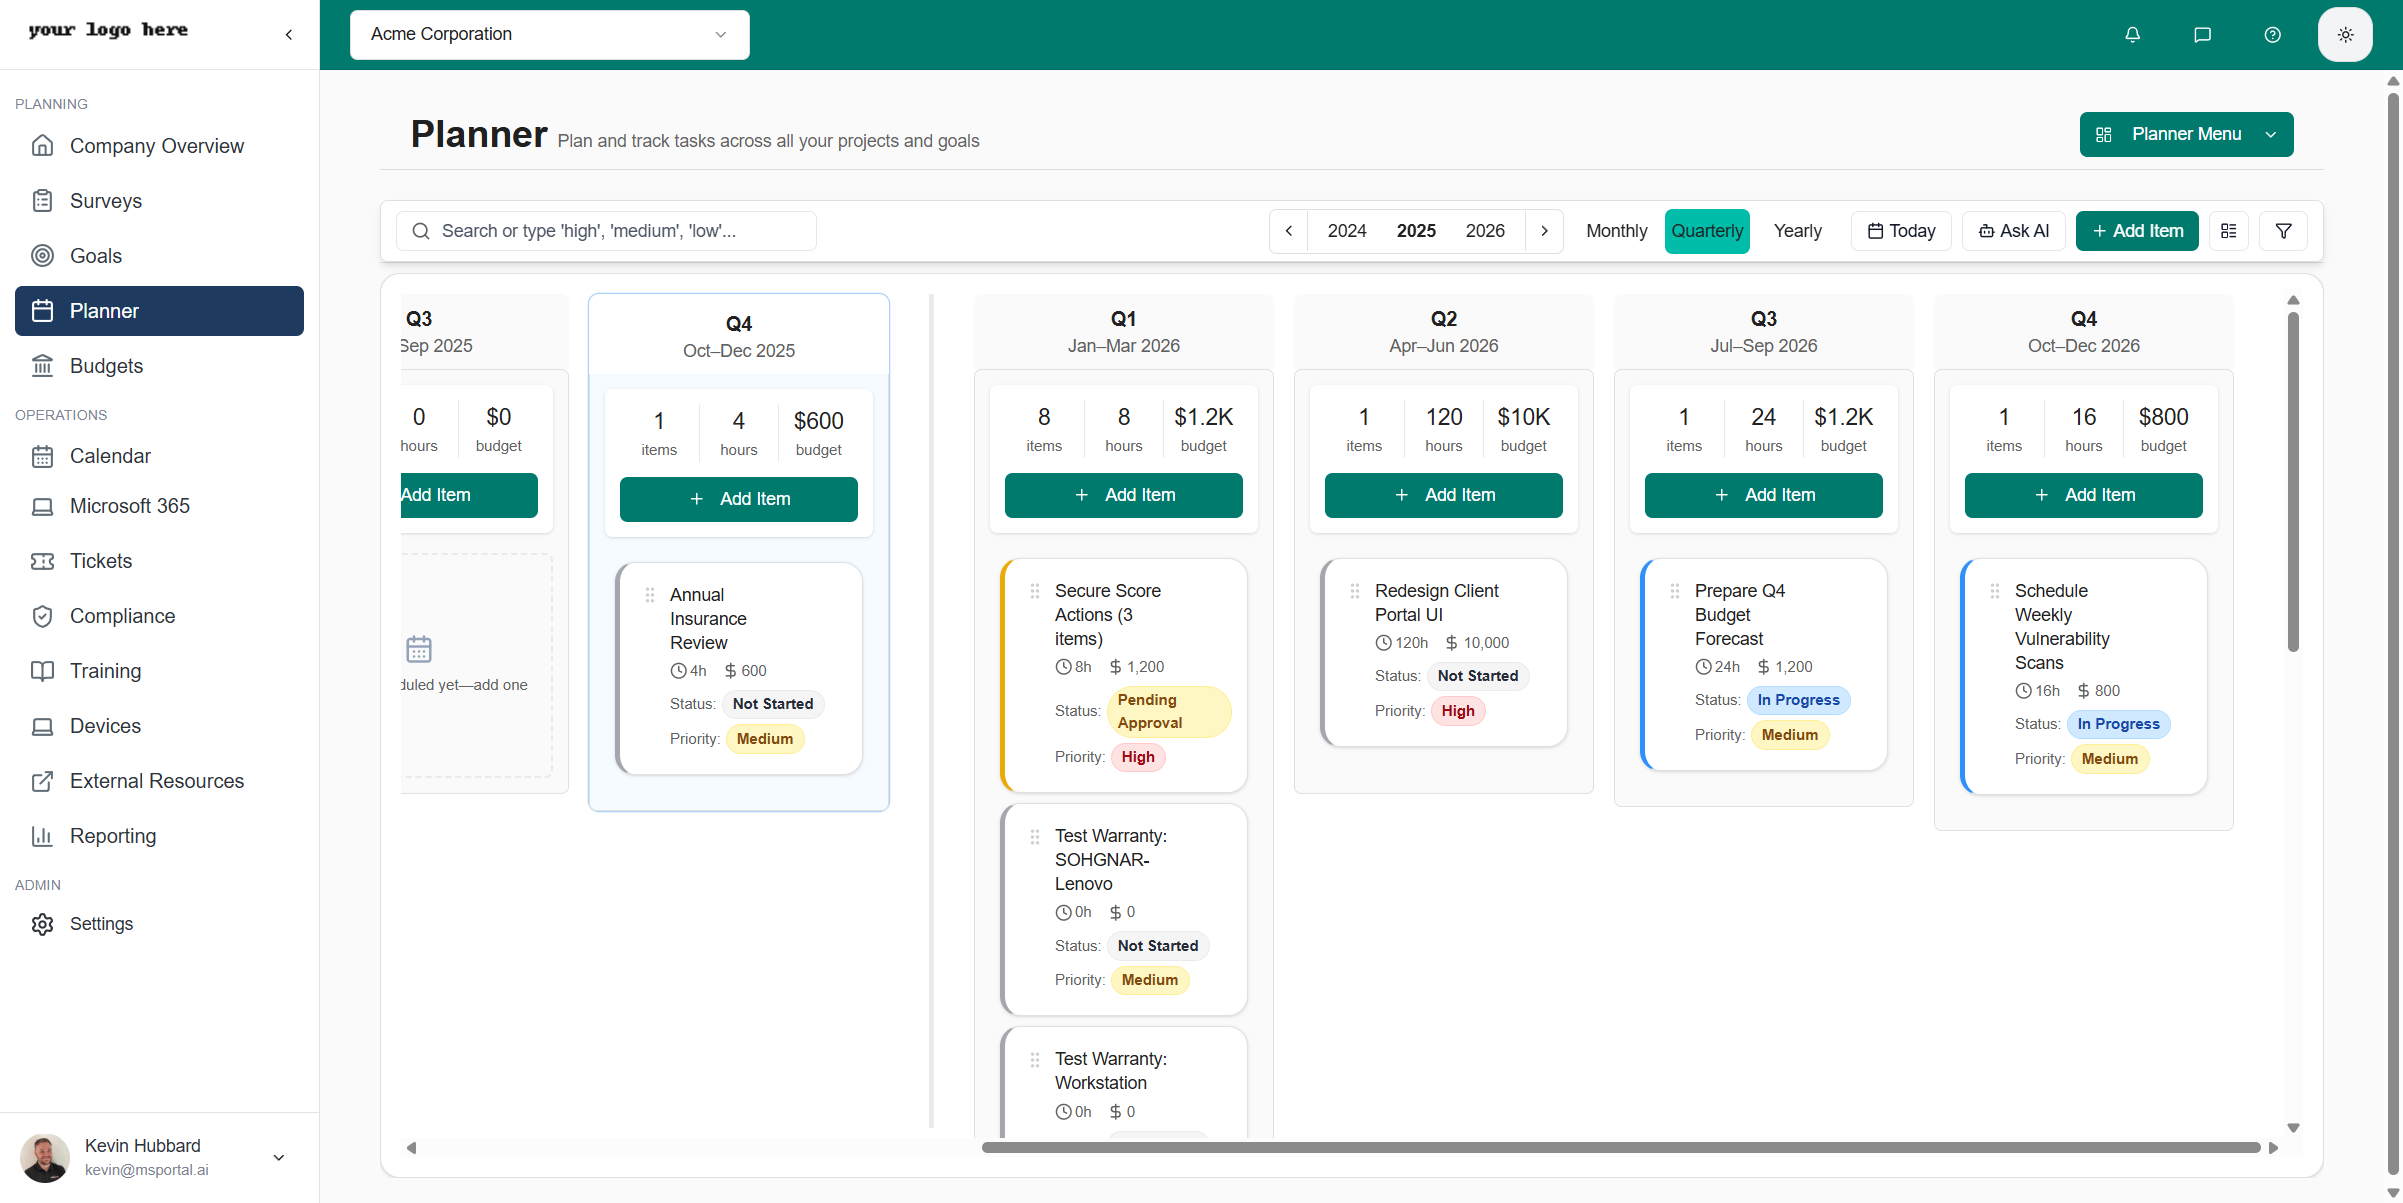
### Quarterly View
 The quarterly view displays four quarters at a time (Q1-Q4). Best for:
* Medium-term project planning
* Quarterly business reviews
* Balancing workload across months
### Yearly View
The quarterly view displays four quarters at a time (Q1-Q4). Best for:
* Medium-term project planning
* Quarterly business reviews
* Balancing workload across months
### Yearly View
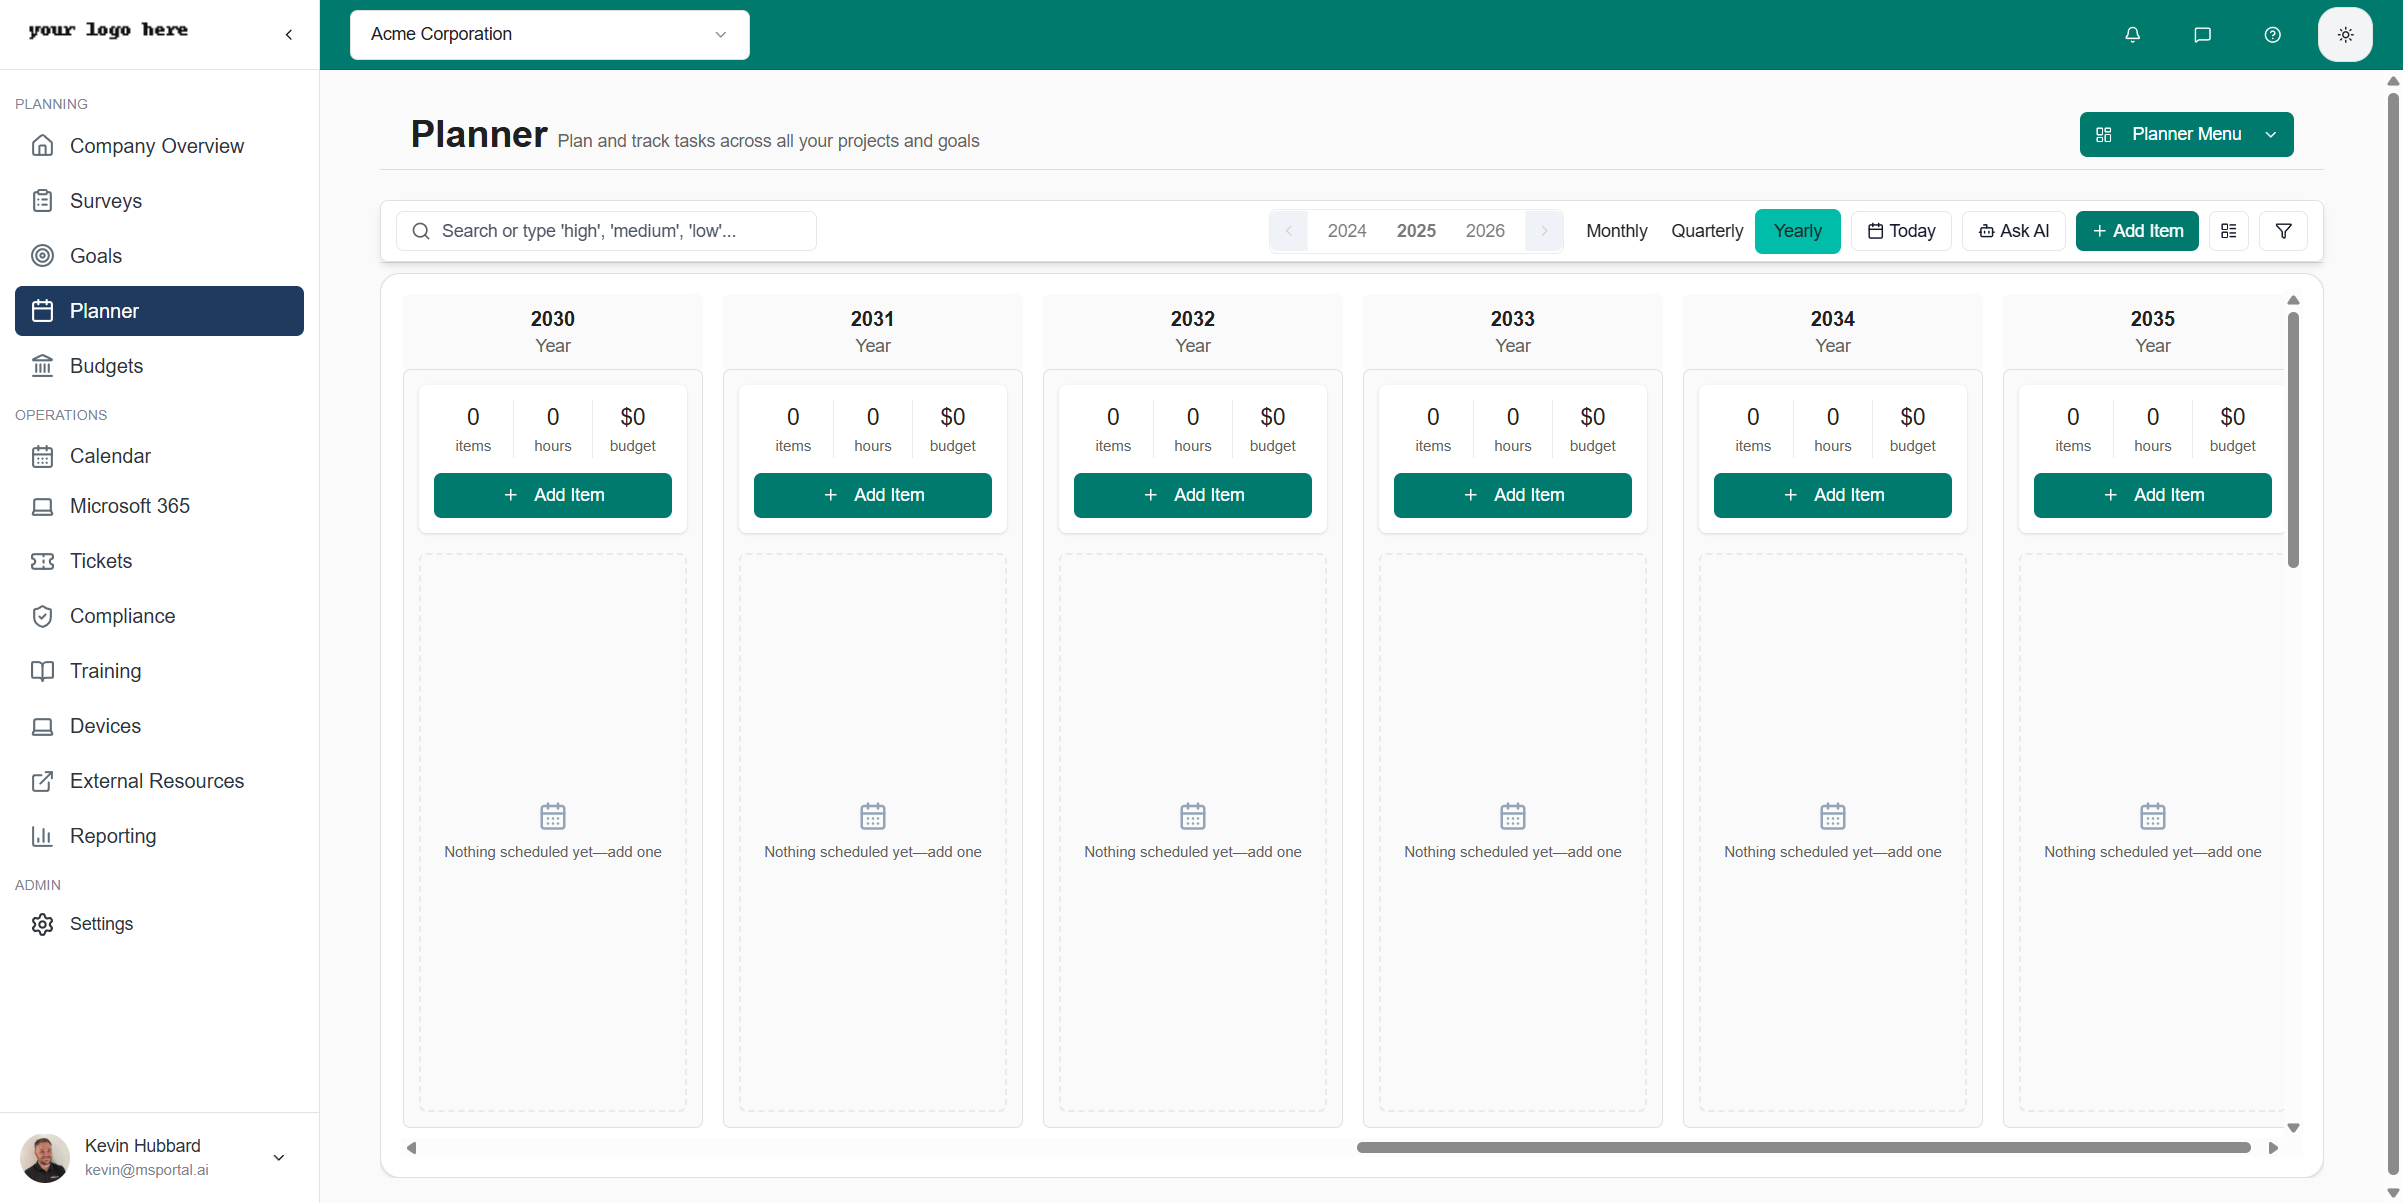 The yearly view shows all 12 months in a single view. Best for:
* Long-term strategic planning
* Annual roadmapping
* Identifying seasonal patterns
Use the year navigation buttons and year selector to move between years. The **Today** button quickly returns you to the current date.
## View Density
Adjust how much information is displayed for each planner item using the View Density setting. This controls the column width of each time period, allowing you to see more or less detail.
The yearly view shows all 12 months in a single view. Best for:
* Long-term strategic planning
* Annual roadmapping
* Identifying seasonal patterns
Use the year navigation buttons and year selector to move between years. The **Today** button quickly returns you to the current date.
## View Density
Adjust how much information is displayed for each planner item using the View Density setting. This controls the column width of each time period, allowing you to see more or less detail.
 | Density | Column Width | Best For |
| --------------- | -------------------------- | ---------------------------------------- |
| **Comfortable** | Widest columns (220-280px) | Detailed item view with full titles |
| **Compact** | Medium columns (190-240px) | Balanced view for everyday use (default) |
| **Dense** | Narrow columns (160-200px) | Fitting more time periods on screen |
Click the **View density** button (grid icon) in the toolbar to open the density menu and select your preferred option.
## Creating Planner Items
Click the **Add Item** button to create a new planner item. You can also click the **Add Item** button within any time period column to add an item at that specific date.
### Item Types
Planner items can be categorized by type:
* Security Services
* Managed Services
* Professional Services
* Projects
* Training
* Compliance
* Other
* Custom types defined in settings
## Importing PSA Opportunities
The **Import Opportunities** dialog pulls existing PSA opportunities into MSPortal as planner items in one click, so you do not have to re-enter deals you already track in your PSA.
**Importing opportunities requires the Manage Planner permission.** Users with only Read or Write access to the Planner can view and edit existing items but cannot run the bulk import. The button is hidden when the permission is missing, and the server action rejects calls from users without it.
Click the **Import Opportunities** button in the planner toolbar. The button only appears when you have the **Manage Planner** permission AND at least one PSA with opportunities is connected (Halo, ConnectWise, or Autotask).
The dialog searches across every connected PSA at once (Halo, ConnectWise, and Autotask). Type to filter by name, or use the company filter to narrow to a single client's opportunities.
Tick the opportunities you want to bring in. Already-imported opportunities are flagged in the dialog so you cannot accidentally add the same deal twice.
Click **Import**. MSPortal creates a planner item for each selected opportunity, populated with the title, description, due date, and estimated value pulled from the PSA.
Combine **Import Opportunities** with the **Quarterly Roadmap** reporting block to drop imported opportunities into a client-presentable QBR slide in seconds.
### Auto-Import on PSA Sync
If your PSA integration has **opportunity auto-import** turned on, MSPortal automatically creates planner items as new opportunities show up in the PSA, so you never have to open the Import dialog manually. The auto-import path runs as a background sync task and is not gated by the user-level Manage Planner permission, since no individual user is making the request.
* The link is one-way (PSA to planner) with a per-opportunity unique constraint, so overlapping syncs cannot create duplicates
* On every sync, MSPortal keeps the linked planner item in sync with the PSA opportunity. Title, description, due date, and estimated value updates flow through automatically. A renamed opportunity in your PSA shows up renamed in MSPortal without anyone touching it
* Sync runs cover Halo PSA, ConnectWise, and Autotask
* An **Opportunity types to auto-import** filter on the integration's setup wizard lets you scope auto-import to specific opportunity types (for example "Managed Services Contract" only) so unrelated sales pipeline noise stays out of your planner
Set up auto-import in **Settings → Integrations → \[your PSA]** under the Opportunity Settings section. The toggle, minimum value, and type filter all save automatically.
### Creating a New Opportunity
You can also create a new PSA opportunity directly from a planner item. Open any planner item, and the **Create Opportunity** action posts a new opportunity to the PSA the company is linked to. The action is only offered for companies that are linked to a PSA (ConnectWise, Halo, or Autotask), since RMM-only links cannot host opportunities.
## Editing Planner Items
Click on any planner item to open the edit dialog with full details.
| Density | Column Width | Best For |
| --------------- | -------------------------- | ---------------------------------------- |
| **Comfortable** | Widest columns (220-280px) | Detailed item view with full titles |
| **Compact** | Medium columns (190-240px) | Balanced view for everyday use (default) |
| **Dense** | Narrow columns (160-200px) | Fitting more time periods on screen |
Click the **View density** button (grid icon) in the toolbar to open the density menu and select your preferred option.
## Creating Planner Items
Click the **Add Item** button to create a new planner item. You can also click the **Add Item** button within any time period column to add an item at that specific date.
### Item Types
Planner items can be categorized by type:
* Security Services
* Managed Services
* Professional Services
* Projects
* Training
* Compliance
* Other
* Custom types defined in settings
## Importing PSA Opportunities
The **Import Opportunities** dialog pulls existing PSA opportunities into MSPortal as planner items in one click, so you do not have to re-enter deals you already track in your PSA.
**Importing opportunities requires the Manage Planner permission.** Users with only Read or Write access to the Planner can view and edit existing items but cannot run the bulk import. The button is hidden when the permission is missing, and the server action rejects calls from users without it.
Click the **Import Opportunities** button in the planner toolbar. The button only appears when you have the **Manage Planner** permission AND at least one PSA with opportunities is connected (Halo, ConnectWise, or Autotask).
The dialog searches across every connected PSA at once (Halo, ConnectWise, and Autotask). Type to filter by name, or use the company filter to narrow to a single client's opportunities.
Tick the opportunities you want to bring in. Already-imported opportunities are flagged in the dialog so you cannot accidentally add the same deal twice.
Click **Import**. MSPortal creates a planner item for each selected opportunity, populated with the title, description, due date, and estimated value pulled from the PSA.
Combine **Import Opportunities** with the **Quarterly Roadmap** reporting block to drop imported opportunities into a client-presentable QBR slide in seconds.
### Auto-Import on PSA Sync
If your PSA integration has **opportunity auto-import** turned on, MSPortal automatically creates planner items as new opportunities show up in the PSA, so you never have to open the Import dialog manually. The auto-import path runs as a background sync task and is not gated by the user-level Manage Planner permission, since no individual user is making the request.
* The link is one-way (PSA to planner) with a per-opportunity unique constraint, so overlapping syncs cannot create duplicates
* On every sync, MSPortal keeps the linked planner item in sync with the PSA opportunity. Title, description, due date, and estimated value updates flow through automatically. A renamed opportunity in your PSA shows up renamed in MSPortal without anyone touching it
* Sync runs cover Halo PSA, ConnectWise, and Autotask
* An **Opportunity types to auto-import** filter on the integration's setup wizard lets you scope auto-import to specific opportunity types (for example "Managed Services Contract" only) so unrelated sales pipeline noise stays out of your planner
Set up auto-import in **Settings → Integrations → \[your PSA]** under the Opportunity Settings section. The toggle, minimum value, and type filter all save automatically.
### Creating a New Opportunity
You can also create a new PSA opportunity directly from a planner item. Open any planner item, and the **Create Opportunity** action posts a new opportunity to the PSA the company is linked to. The action is only offered for companies that are linked to a PSA (ConnectWise, Halo, or Autotask), since RMM-only links cannot host opportunities.
## Editing Planner Items
Click on any planner item to open the edit dialog with full details.
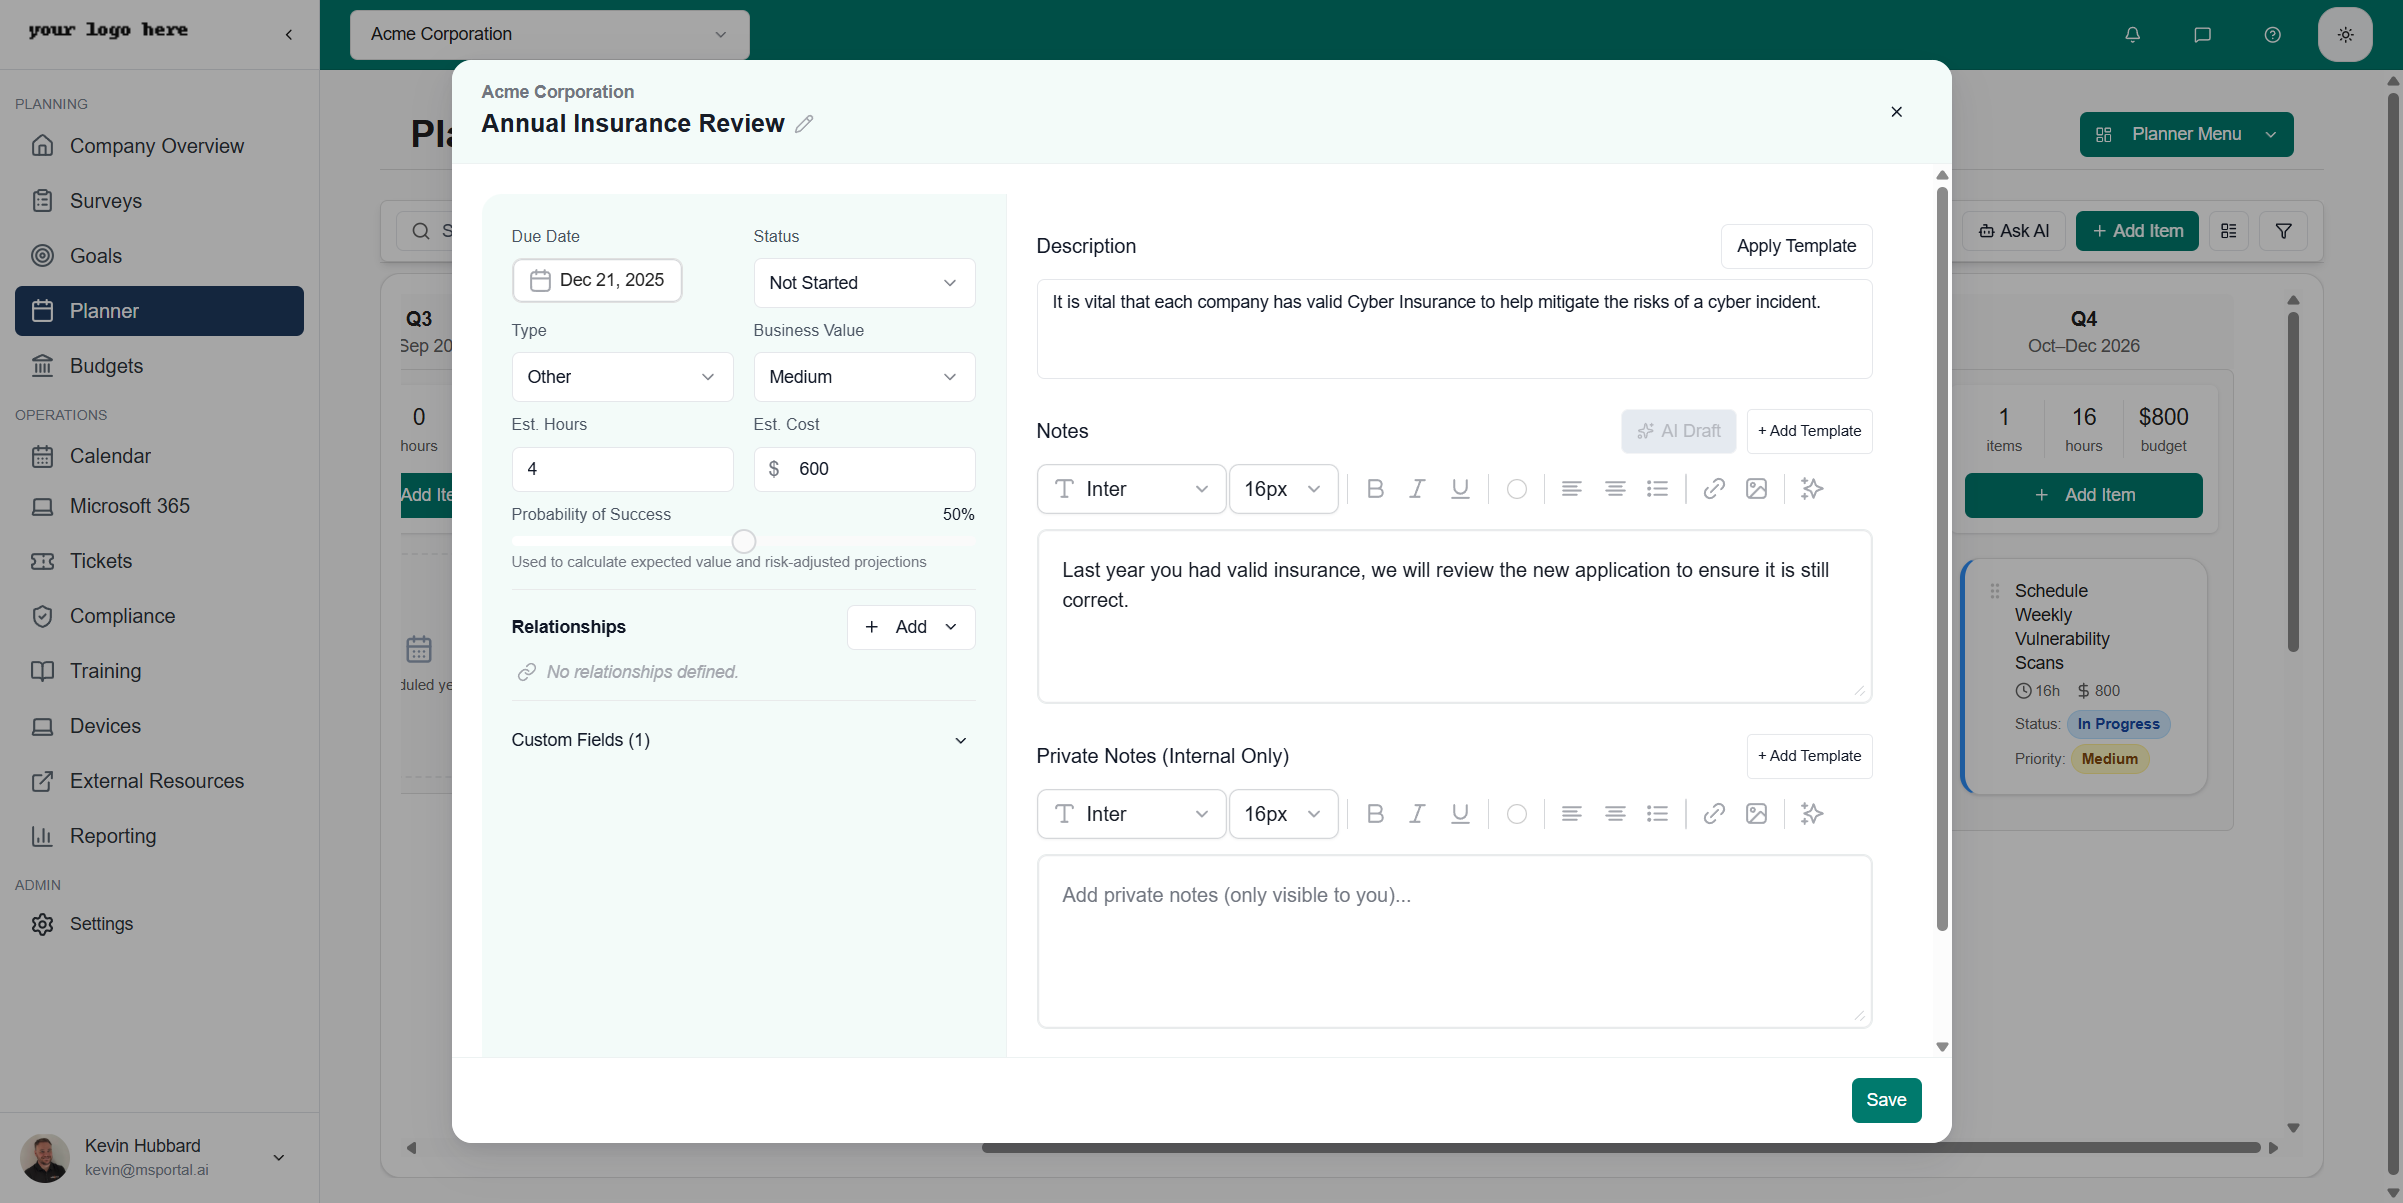 ### Basic Information
| Field | Description |
| ------------------ | --------------------------------------------------------------------- |
| **Title** | The name of the planner item (click to edit) |
| **Company** | The client company this item is for |
| **Due Date** | When the item should be completed |
| **Status** | Current status (Not Started, In Progress, Pending Approval, Complete) |
| **Type** | Category of work (Security Services, Other, etc.) |
| **Business Value** | Priority level (High, Medium, Low) |
### Estimates
| Field | Description |
| -------------------------- | -------------------------------------------- |
| **Est. Hours** | Estimated hours to complete |
| **Est. Cost** | Estimated cost for the work (in dollars) |
| **Probability of Success** | Likelihood of completion (percentage slider) |
### Relationships
Link planner items to other entities using the **Relationships** section:
* **Goals** - Connect to company goals
* **Compliance** - Link to compliance findings
* **Secure Score** - Associate with Microsoft Secure Score actions
* **Devices** - Connect to device-related work
* **Projects** - Link to project management items
* **Opportunities** - Associate with sales opportunities
Click **Add** to create a new relationship or link to an existing item.
### Notes and Description
* **Description** - Brief description of the initiative. Click **Apply Template** to populate from a template
* **Notes** - Collaborative notes visible to your team with rich text editor
* **Private Notes (Internal Only)** - Notes only visible to you
### Custom Fields
Expand the **Custom Fields** section to view and edit any custom fields configured for planner items.
### File Uploads
The **Uploads** section allows you to attach files to planner items. Click to upload or drag and drop files (max 10MB per file).
## Using Templates
Templates help you quickly populate planner items with predefined content.
### Applying a Template
1. Open a planner item for editing
2. Click **Apply Template** in the Description section
3. The Apply Template dialog opens
### Basic Information
| Field | Description |
| ------------------ | --------------------------------------------------------------------- |
| **Title** | The name of the planner item (click to edit) |
| **Company** | The client company this item is for |
| **Due Date** | When the item should be completed |
| **Status** | Current status (Not Started, In Progress, Pending Approval, Complete) |
| **Type** | Category of work (Security Services, Other, etc.) |
| **Business Value** | Priority level (High, Medium, Low) |
### Estimates
| Field | Description |
| -------------------------- | -------------------------------------------- |
| **Est. Hours** | Estimated hours to complete |
| **Est. Cost** | Estimated cost for the work (in dollars) |
| **Probability of Success** | Likelihood of completion (percentage slider) |
### Relationships
Link planner items to other entities using the **Relationships** section:
* **Goals** - Connect to company goals
* **Compliance** - Link to compliance findings
* **Secure Score** - Associate with Microsoft Secure Score actions
* **Devices** - Connect to device-related work
* **Projects** - Link to project management items
* **Opportunities** - Associate with sales opportunities
Click **Add** to create a new relationship or link to an existing item.
### Notes and Description
* **Description** - Brief description of the initiative. Click **Apply Template** to populate from a template
* **Notes** - Collaborative notes visible to your team with rich text editor
* **Private Notes (Internal Only)** - Notes only visible to you
### Custom Fields
Expand the **Custom Fields** section to view and edit any custom fields configured for planner items.
### File Uploads
The **Uploads** section allows you to attach files to planner items. Click to upload or drag and drop files (max 10MB per file).
## Using Templates
Templates help you quickly populate planner items with predefined content.
### Applying a Template
1. Open a planner item for editing
2. Click **Apply Template** in the Description section
3. The Apply Template dialog opens
 4. **Select Template** - Choose from available templates
5. **Fields to Apply** - Check which fields to import from the template
6. Use **All** or **None** buttons to quickly select/deselect all fields
7. Click **Apply Template** to apply the selected fields
Create templates for common project types like QBR Preparation, Security Assessment, or Onboarding Checklist to standardize your planning process.
## AI Features
### Ask AI
Click the **Ask AI** button in the toolbar to get AI-powered assistance:
* Generate project plans
* Suggest tasks based on company context
* Draft descriptions and notes
### AI Draft Notes
Within the edit dialog, use **AI Draft** to automatically generate notes based on the item context.
## Filtering and Search
Use the search box to find planner items by title or description. Click the **Filter** button (funnel icon) to narrow down displayed items by Company, Status, Type, or Business Value.
## Planner Menu
Click the **Planner Menu** button to access additional views:
| Option | Description |
| ----------------- | ------------------------------------- |
| **Timeline View** | Main planner timeline (default) |
| **List View** | Table-based list of all planner items |
| **Templates** | Manage planner item templates |
| **Analytics** | View planning analytics and reports |
| **Settings** | Configure planner settings |
## Related Resources
Connect planner items to strategic objectives
Schedule meetings for planner items
Link findings to planned remediation
Configure planner item types and templates
## Need Help?
For assistance with the Planner module, contact [support@msportal.ai](mailto:support@msportal.ai).
4. **Select Template** - Choose from available templates
5. **Fields to Apply** - Check which fields to import from the template
6. Use **All** or **None** buttons to quickly select/deselect all fields
7. Click **Apply Template** to apply the selected fields
Create templates for common project types like QBR Preparation, Security Assessment, or Onboarding Checklist to standardize your planning process.
## AI Features
### Ask AI
Click the **Ask AI** button in the toolbar to get AI-powered assistance:
* Generate project plans
* Suggest tasks based on company context
* Draft descriptions and notes
### AI Draft Notes
Within the edit dialog, use **AI Draft** to automatically generate notes based on the item context.
## Filtering and Search
Use the search box to find planner items by title or description. Click the **Filter** button (funnel icon) to narrow down displayed items by Company, Status, Type, or Business Value.
## Planner Menu
Click the **Planner Menu** button to access additional views:
| Option | Description |
| ----------------- | ------------------------------------- |
| **Timeline View** | Main planner timeline (default) |
| **List View** | Table-based list of all planner items |
| **Templates** | Manage planner item templates |
| **Analytics** | View planning analytics and reports |
| **Settings** | Configure planner settings |
## Related Resources
Connect planner items to strategic objectives
Schedule meetings for planner items
Link findings to planned remediation
Configure planner item types and templates
## Need Help?
For assistance with the Planner module, contact [support@msportal.ai](mailto:support@msportal.ai).