> ## Documentation Index
> Fetch the complete documentation index at: https://docs.msportal.ai/llms.txt
> Use this file to discover all available pages before exploring further.
# How to open a ticket
> Start with the Home AI Assistant to describe your issue, answer follow-up questions, and review your support request before sending it.
Start on **Home** with the **AI Assistant** to ask your IT provider for help or request a service. Describe what you need in your own words, answer the assistant’s follow-up questions, and review the request before sending it.
This is the primary way to open a ticket. If you prefer to complete a form, or AI is unavailable in your portal, use [Tickets > New Ticket](#use-the-ticket-form-instead).
**Audience:** Company users. MSP staff can use the same form for a selected company.
## Before you start
* Sign in using the portal address supplied by your IT provider. Your portal may use your provider's name, logo, and colors.
* Your MSP must give you access to Tickets and permission to create tickets. Seeing existing tickets does not necessarily mean you can create them.
* Your MSP must make at least one active request template available to you. The requests and questions you see depend on your company and the MSP's configuration.
Your MSP manages ticket templates, user accounts, and permissions. You do not need access to **Settings > Tickets** to submit a request. If a request or button is missing, ask your IT provider to check your access.
## Start with the Home AI Assistant
Select **Home** in the sidebar and use the AI Assistant’s message box. You can start your request here without first opening Tickets or choosing a template.
Type your request and select **Send message**, or press **Enter**. For example:
> I need to open a support ticket. My laptop cannot connect to the office Wi-Fi this morning. I restarted it, but the error still says “Cannot connect to this network.”
Include who is affected, when the issue started, and what you have already tried. Do not include passwords or recovery codes.
 This image shows an unsent example in the MSP Demo Home assistant. Your portal’s appearance and AI availability depend on your MSP’s settings.
The assistant uses an available request template and gathers the details needed for your ticket. Answer any missing questions and correct assumptions, dates, people, or request details that are wrong.
Asking for a ticket and preparing a draft are not confirmation that your IT provider has received it.
Check the request details before using the submission control presented by the assistant. If it presents a **Review** card, read the proposed request and select **Apply** when you are ready to submit it. If it takes you to the request form, complete the required questions and select **Create Ticket** there.
Wait for the submission result. Keep the ticket number or link when one is provided. If the result is unclear, check **Tickets** before starting another request.
Open **Tickets** to find the request, read replies, and follow up. See [find and follow up on a ticket](/user-guides/ticketing/follow-up-on-a-ticket).
Your MSP controls whether AI is available on Home. If you see the standard Home dashboard instead, or cannot use the assistant, use the ticket form below and ask your MSP about AI access.
## Use the ticket form instead
Select **Tickets** in the sidebar, then **New Ticket**. If your IT provider gave you a direct link to a request, open that link to start with its form already selected.
If the AI Assistant opens first and you prefer to fill in the form yourself, close the assistant panel and choose **Select Template Manually** if that option is shown. You can also [use AI to prepare the request](/user-guides/ticketing/open-a-ticket-with-ai).
In **Request Service**, search **Search services or problems...** or browse the categories. Select the card that best matches what you need.
Some portals use a compact **Select Template** list instead of cards. Open **Choose a template...**, search for the request, and select it.
This image shows an unsent example in the MSP Demo Home assistant. Your portal’s appearance and AI availability depend on your MSP’s settings.
The assistant uses an available request template and gathers the details needed for your ticket. Answer any missing questions and correct assumptions, dates, people, or request details that are wrong.
Asking for a ticket and preparing a draft are not confirmation that your IT provider has received it.
Check the request details before using the submission control presented by the assistant. If it presents a **Review** card, read the proposed request and select **Apply** when you are ready to submit it. If it takes you to the request form, complete the required questions and select **Create Ticket** there.
Wait for the submission result. Keep the ticket number or link when one is provided. If the result is unclear, check **Tickets** before starting another request.
Open **Tickets** to find the request, read replies, and follow up. See [find and follow up on a ticket](/user-guides/ticketing/follow-up-on-a-ticket).
Your MSP controls whether AI is available on Home. If you see the standard Home dashboard instead, or cannot use the assistant, use the ticket form below and ask your MSP about AI access.
## Use the ticket form instead
Select **Tickets** in the sidebar, then **New Ticket**. If your IT provider gave you a direct link to a request, open that link to start with its form already selected.
If the AI Assistant opens first and you prefer to fill in the form yourself, close the assistant panel and choose **Select Template Manually** if that option is shown. You can also [use AI to prepare the request](/user-guides/ticketing/open-a-ticket-with-ai).
In **Request Service**, search **Search services or problems...** or browse the categories. Select the card that best matches what you need.
Some portals use a compact **Select Template** list instead of cards. Open **Choose a template...**, search for the request, and select it.
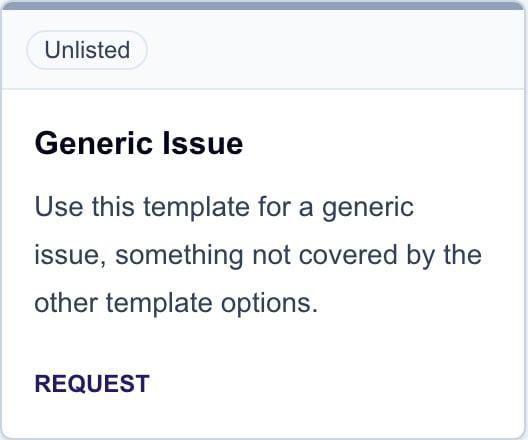 Your provider chooses these names. For example, a general support request might be called **Generic Issue**, while new equipment may have a separate request.
Enter a short, specific **Subject**, such as “Unable to connect to Wi-Fi.” Some requests generate the subject automatically; an **Auto-generated** subject is not editable.
Complete the required questions. Include what happened, when it started, who is affected, the exact error message, and anything you have already tried. Do not include passwords or recovery codes.
Your provider chooses these names. For example, a general support request might be called **Generic Issue**, while new equipment may have a separate request.
Enter a short, specific **Subject**, such as “Unable to connect to Wi-Fi.” Some requests generate the subject automatically; an **Auto-generated** subject is not editable.
Complete the required questions. Include what happened, when it started, who is affected, the exact error message, and anything you have already tried. Do not include passwords or recovery codes.
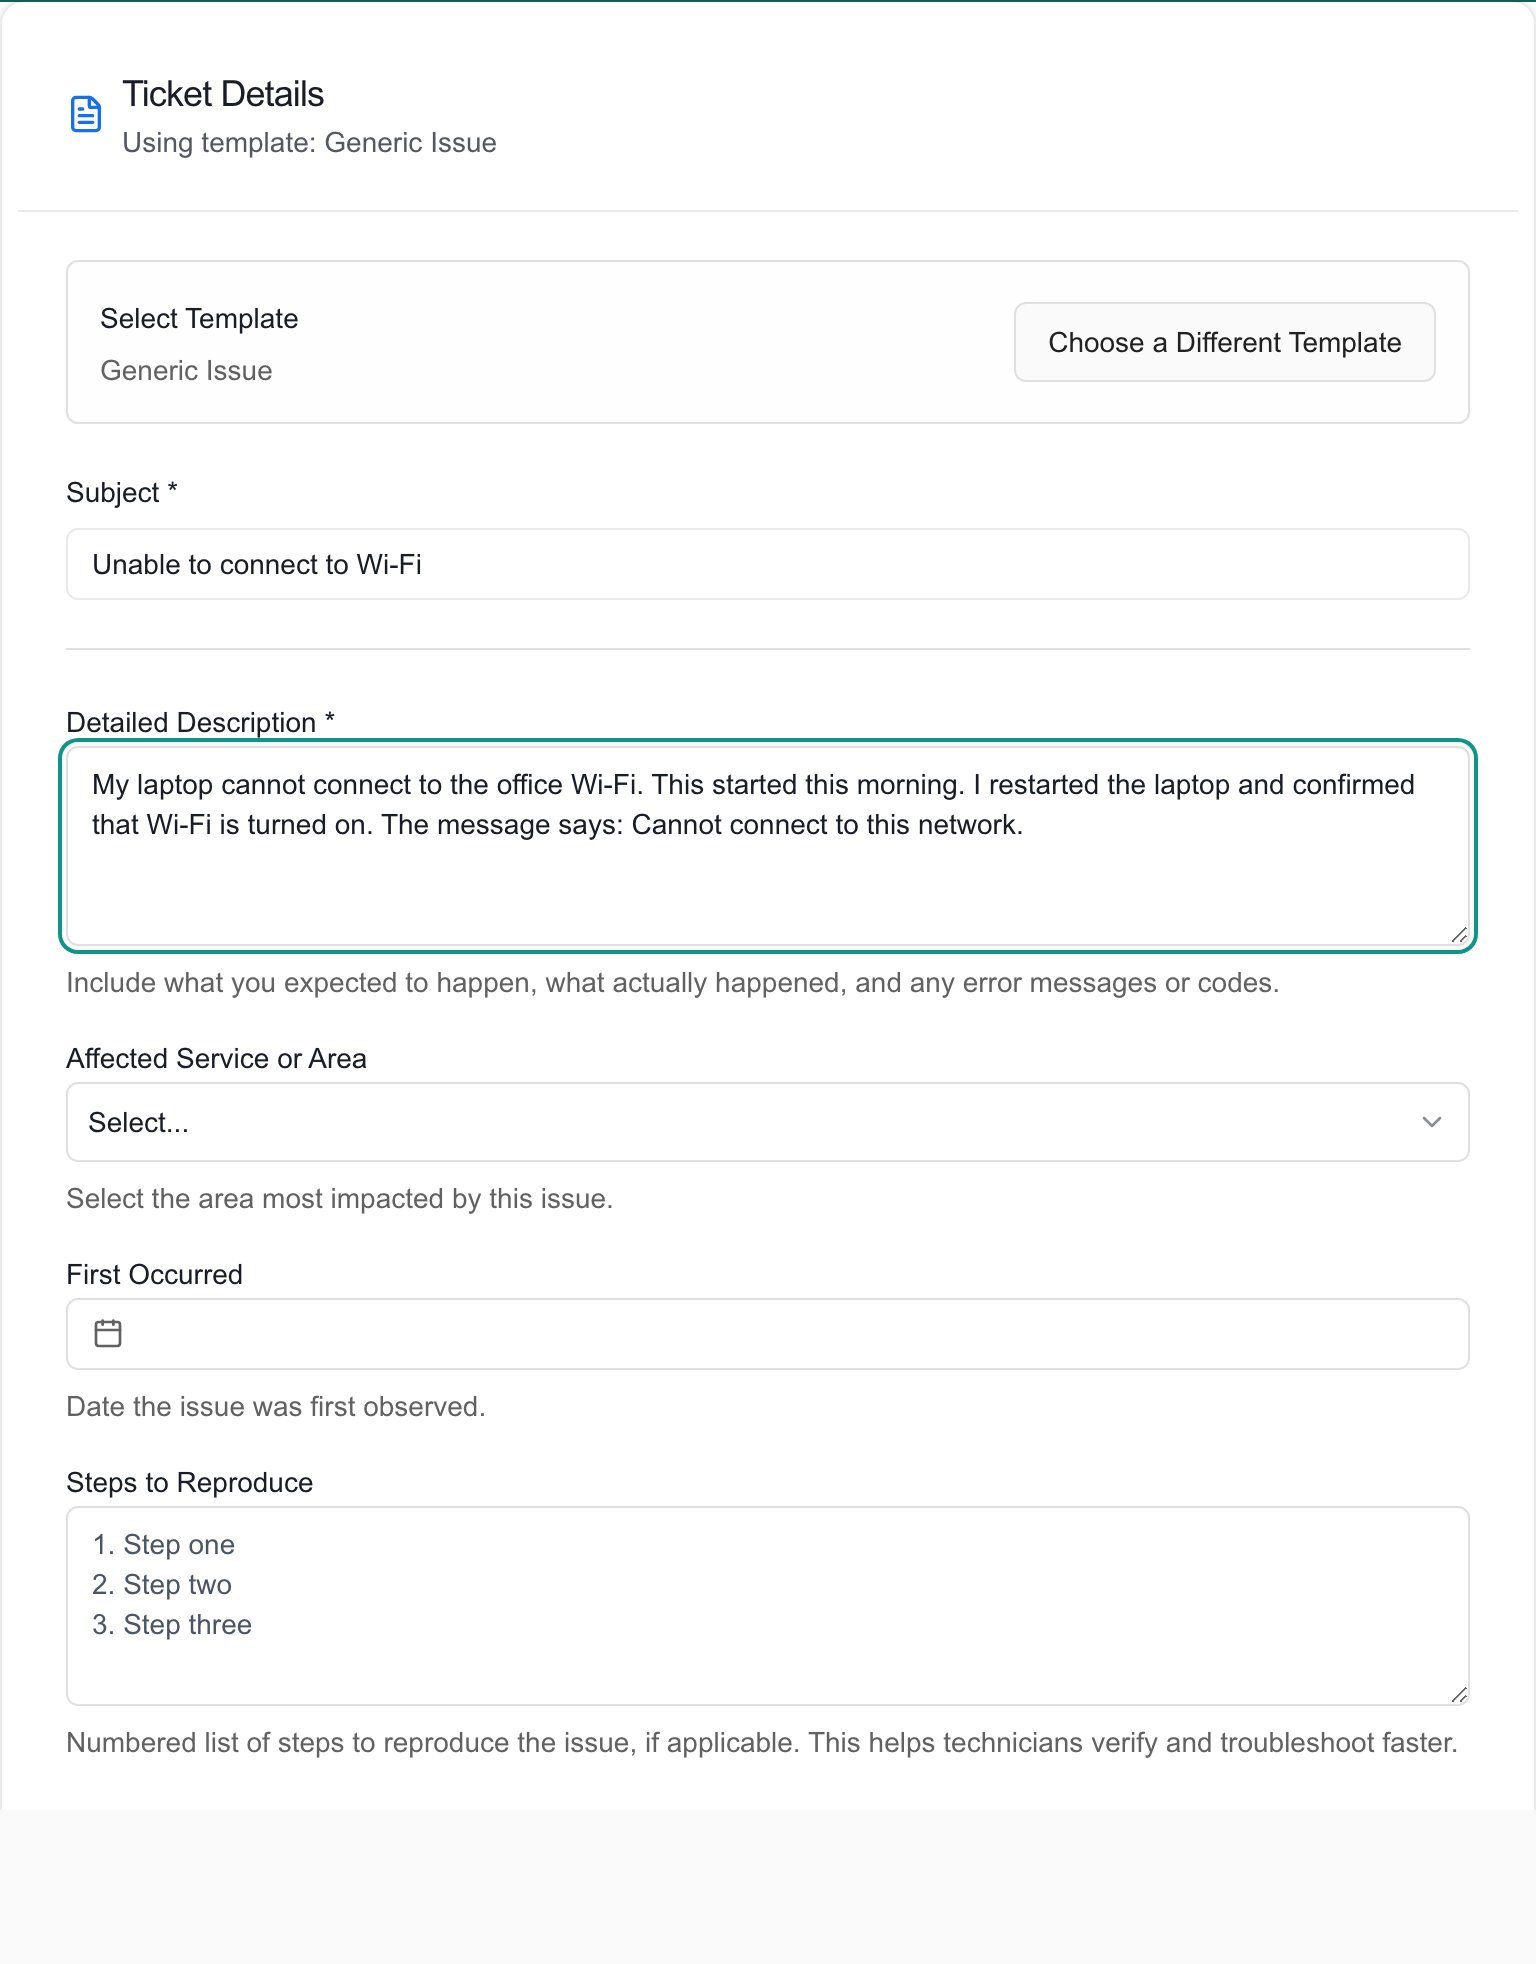 The image shows the shared request form in an MSP Demo session. Your provider chooses your company’s fields and available requests.
If the form has section tabs, visit every section. Other forms display all sections together. Questions can appear or become required after you change an earlier answer.
If the request includes a file-upload field, attach relevant screenshots or documents. Follow the file types and size limits shown by that field. Check screenshots for unrelated personal information before uploading them.
Review the subject, dates, selected people, and every required question. If your request contains an additional request form inside it, complete that form too; it can create a separate ticket.
Select **Create Ticket** and wait for the result. Selecting a request or typing into the form does not submit it.
A missing-field message lists the questions you still need to complete. Correct them and submit again. When creation succeeds, note the ticket number if one is shown, then return to **Tickets** to follow the request.
## Change the request type
Select **Choose a Different Template**, or use the page's back control when a request is selected. Choosing a different template clears the current form answers. Copy any information you want to keep before switching.
## Schedule an appointment
If your request includes **Schedule appointment**, select it before creating the ticket. The ticket is created first; you then continue to TimeZest to choose a time.
This option requires your MSP to enable scheduling for that request. If the ticket succeeds but appointment preparation fails, contact your IT provider to arrange the appointment. You do not need to create the ticket again.
## Understand the result
| Result | What to do |
| ------------------------------------------------------------------ | --------------------------------------------------------------------------------------------------------------------------------------------------------- |
| A ticket number is shown | Keep it for reference and follow the request in Tickets. |
| The ticket was created, but some attachments failed | Keep the existing ticket. Follow up with the missing files through an available attachment option or ask your IT provider how to send them. |
| An additional request inside the form failed | Tell your IT provider which additional request failed. The main ticket may already exist. |
| The request was sent by email or completed without a ticket number | Your provider's delivery setup may send requests outside the normal ticket list. Keep the confirmation and contact your provider if you need a reference. |
| Creation failed with no success confirmation | Read the error, correct any highlighted information, and try again. If the result is unclear, check Tickets before resubmitting to avoid duplicates. |
## Frequently asked questions
Start with the **AI Assistant on Home**: describe your issue, answer its questions, and review the request before submitting it. **Tickets > New Ticket** is the alternative for filling in a form. A direct request link supplied by your MSP can also open that form.
Describing the problem starts the conversation and preparation of your request. Answer any follow-up questions and review the details. Use the submission control shown by the assistant, then wait for a creation result. A draft or a review card is not a submitted ticket.
Reading tickets and creating them are separate permissions. Your MSP must enable creation for your role. Ask your IT provider to check your permissions if **New Ticket** is missing.
Your MSP controls which active templates are available to your company and role. Check that you opened the correct portal and request link, then ask your provider to check the template's availability. Creating or publishing templates is an MSP task.
Home’s AI Assistant is the primary starting point, but you can also use **Tickets > New Ticket**, select a request manually, and complete the form yourself.
Templates can differ by company, request type, and configuration. Conditional questions also depend on earlier answers. Follow the labels and required-field messages in your own form.
Do not rely on leaving the page to preserve your answers. Complete and submit the request, or keep a separate copy of information you need to enter later. Changing templates clears the current answers.
Your MSP can include additional request forms inside a template. Each applicable embedded request can create its own ticket. Read the completion messages for the main request and its additional requests.
Your MSP manages portal user permissions. Ask your IT provider for the access you need; the ticket form does not change your role or grant additional access.
## Related guides
* [Create a ticket with AI assistance](/user-guides/ticketing/open-a-ticket-with-ai)
* [Find and follow up on a ticket](/user-guides/ticketing/follow-up-on-a-ticket)
* [MSP guide: create a ticket template](/user-guides/ticketing/how-to-create-a-ticket-template)
The image shows the shared request form in an MSP Demo session. Your provider chooses your company’s fields and available requests.
If the form has section tabs, visit every section. Other forms display all sections together. Questions can appear or become required after you change an earlier answer.
If the request includes a file-upload field, attach relevant screenshots or documents. Follow the file types and size limits shown by that field. Check screenshots for unrelated personal information before uploading them.
Review the subject, dates, selected people, and every required question. If your request contains an additional request form inside it, complete that form too; it can create a separate ticket.
Select **Create Ticket** and wait for the result. Selecting a request or typing into the form does not submit it.
A missing-field message lists the questions you still need to complete. Correct them and submit again. When creation succeeds, note the ticket number if one is shown, then return to **Tickets** to follow the request.
## Change the request type
Select **Choose a Different Template**, or use the page's back control when a request is selected. Choosing a different template clears the current form answers. Copy any information you want to keep before switching.
## Schedule an appointment
If your request includes **Schedule appointment**, select it before creating the ticket. The ticket is created first; you then continue to TimeZest to choose a time.
This option requires your MSP to enable scheduling for that request. If the ticket succeeds but appointment preparation fails, contact your IT provider to arrange the appointment. You do not need to create the ticket again.
## Understand the result
| Result | What to do |
| ------------------------------------------------------------------ | --------------------------------------------------------------------------------------------------------------------------------------------------------- |
| A ticket number is shown | Keep it for reference and follow the request in Tickets. |
| The ticket was created, but some attachments failed | Keep the existing ticket. Follow up with the missing files through an available attachment option or ask your IT provider how to send them. |
| An additional request inside the form failed | Tell your IT provider which additional request failed. The main ticket may already exist. |
| The request was sent by email or completed without a ticket number | Your provider's delivery setup may send requests outside the normal ticket list. Keep the confirmation and contact your provider if you need a reference. |
| Creation failed with no success confirmation | Read the error, correct any highlighted information, and try again. If the result is unclear, check Tickets before resubmitting to avoid duplicates. |
## Frequently asked questions
Start with the **AI Assistant on Home**: describe your issue, answer its questions, and review the request before submitting it. **Tickets > New Ticket** is the alternative for filling in a form. A direct request link supplied by your MSP can also open that form.
Describing the problem starts the conversation and preparation of your request. Answer any follow-up questions and review the details. Use the submission control shown by the assistant, then wait for a creation result. A draft or a review card is not a submitted ticket.
Reading tickets and creating them are separate permissions. Your MSP must enable creation for your role. Ask your IT provider to check your permissions if **New Ticket** is missing.
Your MSP controls which active templates are available to your company and role. Check that you opened the correct portal and request link, then ask your provider to check the template's availability. Creating or publishing templates is an MSP task.
Home’s AI Assistant is the primary starting point, but you can also use **Tickets > New Ticket**, select a request manually, and complete the form yourself.
Templates can differ by company, request type, and configuration. Conditional questions also depend on earlier answers. Follow the labels and required-field messages in your own form.
Do not rely on leaving the page to preserve your answers. Complete and submit the request, or keep a separate copy of information you need to enter later. Changing templates clears the current answers.
Your MSP can include additional request forms inside a template. Each applicable embedded request can create its own ticket. Read the completion messages for the main request and its additional requests.
Your MSP manages portal user permissions. Ask your IT provider for the access you need; the ticket form does not change your role or grant additional access.
## Related guides
* [Create a ticket with AI assistance](/user-guides/ticketing/open-a-ticket-with-ai)
* [Find and follow up on a ticket](/user-guides/ticketing/follow-up-on-a-ticket)
* [MSP guide: create a ticket template](/user-guides/ticketing/how-to-create-a-ticket-template)