Prerequisites
- Active Cove (N-able Backup) account with administrative access
- MSPortal.ai account with integration management permissions
Part 1: Configure Cove
Before connecting to MSPortal.ai, you need to create an API user in Cove with the appropriate permissions.Create API User
Access User Management
Log into your Cove (N-able Backup) management console and navigate to Users in the main menu.
Select Customer
In the customer selection dropdown, select your top-level reseller name (the account at the very top of the Customer hierarchy), not an individual client. This is the account that the API user will be associated with, and it gives the API user visibility into all of your sub-customers.
Configure User Details
Configure the following settings:
| Field | Value |
|---|---|
| Login Name | MSPortal (or any descriptive name) |
| Role | Supporter |
Required Information
Before proceeding to MSPortal, ensure you have the following:| Information | Description |
|---|---|
| Partner Name | Your top-level reseller name exactly as shown in the Cove management console (see below) |
| API User Name | The login name you created (e.g., MSPortal) |
| API Token | The token generated when creating the API user |
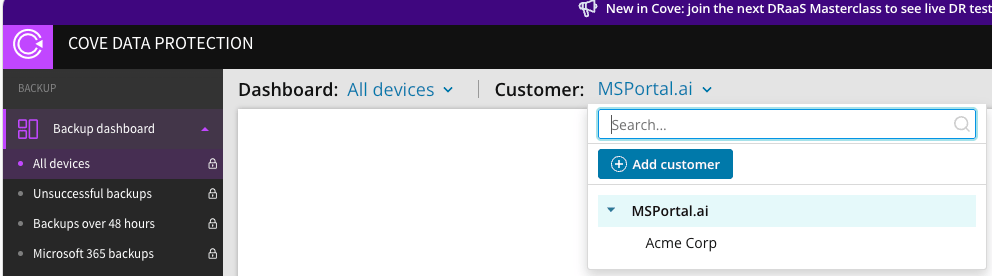
Finding your Partner Name
The Partner Name is your top-level reseller account, found at the top of the Customer dropdown in the Cove management console. It is the parent account that your individual clients are nested under, not one of those clients. In the example below, the Partner Name isMSPortal.ai (the top-level reseller). Acme Corp is a sub-customer nested beneath it and would not be used as the Partner Name.
Part 2: MSPortal Setup Wizard
MSPortal.ai provides a guided setup wizard that walks you through connecting and configuring your Cove integration in 3 easy steps.Starting the Wizard
Step 1: Connect
Enter your Cove API credentials to establish the connection.Enter API Credentials
Fill in the following fields:
| Field | Description |
|---|---|
| Partner Name | Your top-level reseller name exactly as shown at the top of the Customer hierarchy in the Cove management console (e.g., MSPortal.ai), not an individual client |
| API User Name | The login name of your API user (e.g., MSPortal) |
| API Token | The token you copied when creating the API user |
The Partner Name is your top-level reseller account, not one of your individual clients. The API User Name is the login name you created, not an email address.
Test Connection
Click Test Connection to verify your credentials. You’ll see a green “Connection successful” message when successful.If the connection fails:
- Verify your Partner Name is your top-level reseller name (not an individual client) and matches exactly as shown in Cove
- Check that your API User Name is correct (the login name, not email)
- Ensure the API token is copied correctly without extra spaces
- Verify the API user has the Supporter role
Step 2: Map Partners
Map Cove partners (clients/customers) to your MSPortal companies. This determines which backup data syncs to which company.Sync Partners
If no partners appear, click Sync to fetch partners from your Cove account. The initial sync may take a few minutes depending on your account size.
Use Quick Match
Click Quick Match to automatically match Cove partners to MSPortal companies based on name similarity. This saves time when you have many partners with matching names.
Manual Mapping
For partners that weren’t automatically matched or need adjustment:
- Find the partner in the list
- Click the Select company dropdown in the “Mapped To” column
- Search for and select the correct MSPortal company
Filter Partners
Use the filter dropdown to view:
- All Partners - Show all synced partners
- Mapped Only - Show only partners linked to companies
- Unmapped Only - Show partners that still need mapping
Step 3: Import Devices
Import backup devices from Cove into your MSPortal asset inventory.Import Devices
From the device import page, you can:
- View all backup agents from your mapped partners
- Filter by partner or status
- Selectively import devices to your asset inventory
- Sync device data to keep information current
The initial device sync may take a few minutes depending on the number of backup agents in your account.
Managing Your Integration
After setup, you can manage your integration from Settings > Integrations:| Action | Description |
|---|---|
| Configure | Re-open the setup wizard to modify settings or add more partner mappings |
| Sync Partners | Refresh the list of partners from Cove |
| Import Devices | Access the device import page to import backup agents |
Synchronization Process
Initial Sync
- Partner data will sync when you first click the Sync button
- Devices sync separately and may take a few minutes
- Only devices from mapped partners are available for import
Ongoing Sync
- Device status and backup data are synced automatically
- Partner mappings persist until you change them
- New partners will appear after running a sync
Troubleshooting
| Issue | Solution |
|---|---|
| Connection test fails | Verify Partner Name (your top-level reseller name, not a client), API User Name, and Token are correct |
| No partners appear | Click “Sync Partners” to fetch data from Cove |
| Devices not showing | Ensure the partner is mapped to a company first |
| Quick Match didn’t work | Use manual mapping for partners with different names in Cove vs MSPortal |
| Token expired/invalid | Create a new API user in Cove and update the integration |
Important Notes
- Token Security: Store your API token securely. If compromised, delete the API user in Cove and create a new one
- Partner Mapping: Only devices from mapped partners will sync to MSPortal
- Role Permissions: The Supporter role provides read-only access, which is sufficient for MSPortal integration
- Sync Timing: Initial synchronization may take several minutes depending on your account size