Connect the CIPP API to power the client-facing Microsoft 365 Posture page and security reporting
This guide walks you through connecting CIPP (the CyberDrain Improved Partner Portal) to MSPortal.ai. The setup wizard has five steps: Connect, Choose data, Map companies, Review, and Data.On the CIPP connection page, the Setup guide lists the same work as tasks: Connect, Choose data, Import or match companies, Configure compliance group (optional) and Review. Configure compliance group is the same Compliance group import described in Part 7.Once connected, MSPortal synchronizes security, identity, email, Intune, and tenant configuration data from CIPP and presents it to your clients as the Microsoft 365 Posture page.For every mapped tenant, CIPP also supplies Intune managed devices, Windows Autopilot devices and SharePoint storage quota. Intune details appear on matching device records, and Intune devices without an RMM agent are listed in Devices > Not in RMM (see Find Intune devices missing from your RMM).
CIPP is currently a Pilot integration available to selected tenants. If you don’t see the CIPP card in Settings > Integrations, contact support@msportal.ai. The pilot secures and validates the API connection; data sync features build on this connection.
Give the API client a CIPP role with AllTenants read access to every reporting area. The built-in readonly role is recommended. A restricted custom role makes individual datasets fail with authorization errors, and a role limited to one tenant returns only that tenant.
4
Copy the Credentials
Copy the API URL, Tenant ID, Application ID, Application Secret, and API Scope. Copy the API scope exactly as shown for this client; do not build one from a tenant name.
Go to Settings > Integrations, find the CIPP card, and click Configure.
2
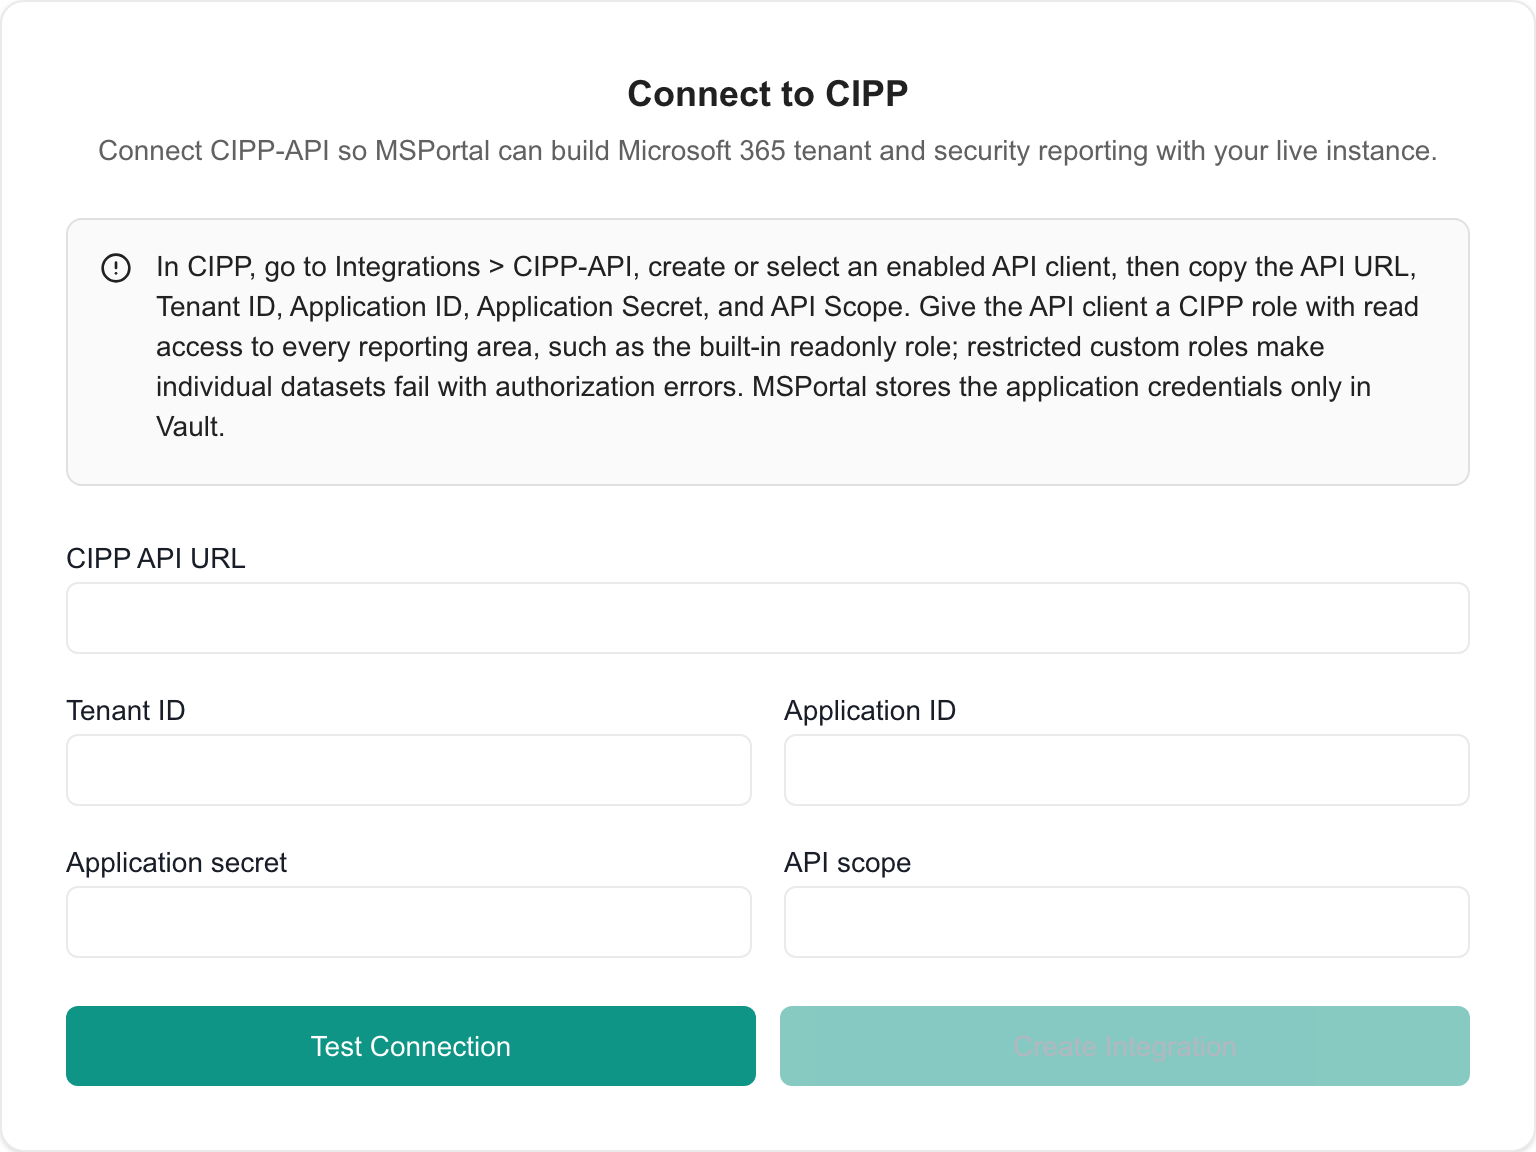
Enter Your Credentials
Fill in the fields:
Field
Value
CIPP API URL
The public HTTPS base URL shown on the CIPP-API integration page (no path, port, or query string)
Tenant ID
Your Microsoft Entra tenant ID
Application ID
The API client’s application ID
Application secret
The API client’s secret
API scope
The scope shown for the API client
The CIPP Connect step before credentials are entered.
3
Test the Connection
Click Test Connection. On success you’ll see Connection Verified: Microsoft issued an access token for this CIPP API client.
4
Create the Integration
Click Create Integration to save. The button stays disabled until the test passes. Credentials are stored only in Vault.A token proves the credentials are valid. It does not prove that every CIPP dataset is reachable, because the API client’s CIPP role controls which tenants and reports it can read.
Choose data holds the optional Document Intune policies setting. Intune policy documentation is opt-in: the setting is off by default, including for existing connections.
1
Open Choose data
After saving credentials, open Choose data, before matching companies. The older wizard shows the same Choose data step before Map companies.
2
Choose whether to document Intune policies
Check Document Intune policies to turn it on, or leave it unchecked to keep it off. The choice saves immediately. Leaving it unchecked is valid.
3
Continue
Continue to company matching once the choice has saved.
With the setting on, the nightly CIPP sync saves each Intune policy’s versions and looks up readable setting names. The policies appear in Documentation > Intune, where staff can export one company’s Intune documentation as a PDF after selecting that company. Clear the checkbox to stop documenting policies on later syncs. A sync that is already running finishes with its saved choice, and versions documented earlier stay available.Sharing Intune documentation with company users is a separate switch, Show Intune documentation to company users in Settings > Documentation > Intune. It is off by default.
After connecting, MSPortal discovers the Microsoft 365 tenants managed in CIPP. Map each tenant to the matching MSPortal company so security, Intune, and Microsoft 365 data appears in the correct customer context.
1
Wait for Tenant Discovery
Tenant discovery can take a few minutes after the connection is created. The page checks automatically while the initial sync runs.
2
Map Tenants to Companies
The table lists each tenant with its Default domain and CIPP status. Tenants whose Microsoft tenant ID matches an existing Microsoft 365 connection are mapped automatically. For the rest:
Click Quick Match to pair tenants and companies by name, or pick a company from the Select company… dropdown in the Mapped column
If the company does not exist yet, use Create new company to add it and link it in one step. Check for an existing company first to avoid duplicates
Review the pending links, then click Import Selected to save them
A company you create here is saved immediately. Removing a saved link also takes effect immediately. Clearing a pending link only discards that draft.
3
Continue
Click Next. Next saves any pending links and starts a full data sync for the mapped tenants.
Data is only stored and shown for tenants that are mapped to a company. Unmapped tenants are listed for mapping but their data stays out of every page and report.
Start full sync to run a synchronization on demand
View Microsoft 365 posture to open the client-facing view, and Manage company mappings to return to the Map step
Synchronization continues automatically in the background after setup, with a full refresh every day. A “sync started” message means the sync was requested, not that it finished. Wait for the counters to settle before you judge coverage.
Counted under Dataset issues. Data from datasets that succeeded stays available
CIPP asks MSPortal to check back while it prepares a report
Counted under Dataset issues while waiting. The sync retries that dataset a few minutes later in the same run
A client tenant does not have the feature (for example Autopilot without Intune licensing, Conditional Access blocking partner access, or CSP licenses without the Sherweb integration in CIPP)
Not an issue. MSPortal skips that tenant and keeps data from the rest
No tenant has the feature
Left out of the healthy totals
A failed or missing dataset is never treated as a passing security result.
The Data step is your admin console for everything CIPP is syncing:
Summary cards for mapped tenants, synced records, and security, Intune, and critical item counts
Dataset coverage showing every dataset by category, with any sync issues flagged
Record explorer to search and filter every synced record, including the full source payload from the CIPP API
Use this view to confirm data is flowing, investigate a specific record, or check why a dataset has no data. Filter to the right company and dataset before you open a record, because some records show the full provider payload. This console is for your team; clients see the curated Microsoft 365 Posture page instead.
The Data step can turn your CIPP standards into a reusable company-level Compliance group. MSPortal creates one check per standard. You then assign the group to runs through your normal Compliance workflow.
Action
Permission needed
Preview standards
Read access to integrations and Compliance settings
Create or update the group
Also Compliance settings write access
This is a tenant-wide MSP task, so a user limited to specific companies cannot run it.
Check the count line, for example 12 standards available · 0 imported, and the list of standard names. The list includes standards synced from mapped companies in the last 48 hours.If the panel shows Map companies and sync CIPP standards to see available checks., map companies and let a sync finish first. Create group stays unavailable until at least one standard is available.
4
Choose Automatic Updates
Keep Automatically update these checks in active runs from CIPP results. selected if you want CIPP results to set check statuses. It is selected by default.
5
Create the Group
Select Create group. A Compliance group saved. message confirms the import.The import also creates a CIPP Standards status list with Unknown, Compliant and Noncompliant. Unknown is the default status.
6
Review the Group
Select Open Compliance groups to review the new CIPP Microsoft 365 Standards group in Settings > Compliance > Groups.
After the group exists, the button reads Update group. Select it to add checks for standards CIPP has reported since your last import. Existing standards keep their current checks, so repeat imports do not create duplicates. Use the same button to save a change to the automatic updates setting.
With automatic updates on, MSPortal sets each imported check in active runs after every CIPP sync. It also evaluates results right after you create or update the group.
CIPP evidence
Result in the run
CIPP reports the standard as compliant
Compliant
CIPP reports the standard as noncompliant
Noncompliant
No evidence, results older than 48 hours, malformed data or an unavailable license
Unknown
When one company maps to more than one CIPP tenant, the check uses the worst result:
Tenant results
Check result
Any tenant is Noncompliant
Noncompliant
Every tenant is Compliant
Compliant
Anything else
Unknown
Automatic updates change only the status. They never touch completed runs or notes. They apply to company-level assignments in runs that are still in progress, and they run only while the CIPP connection is active.
Deleting CIPP Microsoft 365 Standards in Settings > Compliance > Groups pauses automatic updates. The imported checks stay in your library.To restore the group, return to the Data step and select Create group again. MSPortal rebuilds the group from the same checks and resumes automatic updates if that setting is selected.
To update credentials later, re-open the setup page, enter the new values, click Test Connection, then Save connection. Saved secrets stay masked.
To disconnect, click the remove button and confirm Disconnect CIPP?. This removes the connection, synced CIPP data and its stored Vault credentials, and cannot be undone. It does not disable or revoke the API client in CIPP.
Users without integration management permission see the connection read-only.
Check Dataset issues on the Review step. Data from datasets that succeeded stays available, but coverage is partial until the failures clear
A company’s posture page is empty
Confirm the tenant mapping is saved, a sync has finished since mapping, and the user can access that company
”CIPP rejected the application token or the application lacks the required CIPP role”
Microsoft issued a token, so the Tenant ID, Application ID, secret, and API scope are all valid. The fix is inside CIPP: go to Integrations > CIPP-API, confirm the API client is enabled, assign it a CIPP role with AllTenants read access (the built-in readonly role is recommended), and confirm the API scope was copied from that same CIPP instance
{"docsConfig":{"theme":"mint","$schema":"https://mintlify.com/docs.json","name":"MSPortal.ai Documentation","colors":{"primary":"#16A34A","light":"#07C983","dark":"#15803D"},"logo":{"light":"https://mintcdn.com/msportal/KnbwIXtZSTlVJTt6/logo/light.svg?fit=max\u0026auto=format\u0026n=KnbwIXtZSTlVJTt6\u0026q=85\u0026s=eb69f6d6bf16b2c401770aef19ade1d2","dark":"https://mintcdn.com/msportal/KnbwIXtZSTlVJTt6/logo/dark.svg?fit=max\u0026auto=format\u0026n=KnbwIXtZSTlVJTt6\u0026q=85\u0026s=03f8df7191e7a8ea7da084df57f6107f"},"favicon":"https://mintcdn.com/msportal/KjsKytvp08K0bejm/favicon-16x16.png?fit=max\u0026auto=format\u0026n=KjsKytvp08K0bejm\u0026q=85\u0026s=378df7f039bbff7885231fec799d29ac","navbar":{"links":[{"href":"https://app.msportal.ai/product-roadmap","label":"Roadmap"},{"href":"mailto:support@msportal.ai","label":"Support"}],"primary":{"type":"button","label":"Dashboard","href":"https://app.msportal.ai"}},"footer":{"socials":{"linkedin":"https://linkedin.com/company/msportal"}},"styling":{"latex":true},"navigation":{"global":{"anchors":[{"anchor":"MSPortal.ai","icon":"globe","href":"https://msportal.ai"},{"anchor":"Support","icon":"life-ring","href":"mailto:support@msportal.ai"},{"anchor":"Status","icon":"signal","href":"https://status.msportal.ai"}]},"pages":[]}},"deployment":{"deploymentMetadataValue":{"subdomain":"msportal","hasAudioNarration":false,"actualSubdomain":"msportal","customDomains":["docs.msportal.ai"],"gitSource":{"type":"github","owner":"msportal-ai","repo":"mintlify-docs","deployBranch":"main","contentDirectory":"","isPrivate":false,"mountPath":"","label":""},"chroma":{"liveDeploymentHistoryId":"6ad8d218182ff03fed6d05cc","collectionId":"09c61d36-c2f4-4933-8f58-3ef63d827cc0","schemaVersion":"v3","latestBuiltDeploymentHistoryId":"6ad8d218182ff03fed6d05cc"},"feedback":{"thumbs":true},"entitlements":{},"buildId":"6ad9bd261cd014c88d97c85e","clientVersion":"0.0.3926","searchFilterCounts":[{"language":"default","tag":"MSP Guides","count":454},{"language":"default","tag":"Service Delivery","count":165},{"language":"default","tag":"API Reference","count":111},{"language":"default","tag":"Overview \u0026 Planning","count":109},{"language":"default","tag":"Connect your tools","count":88},{"language":"default","tag":"Integration setup","count":88},{"language":"default","tag":"Administration","count":38},{"language":"default","tag":"Settings","count":38},{"language":"default","tag":"Getting Started","count":36},{"language":"default","tag":"Budgets","count":36}]},"assistantConfig":{"enableAskAiButton":false,"enableStarterQuestions":false,"enableAskAiSearchBar":true},"hasChatPermissions":false,"hasWebMcpPermissions":false,"toggles":[{"name":"kill-isr","enabled":true,"variant":{"name":"disabled","enabled":false,"feature_enabled":true},"impressionData":false},{"name":"agent-mintlify-slack","enabled":true,"variant":{"name":"disabled","enabled":false,"feature_enabled":true},"impressionData":false},{"name":"editor-v7-file-tree","enabled":true,"variant":{"name":"disabled","enabled":false,"feature_enabled":true},"impressionData":false},{"name":"agent-integrations-settings","enabled":true,"variant":{"name":"disabled","enabled":false,"feature_enabled":true},"impressionData":false},{"name":"automations-pr-grouping","enabled":true,"variant":{"name":"disabled","enabled":false,"feature_enabled":true},"impressionData":false},{"name":"custom-prefix","enabled":true,"variant":{"name":"disabled","enabled":false,"feature_enabled":true},"impressionData":false},{"name":"analytics-v7","enabled":true,"variant":{"name":"disabled","enabled":false,"feature_enabled":true},"impressionData":false},{"name":"user-flows-analytics","enabled":true,"variant":{"name":"disabled","enabled":false,"feature_enabled":true},"impressionData":false},{"name":"no-publish-flow","enabled":true,"variant":{"name":"disabled","enabled":false,"feature_enabled":true},"impressionData":false},{"name":"workos-onboarding","enabled":true,"variant":{"name":"disabled","enabled":false,"feature_enabled":true},"impressionData":false},{"name":"llms-txt-v2","enabled":true,"variant":{"name":"disabled","enabled":false,"feature_enabled":true},"impressionData":false},{"name":"pause-universal-search-reconcile","enabled":true,"variant":{"name":"disabled","enabled":false,"feature_enabled":true},"impressionData":false},{"name":"snapshot-serving-live","enabled":true,"variant":{"name":"disabled","enabled":false,"feature_enabled":true},"impressionData":false},{"name":"stripTemperatureMiddleware","enabled":true,"variant":{"name":"disabled","enabled":false,"feature_enabled":true},"impressionData":false},{"name":"per-site-search-delta","enabled":true,"variant":{"name":"disabled","enabled":false,"feature_enabled":true},"impressionData":false},{"name":"support-platform-pylon-zendesk","enabled":true,"variant":{"name":"disabled","enabled":false,"feature_enabled":true},"impressionData":false},{"name":"snapshot-serving","enabled":true,"variant":{"name":"disabled","enabled":false,"feature_enabled":true},"impressionData":false},{"name":"instant-rollback","enabled":true,"variant":{"name":"disabled","enabled":false,"feature_enabled":true},"impressionData":false},{"name":"granular-notifications-server","enabled":true,"variant":{"name":"disabled","enabled":false,"feature_enabled":true},"impressionData":false},{"name":"granular-notifications","enabled":true,"variant":{"name":"disabled","enabled":false,"feature_enabled":true},"impressionData":false},{"name":"editor-private-page-search","enabled":true,"variant":{"name":"disabled","enabled":false,"feature_enabled":true},"impressionData":false},{"name":"automations-fable","enabled":true,"variant":{"name":"disabled","enabled":false,"feature_enabled":true},"impressionData":false},{"name":"fixed-ai-action-pricing","enabled":true,"variant":{"name":"disabled","enabled":false,"feature_enabled":true},"impressionData":false},{"name":"automation-resolve-merge-conflict","enabled":true,"variant":{"name":"disabled","enabled":false,"feature_enabled":true},"impressionData":false},{"name":"scoped-publishing","enabled":true,"variant":{"name":"disabled","enabled":false,"feature_enabled":true},"impressionData":false},{"name":"mintql","enabled":true,"variant":{"name":"disabled","enabled":false,"feature_enabled":true},"impressionData":false},{"name":"page-level-analytics","enabled":true,"variant":{"name":"disabled","enabled":false,"feature_enabled":true},"impressionData":false},{"name":"editor-version-history-v2","enabled":true,"variant":{"name":"disabled","enabled":false,"feature_enabled":true},"impressionData":false},{"name":"editor-nav-generations","enabled":true,"variant":{"name":"disabled","enabled":false,"feature_enabled":true},"impressionData":false},{"name":"billing-page-v2","enabled":true,"variant":{"name":"disabled","enabled":false,"feature_enabled":true},"impressionData":false},{"name":"vite-origin","enabled":true,"variant":{"name":"disabled","enabled":false,"feature_enabled":true},"impressionData":false},{"name":"workspace-projects","enabled":true,"variant":{"name":"disabled","enabled":false,"feature_enabled":true},"impressionData":false},{"name":"assistant-v5","enabled":true,"variant":{"name":"disabled","enabled":false,"feature_enabled":true},"impressionData":false},{"name":"byok-sep-25","enabled":true,"variant":{"name":"disabled","enabled":false,"feature_enabled":true},"impressionData":false},{"name":"fork-pr-previews","enabled":true,"variant":{"name":"disabled","enabled":false,"feature_enabled":true},"impressionData":false},{"name":"revalidation-jwt","enabled":true,"variant":{"name":"disabled","enabled":false,"feature_enabled":true},"impressionData":false},{"name":"editor-agent-model-picker","enabled":true,"variant":{"name":"disabled","enabled":false,"feature_enabled":true},"impressionData":false},{"name":"hobby-abuse-scan","enabled":true,"variant":{"name":"disabled","enabled":false,"feature_enabled":true},"impressionData":false},{"name":"dashboard-inbox","enabled":true,"variant":{"name":"disabled","enabled":false,"feature_enabled":true},"impressionData":false}],"isAtlas":false,"googleFontsInlined":false},"customCss":[],"page":{"pagePath":"user-guides/integrations/enable-cipp-integration","slug":"/user-guides/integrations/enable-cipp-integration","pageMetadata":{"title":"Configure CIPP Integration","description":"Connect the CIPP API to power the client-facing Microsoft 365 Posture page and security reporting","icon":"cloud","href":"/user-guides/integrations/enable-cipp-integration"},"description":{"compiledSource":"\"use strict\";\nconst {jsx: _jsx} = arguments[0];\nconst {useMDXComponents: _provideComponents} = arguments[0];\nfunction _createMdxContent(props) {\n const _components = {\n p: \"p\",\n ..._provideComponents(),\n ...props.components\n };\n return _jsx(_components.p, {\n children: \"Connect the CIPP API to power the client-facing Microsoft 365 Posture page and security reporting\"\n });\n}\nfunction MDXContent(props = {}) {\n const {wrapper: MDXLayout} = {\n ..._provideComponents(),\n ...props.components\n };\n return MDXLayout ? _jsx(MDXLayout, {\n ...props,\n children: _jsx(_createMdxContent, {\n ...props\n })\n }) : _createMdxContent(props);\n}\nreturn {\n default: MDXContent\n};\n","frontmatter":{},"scope":{}},"pageType":"default","mdx":{"mdxSource":{"compiledSource":"\"use strict\";const{Fragment:_Fragment,jsx:_jsx,jsxs:_jsxs}=arguments[0];const{useMDXComponents:_provideComponents}=arguments[0];function _createMdxContent(props){const _components={a:`a`,li:`li`,ol:`ol`,p:`p`,strong:`strong`,tbody:`tbody`,td:`td`,th:`th`,thead:`thead`,tr:`tr`,ul:`ul`,..._provideComponents(),...props.components},{Card,CardGroup,Frame,Heading,Note,OptimizedImage,Step,Steps,Table}=_components;if(!Card)_missingMdxReference(`Card`,true);if(!CardGroup)_missingMdxReference(`CardGroup`,true);if(!Frame)_missingMdxReference(`Frame`,true);if(!Heading)_missingMdxReference(`Heading`,true);if(!Note)_missingMdxReference(`Note`,true);if(!OptimizedImage)_missingMdxReference(`OptimizedImage`,true);if(!Step)_missingMdxReference(`Step`,true);if(!Steps)_missingMdxReference(`Steps`,true);if(!Table)_missingMdxReference(`Table`,true);return _jsxs(_Fragment,{children:[_jsxs(_components.p,{children:[`This guide walks you through connecting CIPP (the CyberDrain Improved Partner Portal) to MSPortal.ai. The setup wizard has five steps: `,_jsx(_components.strong,{children:`Connect`}),`, `,_jsx(_components.strong,{children:`Choose data`}),`, `,_jsx(_components.strong,{children:`Map companies`}),`, `,_jsx(_components.strong,{children:`Review`}),`, and `,_jsx(_components.strong,{children:`Data`}),`.`]}),`\n`,_jsxs(_components.p,{children:[`On the CIPP connection page, the `,_jsx(_components.strong,{children:`Setup guide`}),` lists the same work as tasks: `,_jsx(_components.strong,{children:`Connect`}),`, `,_jsx(_components.strong,{children:`Choose data`}),`, `,_jsx(_components.strong,{children:`Import or match companies`}),`, `,_jsx(_components.strong,{children:`Configure compliance group`}),` (optional) and `,_jsx(_components.strong,{children:`Review`}),`. `,_jsx(_components.strong,{children:`Configure compliance group`}),` is the same Compliance group import described in `,_jsx(_components.a,{href:`#part-7-import-cipp-standards-into-compliance`,children:`Part 7`}),`.`]}),`\n`,_jsxs(_components.p,{children:[`Once connected, MSPortal synchronizes security, identity, email, Intune, and tenant configuration data from CIPP and presents it to your clients as the `,_jsx(_components.a,{href:`/user-guides/microsoft-365/posture`,children:`Microsoft 365 Posture`}),` page.`]}),`\n`,_jsxs(_components.p,{children:[`For every mapped tenant, CIPP also supplies Intune managed devices, Windows Autopilot devices and SharePoint storage quota. Intune details appear on matching `,_jsx(_components.a,{href:`/user-guides/devices/understand-device-details#review-microsoft-entra-id-and-intune-details`,children:`device records`}),`, and Intune devices without an RMM agent are listed in `,_jsx(_components.strong,{children:`Devices > Not in RMM`}),` (see `,_jsx(_components.a,{href:`/user-guides/devices/find-devices#find-intune-devices-missing-from-your-rmm`,children:`Find Intune devices missing from your RMM`}),`).`]}),`\n`,_jsx(Note,{children:_jsxs(_components.p,{children:[`CIPP is currently a `,_jsx(_components.strong,{children:`Pilot`}),` integration available to selected tenants. If you don’t see the CIPP card in `,_jsx(_components.strong,{children:`Settings > Integrations`}),`, contact `,_jsx(_components.a,{href:`mailto:support@msportal.ai`,children:`support@msportal.ai`}),`. The pilot secures and validates the API connection; data sync features build on this connection.`]})}),`\n`,_jsx(Heading,{level:`2`,id:`prerequisites`,children:`Prerequisites`}),`\n`,_jsxs(_components.ul,{children:[`\n`,_jsx(_components.li,{children:`A CIPP instance with the CIPP-API integration enabled`}),`\n`,_jsx(_components.li,{children:`MSPortal.ai integration management permission`}),`\n`]}),`\n`,_jsx(Heading,{level:`2`,id:`part-1-create-cipp-api-credentials`,children:`Part 1: Create CIPP API Credentials`}),`\n`,_jsxs(Steps,{children:[_jsx(Step,{title:`Open CIPP API Settings`,children:_jsxs(_components.p,{children:[`In CIPP, go to `,_jsx(_components.strong,{children:`Integrations > CIPP-API`}),`.`]})}),_jsx(Step,{title:`Create or Select an API Client`,children:_jsx(_components.p,{children:`Create or select an enabled API client.`})}),_jsx(Step,{title:`Assign a Read-Only Role`,children:_jsxs(_components.p,{children:[`Give the API client a CIPP role with AllTenants read access to every reporting area. The built-in `,_jsx(_components.strong,{children:`readonly`}),` role is recommended. A restricted custom role makes individual datasets fail with authorization errors, and a role limited to one tenant returns only that tenant.`]})}),_jsx(Step,{title:`Copy the Credentials`,children:_jsxs(_components.p,{children:[`Copy the `,_jsx(_components.strong,{children:`API URL`}),`, `,_jsx(_components.strong,{children:`Tenant ID`}),`, `,_jsx(_components.strong,{children:`Application ID`}),`, `,_jsx(_components.strong,{children:`Application Secret`}),`, and `,_jsx(_components.strong,{children:`API Scope`}),`. Copy the API scope exactly as shown for this client; do not build one from a tenant name.`]})})]}),`\n`,_jsx(Heading,{level:`2`,id:`part-2-connect-in-msportal`,children:`Part 2: Connect in MSPortal`}),`\n`,_jsxs(Steps,{children:[_jsx(Step,{title:`Open the Setup Page`,children:_jsxs(_components.p,{children:[`Go to `,_jsx(_components.strong,{children:`Settings > Integrations`}),`, find the `,_jsx(_components.strong,{children:`CIPP`}),` card, and click `,_jsx(_components.strong,{children:`Configure`}),`.`]})}),_jsxs(Step,{title:`Enter Your Credentials`,children:[_jsx(_components.p,{children:`Fill in the fields:`}),_jsxs(Table,{children:[_jsx(_components.thead,{children:_jsxs(_components.tr,{children:[_jsx(_components.th,{children:`Field`}),_jsx(_components.th,{children:`Value`})]})}),_jsxs(_components.tbody,{children:[_jsxs(_components.tr,{children:[_jsx(_components.td,{children:_jsx(_components.strong,{children:`CIPP API URL`})}),_jsx(_components.td,{children:`The public HTTPS base URL shown on the CIPP-API integration page (no path, port, or query string)`})]}),_jsxs(_components.tr,{children:[_jsx(_components.td,{children:_jsx(_components.strong,{children:`Tenant ID`})}),_jsx(_components.td,{children:`Your Microsoft Entra tenant ID`})]}),_jsxs(_components.tr,{children:[_jsx(_components.td,{children:_jsx(_components.strong,{children:`Application ID`})}),_jsx(_components.td,{children:`The API client’s application ID`})]}),_jsxs(_components.tr,{children:[_jsx(_components.td,{children:_jsx(_components.strong,{children:`Application secret`})}),_jsx(_components.td,{children:`The API client’s secret`})]}),_jsxs(_components.tr,{children:[_jsx(_components.td,{children:_jsx(_components.strong,{children:`API scope`})}),_jsx(_components.td,{children:`The scope shown for the API client`})]})]})]}),_jsx(Frame,{caption:`The CIPP Connect step before credentials are entered.`,children:_jsx(OptimizedImage,{src:`https://mintcdn.com/msportal/LUe1Ix2pDHU7mVmf/images/product/cipp-setup-connection.png?fit=max\u0026auto=format\u0026n=LUe1Ix2pDHU7mVmf\u0026q=85\u0026s=102b7d4972ab60185b5a78894b728cc9`,alt:`CIPP connection form with blank credential fields and test and save buttons`,width:`1536`,height:`1152`,\"data-og-width\":`1536`,\"data-og-height\":`1152`,\"data-path\":`images/product/cipp-setup-connection.png`,\"data-optimize\":`true`,\"data-opv\":`3`,srcset:`https://mintcdn.com/msportal/LUe1Ix2pDHU7mVmf/images/product/cipp-setup-connection.png?w=280\u0026fit=max\u0026auto=format\u0026n=LUe1Ix2pDHU7mVmf\u0026q=85\u0026s=eead5d73e7a5597701b4daf86eac0233 280w, https://mintcdn.com/msportal/LUe1Ix2pDHU7mVmf/images/product/cipp-setup-connection.png?w=560\u0026fit=max\u0026auto=format\u0026n=LUe1Ix2pDHU7mVmf\u0026q=85\u0026s=0b9062fa34f16ac1c87e59605b2a18df 560w, https://mintcdn.com/msportal/LUe1Ix2pDHU7mVmf/images/product/cipp-setup-connection.png?w=840\u0026fit=max\u0026auto=format\u0026n=LUe1Ix2pDHU7mVmf\u0026q=85\u0026s=6d31ffb7004f53d39b384741da820a51 840w, https://mintcdn.com/msportal/LUe1Ix2pDHU7mVmf/images/product/cipp-setup-connection.png?w=1100\u0026fit=max\u0026auto=format\u0026n=LUe1Ix2pDHU7mVmf\u0026q=85\u0026s=f87b7c077635318ac25f1c8f0cb36f37 1100w, https://mintcdn.com/msportal/LUe1Ix2pDHU7mVmf/images/product/cipp-setup-connection.png?w=1650\u0026fit=max\u0026auto=format\u0026n=LUe1Ix2pDHU7mVmf\u0026q=85\u0026s=b42bc9103eed9a42ab61947a0b6b0cc1 1650w, https://mintcdn.com/msportal/LUe1Ix2pDHU7mVmf/images/product/cipp-setup-connection.png?w=2500\u0026fit=max\u0026auto=format\u0026n=LUe1Ix2pDHU7mVmf\u0026q=85\u0026s=537aab37bbdd778dc0a780ac013d5e8b 2500w`})})]}),_jsx(Step,{title:`Test the Connection`,children:_jsxs(_components.p,{children:[`Click `,_jsx(_components.strong,{children:`Test Connection`}),`. On success you’ll see `,_jsx(_components.strong,{children:`Connection Verified`}),`: Microsoft issued an access token for this CIPP API client.`]})}),_jsxs(Step,{title:`Create the Integration`,children:[_jsxs(_components.p,{children:[`Click `,_jsx(_components.strong,{children:`Create Integration`}),` to save. The button stays disabled until the test passes. Credentials are stored only in Vault.`]}),_jsx(_components.p,{children:`A token proves the credentials are valid. It does not prove that every CIPP dataset is reachable, because the API client’s CIPP role controls which tenants and reports it can read.`})]})]}),`\n`,_jsx(Heading,{level:`2`,id:`part-3-choose-data`,children:`Part 3: Choose Data`}),`\n`,_jsxs(_components.p,{children:[_jsx(_components.strong,{children:`Choose data`}),` holds the optional `,_jsx(_components.strong,{children:`Document Intune policies`}),` setting. Intune policy documentation is opt-in: the setting is off by default, including for existing connections.`]}),`\n`,_jsxs(Steps,{children:[_jsx(Step,{title:`Open Choose data`,children:_jsxs(_components.p,{children:[`After saving credentials, open `,_jsx(_components.strong,{children:`Choose data`}),`, before matching companies. The older wizard shows the same `,_jsx(_components.strong,{children:`Choose data`}),` step before `,_jsx(_components.strong,{children:`Map companies`}),`.`]})}),_jsx(Step,{title:`Choose whether to document Intune policies`,children:_jsxs(_components.p,{children:[`Check `,_jsx(_components.strong,{children:`Document Intune policies`}),` to turn it on, or leave it unchecked to keep it off. The choice saves immediately. Leaving it unchecked is valid.`]})}),_jsx(Step,{title:`Continue`,children:_jsx(_components.p,{children:`Continue to company matching once the choice has saved.`})})]}),`\n`,_jsxs(_components.p,{children:[`With the setting on, the nightly CIPP sync saves each Intune policy’s versions and looks up readable setting names. The policies appear in `,_jsx(_components.a,{href:`/user-guides/documentation/view-it-records#review-intune-configuration`,children:`Documentation > Intune`}),`, where staff can export one company’s Intune documentation as a PDF after selecting that company. Clear the checkbox to stop documenting policies on later syncs. A sync that is already running finishes with its saved choice, and versions documented earlier stay available.`]}),`\n`,_jsxs(_components.p,{children:[`Sharing Intune documentation with company users is a separate switch, `,_jsx(_components.strong,{children:`Show Intune documentation to company users`}),` in `,_jsx(_components.strong,{children:`Settings > Documentation > Intune`}),`. It is off by default.`]}),`\n`,_jsx(Frame,{caption:`Choose data between Connect and company matching.`,children:_jsx(OptimizedImage,{src:`https://mintcdn.com/msportal/p3JP3zTKoSHAV7Q5/images/product/cipp-choose-data-preview-desktop.png?fit=max\u0026auto=format\u0026n=p3JP3zTKoSHAV7Q5\u0026q=85\u0026s=aa2765295af29d8bb68f8719eef84d11`,alt:`CIPP Choose data step with Intune documentation unchecked`,width:`1440`,height:`960`,\"data-og-width\":`1440`,\"data-og-height\":`960`,\"data-path\":`images/product/cipp-choose-data-preview-desktop.png`,\"data-optimize\":`true`,\"data-opv\":`3`,srcset:`https://mintcdn.com/msportal/p3JP3zTKoSHAV7Q5/images/product/cipp-choose-data-preview-desktop.png?w=280\u0026fit=max\u0026auto=format\u0026n=p3JP3zTKoSHAV7Q5\u0026q=85\u0026s=1cebb72c439c7a2e2859324a202d68bc 280w, https://mintcdn.com/msportal/p3JP3zTKoSHAV7Q5/images/product/cipp-choose-data-preview-desktop.png?w=560\u0026fit=max\u0026auto=format\u0026n=p3JP3zTKoSHAV7Q5\u0026q=85\u0026s=a789836041793e715a22fa15f0375fe9 560w, https://mintcdn.com/msportal/p3JP3zTKoSHAV7Q5/images/product/cipp-choose-data-preview-desktop.png?w=840\u0026fit=max\u0026auto=format\u0026n=p3JP3zTKoSHAV7Q5\u0026q=85\u0026s=adb5e7e7a664e4d58dd1cdd0e12cae9a 840w, https://mintcdn.com/msportal/p3JP3zTKoSHAV7Q5/images/product/cipp-choose-data-preview-desktop.png?w=1100\u0026fit=max\u0026auto=format\u0026n=p3JP3zTKoSHAV7Q5\u0026q=85\u0026s=8cb9708ccb0f93e6652f29470d59f0d5 1100w, https://mintcdn.com/msportal/p3JP3zTKoSHAV7Q5/images/product/cipp-choose-data-preview-desktop.png?w=1650\u0026fit=max\u0026auto=format\u0026n=p3JP3zTKoSHAV7Q5\u0026q=85\u0026s=c286bce97b00c74e4b59a03cf28842fa 1650w, https://mintcdn.com/msportal/p3JP3zTKoSHAV7Q5/images/product/cipp-choose-data-preview-desktop.png?w=2500\u0026fit=max\u0026auto=format\u0026n=p3JP3zTKoSHAV7Q5\u0026q=85\u0026s=c62332af5c89642ad9b729e7721799ae 2500w`})}),`\n`,_jsx(Frame,{caption:`Choose data in the older wizard.`,children:_jsx(OptimizedImage,{src:`https://mintcdn.com/msportal/p3JP3zTKoSHAV7Q5/images/product/cipp-choose-data-legacy-preview-desktop.png?fit=max\u0026auto=format\u0026n=p3JP3zTKoSHAV7Q5\u0026q=85\u0026s=3f803c7941dbcad3753b9f0a093cdf84`,alt:`CIPP wizard Choose data step with Document Intune policies unchecked`,width:`1440`,height:`960`,\"data-og-width\":`1440`,\"data-og-height\":`960`,\"data-path\":`images/product/cipp-choose-data-legacy-preview-desktop.png`,\"data-optimize\":`true`,\"data-opv\":`3`,srcset:`https://mintcdn.com/msportal/p3JP3zTKoSHAV7Q5/images/product/cipp-choose-data-legacy-preview-desktop.png?w=280\u0026fit=max\u0026auto=format\u0026n=p3JP3zTKoSHAV7Q5\u0026q=85\u0026s=58dedb4806d11d212bac45a9bb6aac3c 280w, https://mintcdn.com/msportal/p3JP3zTKoSHAV7Q5/images/product/cipp-choose-data-legacy-preview-desktop.png?w=560\u0026fit=max\u0026auto=format\u0026n=p3JP3zTKoSHAV7Q5\u0026q=85\u0026s=df63e3e1183846d77bbdffd428c9421e 560w, https://mintcdn.com/msportal/p3JP3zTKoSHAV7Q5/images/product/cipp-choose-data-legacy-preview-desktop.png?w=840\u0026fit=max\u0026auto=format\u0026n=p3JP3zTKoSHAV7Q5\u0026q=85\u0026s=4b3bb3bbb7888b77c73c48f6b6cceff9 840w, https://mintcdn.com/msportal/p3JP3zTKoSHAV7Q5/images/product/cipp-choose-data-legacy-preview-desktop.png?w=1100\u0026fit=max\u0026auto=format\u0026n=p3JP3zTKoSHAV7Q5\u0026q=85\u0026s=3da82a763e9e3f20f7e74373ac4a762d 1100w, https://mintcdn.com/msportal/p3JP3zTKoSHAV7Q5/images/product/cipp-choose-data-legacy-preview-desktop.png?w=1650\u0026fit=max\u0026auto=format\u0026n=p3JP3zTKoSHAV7Q5\u0026q=85\u0026s=a9ea7fc627e1caf80828f0e2c7dcfa34 1650w, https://mintcdn.com/msportal/p3JP3zTKoSHAV7Q5/images/product/cipp-choose-data-legacy-preview-desktop.png?w=2500\u0026fit=max\u0026auto=format\u0026n=p3JP3zTKoSHAV7Q5\u0026q=85\u0026s=b9fcdfb8b817e74fec08e82c24e52d66 2500w`})}),`\n`,_jsx(Heading,{level:`2`,id:`part-4-map-companies`,children:`Part 4: Map Companies`}),`\n`,_jsx(_components.p,{children:`After connecting, MSPortal discovers the Microsoft 365 tenants managed in CIPP. Map each tenant to the matching MSPortal company so security, Intune, and Microsoft 365 data appears in the correct customer context.`}),`\n`,_jsxs(Steps,{children:[_jsx(Step,{title:`Wait for Tenant Discovery`,children:_jsx(_components.p,{children:`Tenant discovery can take a few minutes after the connection is created. The page checks automatically while the initial sync runs.`})}),_jsxs(Step,{title:`Map Tenants to Companies`,children:[_jsxs(_components.p,{children:[`The table lists each tenant with its `,_jsx(_components.strong,{children:`Default domain`}),` and `,_jsx(_components.strong,{children:`CIPP status`}),`. Tenants whose Microsoft tenant ID matches an existing Microsoft 365 connection are mapped automatically. For the rest:`]}),_jsxs(_components.ol,{children:[`\n`,_jsxs(_components.li,{children:[`Click `,_jsx(_components.strong,{children:`Quick Match`}),` to pair tenants and companies by name, or pick a company from the `,_jsx(_components.strong,{children:`Select company…`}),` dropdown in the `,_jsx(_components.strong,{children:`Mapped`}),` column`]}),`\n`,_jsxs(_components.li,{children:[`If the company does not exist yet, use `,_jsx(_components.strong,{children:`Create new company`}),` to add it and link it in one step. Check for an existing company first to avoid duplicates`]}),`\n`,_jsxs(_components.li,{children:[`Review the pending links, then click `,_jsx(_components.strong,{children:`Import Selected`}),` to save them`]}),`\n`]}),_jsx(_components.p,{children:`A company you create here is saved immediately. Removing a saved link also takes effect immediately. Clearing a pending link only discards that draft.`})]}),_jsx(Step,{title:`Continue`,children:_jsxs(_components.p,{children:[`Click `,_jsx(_components.strong,{children:`Next`}),`. `,_jsx(_components.strong,{children:`Next`}),` saves any pending links and starts a full data sync for the mapped tenants.`]})})]}),`\n`,_jsx(Note,{children:_jsx(_components.p,{children:`Data is only stored and shown for tenants that are mapped to a company. Unmapped tenants are listed for mapping but their data stays out of every page and report.`})}),`\n`,_jsx(Heading,{level:`2`,id:`part-5-review`,children:`Part 5: Review`}),`\n`,_jsx(_components.p,{children:`The Review step confirms your data coverage before you finish setup:`}),`\n`,_jsxs(_components.ul,{children:[`\n`,_jsxs(_components.li,{children:[_jsx(_components.strong,{children:`Tenants discovered`}),`, `,_jsx(_components.strong,{children:`Tenants mapped`}),` and `,_jsx(_components.strong,{children:`Synced records`}),` counters`]}),`\n`,_jsxs(_components.li,{children:[_jsx(_components.strong,{children:`Healthy datasets`}),`, `,_jsx(_components.strong,{children:`Datasets running`}),`, `,_jsx(_components.strong,{children:`Security coverage`}),`, `,_jsx(_components.strong,{children:`Intune coverage`}),` and `,_jsx(_components.strong,{children:`Dataset issues`}),` indicators`]}),`\n`,_jsxs(_components.li,{children:[_jsx(_components.strong,{children:`Last data received`}),` time`]}),`\n`,_jsxs(_components.li,{children:[_jsx(_components.strong,{children:`Start full sync`}),` to run a synchronization on demand`]}),`\n`,_jsxs(_components.li,{children:[_jsx(_components.strong,{children:`View Microsoft 365 posture`}),` to open the client-facing view, and `,_jsx(_components.strong,{children:`Manage company mappings`}),` to return to the Map step`]}),`\n`]}),`\n`,_jsx(_components.p,{children:`Synchronization continues automatically in the background after setup, with a full refresh every day. A “sync started” message means the sync was requested, not that it finished. Wait for the counters to settle before you judge coverage.`}),`\n`,_jsx(Heading,{level:`3`,id:`which-dataset-issues-count`,children:`Which dataset issues count`}),`\n`,_jsxs(Table,{children:[_jsx(_components.thead,{children:_jsxs(_components.tr,{children:[_jsx(_components.th,{children:`Situation`}),_jsx(_components.th,{children:`How MSPortal treats it`})]})}),_jsxs(_components.tbody,{children:[_jsxs(_components.tr,{children:[_jsx(_components.td,{children:`A dataset failed`}),_jsxs(_components.td,{children:[`Counted under `,_jsx(_components.strong,{children:`Dataset issues`}),`. Data from datasets that succeeded stays available`]})]}),_jsxs(_components.tr,{children:[_jsx(_components.td,{children:`CIPP asks MSPortal to check back while it prepares a report`}),_jsxs(_components.td,{children:[`Counted under `,_jsx(_components.strong,{children:`Dataset issues`}),` while waiting. The sync retries that dataset a few minutes later in the same run`]})]}),_jsxs(_components.tr,{children:[_jsx(_components.td,{children:`A client tenant does not have the feature (for example Autopilot without Intune licensing, Conditional Access blocking partner access, or CSP licenses without the Sherweb integration in CIPP)`}),_jsx(_components.td,{children:`Not an issue. MSPortal skips that tenant and keeps data from the rest`})]}),_jsxs(_components.tr,{children:[_jsx(_components.td,{children:`No tenant has the feature`}),_jsx(_components.td,{children:`Left out of the healthy totals`})]})]})]}),`\n`,_jsx(_components.p,{children:`A failed or missing dataset is never treated as a passing security result.`}),`\n`,_jsx(Heading,{level:`3`,id:`only-one-tenant-appears`,children:`Only one tenant appears`}),`\n`,_jsxs(_components.p,{children:[`If the Review step shows `,_jsx(_components.strong,{children:`Only one CIPP tenant was returned`}),` and you expected more, the API client’s CIPP role does not cover all tenants.`]}),`\n`,_jsxs(_components.ol,{children:[`\n`,_jsxs(_components.li,{children:[`In CIPP, open `,_jsx(_components.strong,{children:`Integrations > CIPP-API`}),` and assign the API client a role with AllTenants access, such as the built-in `,_jsx(_components.strong,{children:`readonly`}),` role`]}),`\n`,_jsxs(_components.li,{children:[`Return to the Review step and click `,_jsx(_components.strong,{children:`Start full sync`})]}),`\n`]}),`\n`,_jsx(Heading,{level:`2`,id:`part-6-data`,children:`Part 6: Data`}),`\n`,_jsxs(_components.p,{children:[`The `,_jsx(_components.strong,{children:`Data`}),` step is your admin console for everything CIPP is syncing:`]}),`\n`,_jsxs(_components.ul,{children:[`\n`,_jsxs(_components.li,{children:[_jsx(_components.strong,{children:`Summary cards`}),` for mapped tenants, synced records, and security, Intune, and critical item counts`]}),`\n`,_jsxs(_components.li,{children:[_jsx(_components.strong,{children:`Dataset coverage`}),` showing every dataset by category, with any sync issues flagged`]}),`\n`,_jsxs(_components.li,{children:[_jsx(_components.strong,{children:`Record explorer`}),` to search and filter every synced record, including the full source payload from the CIPP API`]}),`\n`]}),`\n`,_jsxs(_components.p,{children:[`Use this view to confirm data is flowing, investigate a specific record, or check why a dataset has no data. Filter to the right company and dataset before you open a record, because some records show the full provider payload. This console is for your team; clients see the curated `,_jsx(_components.a,{href:`/user-guides/microsoft-365/posture`,children:`Microsoft 365 Posture`}),` page instead.`]}),`\n`,_jsx(Heading,{level:`2`,id:`part-7-import-cipp-standards-into-compliance`,children:`Part 7: Import CIPP Standards into Compliance`}),`\n`,_jsxs(_components.p,{children:[`The `,_jsx(_components.strong,{children:`Data`}),` step can turn your CIPP standards into a reusable company-level Compliance group. MSPortal creates one check per standard. You then assign the group to runs through your normal Compliance workflow.`]}),`\n`,_jsxs(Table,{children:[_jsx(_components.thead,{children:_jsxs(_components.tr,{children:[_jsx(_components.th,{children:`Action`}),_jsx(_components.th,{children:`Permission needed`})]})}),_jsxs(_components.tbody,{children:[_jsxs(_components.tr,{children:[_jsx(_components.td,{children:`Preview standards`}),_jsx(_components.td,{children:`Read access to integrations and Compliance settings`})]}),_jsxs(_components.tr,{children:[_jsx(_components.td,{children:`Create or update the group`}),_jsx(_components.td,{children:`Also Compliance settings write access`})]})]})]}),`\n`,_jsx(_components.p,{children:`This is a tenant-wide MSP task, so a user limited to specific companies cannot run it.`}),`\n`,_jsx(Heading,{level:`3`,id:`create-the-group`,children:`Create the Group`}),`\n`,_jsxs(Steps,{children:[_jsx(Step,{title:`Open the Data Step`,children:_jsxs(_components.p,{children:[`Open the CIPP connection and select `,_jsx(_components.strong,{children:`Data`}),`.`]})}),_jsx(Step,{title:`Expand the Panel`,children:_jsxs(_components.p,{children:[`Select `,_jsx(_components.strong,{children:`CIPP Compliance group`}),` to expand the panel.`]})}),_jsxs(Step,{title:`Review the Standards`,children:[_jsxs(_components.p,{children:[`Check the count line, for example `,_jsx(_components.strong,{children:`12 standards available · 0 imported`}),`, and the list of standard names. The list includes standards synced from mapped companies in the last 48 hours.`]}),_jsxs(_components.p,{children:[`If the panel shows `,_jsx(_components.strong,{children:`Map companies and sync CIPP standards to see available checks.`}),`, map companies and let a sync finish first. `,_jsx(_components.strong,{children:`Create group`}),` stays unavailable until at least one standard is available.`]})]}),_jsx(Step,{title:`Choose Automatic Updates`,children:_jsxs(_components.p,{children:[`Keep `,_jsx(_components.strong,{children:`Automatically update these checks in active runs from CIPP results.`}),` selected if you want CIPP results to set check statuses. It is selected by default.`]})}),_jsxs(Step,{title:`Create the Group`,children:[_jsxs(_components.p,{children:[`Select `,_jsx(_components.strong,{children:`Create group`}),`. A `,_jsx(_components.strong,{children:`Compliance group saved.`}),` message confirms the import.`]}),_jsxs(_components.p,{children:[`The import also creates a `,_jsx(_components.strong,{children:`CIPP Standards`}),` status list with `,_jsx(_components.strong,{children:`Unknown`}),`, `,_jsx(_components.strong,{children:`Compliant`}),` and `,_jsx(_components.strong,{children:`Noncompliant`}),`. `,_jsx(_components.strong,{children:`Unknown`}),` is the default status.`]})]}),_jsx(Step,{title:`Review the Group`,children:_jsxs(_components.p,{children:[`Select `,_jsx(_components.strong,{children:`Open Compliance groups`}),` to review the new `,_jsx(_components.strong,{children:`CIPP Microsoft 365 Standards`}),` group in `,_jsx(_components.strong,{children:`Settings > Compliance > Groups`}),`.`]})})]}),`\n`,_jsx(Heading,{level:`3`,id:`assign-the-group-to-runs`,children:`Assign the Group to Runs`}),`\n`,_jsx(_components.p,{children:`The import does not add checks to any run.`}),`\n`,_jsxs(Steps,{children:[_jsx(Step,{title:`Add the Group to a Run Template`,children:_jsxs(_components.p,{children:[`In `,_jsx(_components.a,{href:`/user-guides/settings/compliance#runs-tab`,children:`Compliance settings`}),`, open the `,_jsx(_components.strong,{children:`Runs`}),` tab and add `,_jsx(_components.strong,{children:`CIPP Microsoft 365 Standards`}),` to a run template.`]})}),_jsx(Step,{title:`Start Assessments`,children:_jsxs(_components.p,{children:[`Create an assessment from that template, or `,_jsx(_components.a,{href:`/user-guides/settings/compliance-schedules`,children:`schedule assessments`}),`.`]})})]}),`\n`,_jsx(Heading,{level:`3`,id:`import-again`,children:`Import Again`}),`\n`,_jsxs(_components.p,{children:[`After the group exists, the button reads `,_jsx(_components.strong,{children:`Update group`}),`. Select it to add checks for standards CIPP has reported since your last import. Existing standards keep their current checks, so repeat imports do not create duplicates. Use the same button to save a change to the automatic updates setting.`]}),`\n`,_jsx(Heading,{level:`3`,id:`how-automatic-updates-set-results`,children:`How Automatic Updates Set Results`}),`\n`,_jsx(_components.p,{children:`With automatic updates on, MSPortal sets each imported check in active runs after every CIPP sync. It also evaluates results right after you create or update the group.`}),`\n`,_jsxs(Table,{children:[_jsx(_components.thead,{children:_jsxs(_components.tr,{children:[_jsx(_components.th,{children:`CIPP evidence`}),_jsx(_components.th,{children:`Result in the run`})]})}),_jsxs(_components.tbody,{children:[_jsxs(_components.tr,{children:[_jsx(_components.td,{children:`CIPP reports the standard as compliant`}),_jsx(_components.td,{children:_jsx(_components.strong,{children:`Compliant`})})]}),_jsxs(_components.tr,{children:[_jsx(_components.td,{children:`CIPP reports the standard as noncompliant`}),_jsx(_components.td,{children:_jsx(_components.strong,{children:`Noncompliant`})})]}),_jsxs(_components.tr,{children:[_jsx(_components.td,{children:`No evidence, results older than 48 hours, malformed data or an unavailable license`}),_jsx(_components.td,{children:_jsx(_components.strong,{children:`Unknown`})})]})]})]}),`\n`,_jsx(_components.p,{children:`When one company maps to more than one CIPP tenant, the check uses the worst result:`}),`\n`,_jsxs(Table,{children:[_jsx(_components.thead,{children:_jsxs(_components.tr,{children:[_jsx(_components.th,{children:`Tenant results`}),_jsx(_components.th,{children:`Check result`})]})}),_jsxs(_components.tbody,{children:[_jsxs(_components.tr,{children:[_jsxs(_components.td,{children:[`Any tenant is `,_jsx(_components.strong,{children:`Noncompliant`})]}),_jsx(_components.td,{children:_jsx(_components.strong,{children:`Noncompliant`})})]}),_jsxs(_components.tr,{children:[_jsxs(_components.td,{children:[`Every tenant is `,_jsx(_components.strong,{children:`Compliant`})]}),_jsx(_components.td,{children:_jsx(_components.strong,{children:`Compliant`})})]}),_jsxs(_components.tr,{children:[_jsx(_components.td,{children:`Anything else`}),_jsx(_components.td,{children:_jsx(_components.strong,{children:`Unknown`})})]})]})]}),`\n`,_jsx(_components.p,{children:`Automatic updates change only the status. They never touch completed runs or notes. They apply to company-level assignments in runs that are still in progress, and they run only while the CIPP connection is active.`}),`\n`,_jsx(Heading,{level:`3`,id:`delete-or-restore-the-group`,children:`Delete or Restore the Group`}),`\n`,_jsxs(_components.p,{children:[`Deleting `,_jsx(_components.strong,{children:`CIPP Microsoft 365 Standards`}),` in `,_jsx(_components.strong,{children:`Settings > Compliance > Groups`}),` pauses automatic updates. The imported checks stay in your library.`]}),`\n`,_jsxs(_components.p,{children:[`To restore the group, return to the `,_jsx(_components.strong,{children:`Data`}),` step and select `,_jsx(_components.strong,{children:`Create group`}),` again. MSPortal rebuilds the group from the same checks and resumes automatic updates if that setting is selected.`]}),`\n`,_jsx(Heading,{level:`2`,id:`managing-the-connection`,children:`Managing the Connection`}),`\n`,_jsxs(_components.ul,{children:[`\n`,_jsxs(_components.li,{children:[`To update credentials later, re-open the setup page, enter the new values, click `,_jsx(_components.strong,{children:`Test Connection`}),`, then `,_jsx(_components.strong,{children:`Save connection`}),`. Saved secrets stay masked.`]}),`\n`,_jsxs(_components.li,{children:[`To disconnect, click the remove button and confirm `,_jsx(_components.strong,{children:`Disconnect CIPP?`}),`. This removes the connection, synced CIPP data and its stored Vault credentials, and cannot be undone. It does not disable or revoke the API client in CIPP.`]}),`\n`,_jsx(_components.li,{children:`Users without integration management permission see the connection read-only.`}),`\n`]}),`\n`,_jsx(Heading,{level:`2`,id:`troubleshooting`,children:`Troubleshooting`}),`\n`,_jsxs(Table,{children:[_jsx(_components.thead,{children:_jsxs(_components.tr,{children:[_jsx(_components.th,{children:`Issue`}),_jsx(_components.th,{children:`Solution`})]})}),_jsxs(_components.tbody,{children:[_jsxs(_components.tr,{children:[_jsx(_components.td,{children:`API URL rejected`}),_jsx(_components.td,{children:`Use the public HTTPS base URL shown on the CIPP-API integration page, without a path, port, or query string`})]}),_jsxs(_components.tr,{children:[_jsx(_components.td,{children:`Token request fails`}),_jsx(_components.td,{children:`Verify the Tenant ID, Application ID, and secret, and confirm the API client is enabled in CIPP`})]}),_jsxs(_components.tr,{children:[_jsx(_components.td,{children:`”CIPP did not recognize the access token for this API client”`}),_jsxs(_components.td,{children:[`In CIPP, go to `,_jsx(_components.strong,{children:`Integrations > CIPP-API`}),`, confirm the API client is registered and enabled, and confirm the API scope was copied from this CIPP instance`]})]}),_jsxs(_components.tr,{children:[_jsx(_components.td,{children:`”CIPP accepted the token, but the assigned CIPP role does not grant the required access”`}),_jsx(_components.td,{children:`Assign the API client a role with AllTenants read access, such as the built-in readonly role, then test again`})]}),_jsxs(_components.tr,{children:[_jsx(_components.td,{children:`Only one tenant appears`}),_jsxs(_components.td,{children:[`The API client’s role is limited to one tenant. See `,_jsx(_components.a,{href:`#only-one-tenant-appears`,children:`Only one tenant appears`})]})]}),_jsxs(_components.tr,{children:[_jsx(_components.td,{children:`Some datasets fail`}),_jsxs(_components.td,{children:[`Check `,_jsx(_components.strong,{children:`Dataset issues`}),` on the Review step. Data from datasets that succeeded stays available, but coverage is partial until the failures clear`]})]}),_jsxs(_components.tr,{children:[_jsx(_components.td,{children:`A company’s posture page is empty`}),_jsx(_components.td,{children:`Confirm the tenant mapping is saved, a sync has finished since mapping, and the user can access that company`})]}),_jsxs(_components.tr,{children:[_jsx(_components.td,{children:`”CIPP rejected the application token or the application lacks the required CIPP role”`}),_jsxs(_components.td,{children:[`Microsoft issued a token, so the Tenant ID, Application ID, secret, and API scope are all valid. The fix is inside CIPP: go to `,_jsx(_components.strong,{children:`Integrations > CIPP-API`}),`, confirm the API client is enabled, assign it a CIPP role with AllTenants read access (the built-in readonly role is recommended), and confirm the API scope was copied from that same CIPP instance`]})]})]})]}),`\n`,_jsx(Heading,{level:`2`,id:`related-resources`,children:`Related Resources`}),`\n`,_jsxs(CardGroup,{cols:2,children:[_jsx(Card,{title:`Integrations Overview`,icon:`plug`,href:`/user-guides/integrations/index`,children:_jsx(_components.p,{children:`Explore all available integrations`})}),_jsx(Card,{title:`Microsoft 365`,icon:`microsoft`,href:`/user-guides/microsoft-365/index`,children:_jsx(_components.p,{children:`Manage Microsoft 365 across your clients`})}),_jsx(Card,{title:`Microsoft 365 Posture`,icon:`shield-halved`,href:`/user-guides/microsoft-365/posture`,children:_jsx(_components.p,{children:`See what clients see from CIPP data`})}),_jsx(Card,{title:`Compliance Settings`,icon:`list-check`,href:`/user-guides/settings/compliance`,children:_jsx(_components.p,{children:`Assign the CIPP standards group to runs`})})]})]})}function MDXContent(props={}){const{wrapper:MDXLayout}={..._provideComponents(),...props.components};return MDXLayout?_jsx(MDXLayout,{...props,children:_jsx(_createMdxContent,{...props})}):_createMdxContent(props)}return{default:MDXContent};function _missingMdxReference(id,component){throw new Error(`Expected `+(component?`component`:`object`)+\" `\"+id+\"` to be defined: you likely forgot to import, pass, or provide it.\")}","frontmatter":{},"scope":{"config":{},"pageMetadata":{"title":"Configure CIPP Integration","description":"Connect the CIPP API to power the client-facing Microsoft 365 Posture page and security reporting","icon":"cloud","href":"/user-guides/integrations/enable-cipp-integration"}}},"mdxSourceWithNoJs":null},"mdxExtracts":{"tableOfContents":[{"title":"Prerequisites","slug":"prerequisites","depth":2,"children":[]},{"title":"Part 1: Create CIPP API Credentials","slug":"part-1-create-cipp-api-credentials","depth":2,"children":[]},{"title":"Part 2: Connect in MSPortal","slug":"part-2-connect-in-msportal","depth":2,"children":[]},{"title":"Part 3: Choose Data","slug":"part-3-choose-data","depth":2,"children":[]},{"title":"Part 4: Map Companies","slug":"part-4-map-companies","depth":2,"children":[]},{"title":"Part 5: Review","slug":"part-5-review","depth":2,"children":[{"title":"Which dataset issues count","slug":"which-dataset-issues-count","depth":3,"children":[]},{"title":"Only one tenant appears","slug":"only-one-tenant-appears","depth":3,"children":[]}]},{"title":"Part 6: Data","slug":"part-6-data","depth":2,"children":[]},{"title":"Part 7: Import CIPP Standards into Compliance","slug":"part-7-import-cipp-standards-into-compliance","depth":2,"children":[{"title":"Create the Group","slug":"create-the-group","depth":3,"children":[]},{"title":"Assign the Group to Runs","slug":"assign-the-group-to-runs","depth":3,"children":[]},{"title":"Import Again","slug":"import-again","depth":3,"children":[]},{"title":"How Automatic Updates Set Results","slug":"how-automatic-updates-set-results","depth":3,"children":[]},{"title":"Delete or Restore the Group","slug":"delete-or-restore-the-group","depth":3,"children":[]}]},{"title":"Managing the Connection","slug":"managing-the-connection","depth":2,"children":[]},{"title":"Troubleshooting","slug":"troubleshooting","depth":2,"children":[]},{"title":"Related Resources","slug":"related-resources","depth":2,"children":[]}],"codeExamples":{}},"jsLinks":[],"subdomain":"msportal","siteName":"MSPortal.ai Documentation","title":"Configure CIPP Integration - MSPortal.ai Documentation","navMaps":{"firstHrefInVersion":{},"firstHrefInLanguage":{}},"lastModified":"2026-10-15T00:13:14.603Z","originalFileLocation":"user-guides/integrations/enable-cipp-integration.mdx"},"headHtml":"\u003cscript data-mint-head>(function(){var d=document.documentElement,p=null;if(!p){try{p=localStorage.getItem(\"isDarkMode\")}catch(e){}if(p==='true')p='dark';else if(p==='false')p='light';if(p!=='light'\u0026\u0026p!=='dark'\u0026\u0026p!=='system')p=\"system\"}var r=p==='system'?(matchMedia(\"(prefers-color-scheme: dark)\").matches?'dark':'light'):p;d.classList.remove(r==='dark'?'light':'dark');d.classList.add(r);d.setAttribute(\"data-theme-preference\",p)})();\u003c/script>\u003cmeta data-mint-head name=\"description\" content=\"Connect the CIPP API to power the client-facing Microsoft 365 Posture page and security reporting\">\u003cmeta data-mint-head name=\"application-name\" content=\"MSPortal.ai Documentation\">\u003cmeta data-mint-head name=\"generator\" content=\"Mintlify\">\u003clink data-mint-head rel=\"icon\" type=\"image/png\" sizes=\"192x192\" href=\"/mintlify-assets/_mintlify/favicons/msportal/MdEo74vho503Sp8Y/_generated/favicon/android-chrome-192x192.png\" media=\"(prefers-color-scheme: light)\">\u003clink data-mint-head rel=\"apple-touch-icon\" type=\"image/png\" sizes=\"180x180\" href=\"/mintlify-assets/_mintlify/favicons/msportal/MdEo74vho503Sp8Y/_generated/favicon/apple-touch-icon.png\">\u003clink data-mint-head rel=\"icon\" type=\"image/png\" sizes=\"16x16\" href=\"/mintlify-assets/_mintlify/favicons/msportal/MdEo74vho503Sp8Y/_generated/favicon/favicon-16x16.png\" media=\"(prefers-color-scheme: light)\">\u003clink data-mint-head rel=\"icon\" type=\"image/png\" sizes=\"32x32\" href=\"/mintlify-assets/_mintlify/favicons/msportal/MdEo74vho503Sp8Y/_generated/favicon/favicon-32x32.png\" media=\"(prefers-color-scheme: light)\">\u003clink data-mint-head rel=\"shortcut icon\" type=\"image/x-icon\" href=\"/mintlify-assets/_mintlify/favicons/msportal/MdEo74vho503Sp8Y/_generated/favicon/favicon.ico\" media=\"(prefers-color-scheme: light)\">\u003clink data-mint-head rel=\"icon\" type=\"image/png\" sizes=\"192x192\" href=\"/mintlify-assets/_mintlify/favicons/msportal/MdEo74vho503Sp8Y/_generated/favicon-dark/android-chrome-192x192.png\" media=\"(prefers-color-scheme: dark)\">\u003clink data-mint-head rel=\"icon\" type=\"image/png\" sizes=\"16x16\" href=\"/mintlify-assets/_mintlify/favicons/msportal/MdEo74vho503Sp8Y/_generated/favicon-dark/favicon-16x16.png\" media=\"(prefers-color-scheme: dark)\">\u003clink data-mint-head rel=\"icon\" type=\"image/png\" sizes=\"32x32\" href=\"/mintlify-assets/_mintlify/favicons/msportal/MdEo74vho503Sp8Y/_generated/favicon-dark/favicon-32x32.png\" media=\"(prefers-color-scheme: dark)\">\u003clink data-mint-head rel=\"shortcut icon\" type=\"image/x-icon\" href=\"/mintlify-assets/_mintlify/favicons/msportal/MdEo74vho503Sp8Y/_generated/favicon-dark/favicon.ico\" media=\"(prefers-color-scheme: dark)\">\u003cmeta data-mint-head property=\"og:title\" content=\"Configure CIPP Integration - MSPortal.ai Documentation\">\u003cmeta data-mint-head property=\"og:description\" content=\"Connect the CIPP API to power the client-facing Microsoft 365 Posture page and security reporting\">\u003cmeta data-mint-head property=\"og:site_name\" content=\"MSPortal.ai Documentation\">\u003cmeta data-mint-head property=\"og:url\" content=\"https://docs.msportal.ai/user-guides/integrations/enable-cipp-integration\">\u003cmeta data-mint-head property=\"og:type\" content=\"website\">\u003cmeta data-mint-head property=\"og:image\" content=\"https://msportal.mintlify.app/_mintlify/api/og/v2?division=Cloud+and+domains\u0026amp;title=Configure+CIPP+Integration\u0026amp;description=Connect+the+CIPP+API+to+power+the+client-facing+Microsoft+365+Posture+page+and+security+reporting\u0026amp;theme=e333244db34194e42db1df22\u0026amp;signature=348b4712ac9633159813605f0a8764e6bb04ee32ea3743b46e1a2ef8c54ba2ad\">\u003cmeta data-mint-head property=\"og:image:width\" content=\"1200\">\u003cmeta data-mint-head property=\"og:image:height\" content=\"630\">\u003cmeta data-mint-head name=\"twitter:card\" content=\"summary_large_image\">\u003cmeta data-mint-head name=\"twitter:title\" content=\"Configure CIPP Integration - MSPortal.ai Documentation\">\u003cmeta data-mint-head name=\"twitter:description\" content=\"Connect the CIPP API to power the client-facing Microsoft 365 Posture page and security reporting\">\u003cmeta data-mint-head name=\"twitter:image\" content=\"https://msportal.mintlify.app/_mintlify/api/og/v2?division=Cloud+and+domains\u0026amp;title=Configure+CIPP+Integration\u0026amp;description=Connect+the+CIPP+API+to+power+the+client-facing+Microsoft+365+Posture+page+and+security+reporting\u0026amp;theme=e333244db34194e42db1df22\u0026amp;signature=348b4712ac9633159813605f0a8764e6bb04ee32ea3743b46e1a2ef8c54ba2ad\">\u003cmeta data-mint-head name=\"twitter:image:width\" content=\"1200\">\u003cmeta data-mint-head name=\"twitter:image:height\" content=\"630\">\u003cmeta data-mint-head name=\"msapplication-config\" content=\"/mintlify-assets/_mintlify/favicons/msportal/MdEo74vho503Sp8Y/_generated/favicon/browserconfig.xml\">\u003cmeta data-mint-head name=\"apple-mobile-web-app-title\" content=\"MSPortal.ai Documentation\">\u003cmeta data-mint-head name=\"msapplication-TileColor\" content=\"#16A34A\">\u003clink data-mint-head rel=\"canonical\" href=\"https://docs.msportal.ai/user-guides/integrations/enable-cipp-integration\">\u003clink data-mint-head rel=\"alternate\" type=\"application/xml\" href=\"/sitemap.xml\">\u003clink data-mint-head rel=\"alternate\" type=\"text/markdown\" href=\"/user-guides/integrations/enable-cipp-integration.md\">\u003cscript data-mint-head type=\"application/ld+json\">{\"@context\":\"https://schema.org\",\"@graph\":[{\"@type\":\"Organization\",\"@id\":\"https://docs.msportal.ai/#organization\",\"name\":\"MSPortal.ai Documentation\",\"url\":\"https://docs.msportal.ai\",\"logo\":{\"@type\":\"ImageObject\",\"url\":\"https://mintcdn.com/msportal/KnbwIXtZSTlVJTt6/logo/light.svg?fit=max\u0026auto=format\u0026n=KnbwIXtZSTlVJTt6\u0026q=85\u0026s=eb69f6d6bf16b2c401770aef19ade1d2\"}},{\"@type\":\"WebSite\",\"@id\":\"https://docs.msportal.ai#website\",\"name\":\"MSPortal.ai Documentation\",\"url\":\"https://docs.msportal.ai\",\"publisher\":{\"@id\":\"https://docs.msportal.ai/#organization\"}},{\"@type\":\"WebPage\",\"@id\":\"https://docs.msportal.ai/user-guides/integrations/enable-cipp-integration#webpage\",\"url\":\"https://docs.msportal.ai/user-guides/integrations/enable-cipp-integration\",\"name\":\"Configure CIPP Integration\",\"description\":\"Connect the CIPP API to power the client-facing Microsoft 365 Posture page and security reporting\",\"dateModified\":\"2026-10-15T00:13:14.603Z\",\"isPartOf\":{\"@id\":\"https://docs.msportal.ai#website\"},\"breadcrumb\":{\"@id\":\"https://docs.msportal.ai/user-guides/integrations/enable-cipp-integration#breadcrumb\"}},{\"@type\":\"BreadcrumbList\",\"@id\":\"https://docs.msportal.ai/user-guides/integrations/enable-cipp-integration#breadcrumb\",\"itemListElement\":[{\"@type\":\"ListItem\",\"position\":1,\"name\":\"Connect your tools\",\"item\":\"https://docs.msportal.ai/user-guides/integrations/index\"},{\"@type\":\"ListItem\",\"position\":2,\"name\":\"Integration setup\",\"item\":\"https://docs.msportal.ai/user-guides/integrations/index\"},{\"@type\":\"ListItem\",\"position\":3,\"name\":\"Cloud and domains\",\"item\":\"https://docs.msportal.ai/user-guides/getting-started/onboarding/company-m365\"},{\"@type\":\"ListItem\",\"position\":4,\"name\":\"Configure CIPP Integration\",\"item\":\"https://docs.msportal.ai/user-guides/integrations/enable-cipp-integration\"}]},{\"@type\":[\"Article\",\"TechArticle\"],\"@id\":\"https://docs.msportal.ai/user-guides/integrations/enable-cipp-integration#article\",\"headline\":\"Configure CIPP Integration\",\"name\":\"Configure CIPP Integration\",\"description\":\"Connect the CIPP API to power the client-facing Microsoft 365 Posture page and security reporting\",\"url\":\"https://docs.msportal.ai/user-guides/integrations/enable-cipp-integration\",\"mainEntityOfPage\":{\"@id\":\"https://docs.msportal.ai/user-guides/integrations/enable-cipp-integration#webpage\"},\"dateModified\":\"2026-10-15T00:13:14.603Z\",\"publisher\":{\"@id\":\"https://docs.msportal.ai/#organization\"},\"isPartOf\":{\"@id\":\"https://docs.msportal.ai#website\"}}]}\u003c/script>\u003cscript data-mint-head type=\"application/ld+json\">{\"@context\":\"https://schema.org\",\"@type\":\"WebSite\",\"name\":\"MSPortal.ai Documentation\",\"creator\":{\"@type\":\"Organization\",\"name\":\"Mintlify\",\"url\":\"https://mintlify.com\"}}\u003c/script>","siteName":"MSPortal.ai Documentation","nav":{"global":{"anchors":[{"anchor":"MSPortal.ai","icon":"globe","href":"https://msportal.ai"},{"anchor":"Support","icon":"life-ring","href":"mailto:support@msportal.ai"},{"anchor":"Status","icon":"signal","href":"https://status.msportal.ai"}]},"tabs":[{"tab":"Company Guides","pages":[{"title":"Company Guides","href":"/user-guides/account/manage-your-profile"}]},{"tab":"MSP Guides","groups":[{"group":"Getting Started","pages":[{"title":"MSP guides","icon":"book-open","href":"/user-guides/getting-started"},{"title":"Quick start for MSP staff","icon":"book-open","href":"/user-guides/getting-started/quick-start"},{"title":"Work through your portal launch plan","icon":"rocket","href":"/user-guides/getting-started/launch-center"},{"group":"Navigation and access","expanded":false,"pages":[{"title":"How data moves through MSPortal","icon":"diagram-project","href":"/user-guides/getting-started/data-flow"},{"title":"Find pages and records with Search","icon":"magnifying-glass","href":"/user-guides/getting-started/universal-search"},{"title":"Customize the sidebar","icon":"book-open","href":"/user-guides/getting-started/customizing-the-sidebar"},{"title":"Use keyboard shortcuts","icon":"keyboard","href":"/user-guides/getting-started/keyboard-shortcuts"},{"title":"How to Create a New User Role","icon":"shield-halved","href":"/user-guides/getting-started/how-to-create-a-new-user-role"},{"title":"Control what Company users can see","icon":"eye-slash","href":"/user-guides/getting-started/hiding-items-from-clients"}]},{"group":"MSP Setup Playbook","expanded":false,"pages":[{"title":"MSP setup playbook","sidebarTitle":"MSP setup playbook","icon":"rocket","href":"/user-guides/getting-started/onboarding/index"},{"title":"Tenant details","sidebarTitle":"Tenant details","icon":"building","href":"/user-guides/getting-started/onboarding/tenant-details"},{"title":"Support identity and AI settings","sidebarTitle":"Support identity and AI settings","icon":"sparkles","href":"/user-guides/getting-started/onboarding/ai-settings"},{"title":"Portal branding","sidebarTitle":"Portal branding","icon":"palette","href":"/user-guides/getting-started/onboarding/branding"},{"title":"Staff access groups","sidebarTitle":"Staff access groups","icon":"users","href":"/user-guides/getting-started/onboarding/tenant-roles"},{"title":"Company access groups","sidebarTitle":"Company access groups","icon":"shield","href":"/user-guides/getting-started/onboarding/company-permission-groups"},{"title":"Account teams and Team Roles","sidebarTitle":"Account teams and Team Roles","icon":"user-cog","href":"/user-guides/getting-started/onboarding/company-roles"},{"title":"Choose launch integrations","sidebarTitle":"Choose launch integrations","icon":"puzzle-piece","href":"/user-guides/getting-started/onboarding/integration-selection"},{"title":"PSA connection","sidebarTitle":"PSA connection","icon":"ticket","href":"/user-guides/getting-started/onboarding/psa-setup"},{"title":"Prepare client ticketing","sidebarTitle":"Prepare client ticketing","icon":"sliders","href":"/user-guides/getting-started/onboarding/ticket-settings"},{"title":"RMM connection","sidebarTitle":"RMM connection","icon":"desktop","href":"/user-guides/getting-started/onboarding/rmm-setup"},{"title":"Import rollout devices","sidebarTitle":"Import rollout devices","icon":"server","href":"/user-guides/getting-started/onboarding/device-import"},{"title":"Set up a sending domain","sidebarTitle":"Set up a sending domain","icon":"envelope","href":"/user-guides/getting-started/onboarding/email-domain"},{"title":"Prepare training for launch","sidebarTitle":"Prepare training for launch","icon":"graduation-cap","href":"/user-guides/getting-started/onboarding/training"},{"title":"Review billing before launch","sidebarTitle":"Review billing before launch","icon":"credit-card","href":"/user-guides/getting-started/onboarding/billing"},{"title":"Connect rollout companies to Microsoft 365","sidebarTitle":"Connect rollout companies to Microsoft 365","icon":"cloud","href":"/user-guides/getting-started/onboarding/company-m365"},{"title":"Prepare Company users","sidebarTitle":"Prepare Company users","icon":"users","href":"/user-guides/getting-started/onboarding/company-users"}]},{"group":"Your account","expanded":false,"pages":[{"title":"Manage your profile and email preferences","icon":"user-gear","href":"/msp-guides/account/manage-your-profile"},{"title":"Understand your role and company access","icon":"shield-halved","href":"/msp-guides/account/understand-your-access"},{"title":"Arrange your personal sidebar","icon":"table-columns","href":"/msp-guides/account/arrange-your-sidebar"},{"title":"Tasks and notes","icon":"list-check","href":"/user-guides/tasks/index"},{"title":"Import and add linked tasks","icon":"file-import","href":"/user-guides/tasks/import-tasks"},{"title":"Notes and AI task suggestions","icon":"notebook-pen","href":"/user-guides/tasks/notes"}]},{"group":"AI and MCP","expanded":false,"pages":[{"title":"AI Assistant","icon":"sparkles","href":"/user-guides/ai-assistant/index"},{"title":"Use the Home AI Assistant","icon":"sparkles","href":"/msp-guides/ai-assistant/use-home-assistant"},{"title":"MCP Server","icon":"plug","href":"/user-guides/mcp-server/index"},{"title":"Connect GitHub Copilot","icon":"github","href":"/user-guides/mcp-server/github-copilot"},{"title":"MCP Tools Reference","icon":"screwdriver-wrench","href":"/user-guides/mcp-server/tools-reference"}]}]},{"group":"Service Delivery","pages":[{"group":"Client Onboarding","expanded":false,"pages":[{"title":"Client Onboarding","icon":"clipboard-check","href":"/user-guides/client-onboarding/index"},{"title":"Open your onboarding portal","icon":"door-open","href":"/user-guides/client-onboarding/open-your-onboarding"},{"title":"Complete onboarding tasks and forms","icon":"list-check","href":"/user-guides/client-onboarding/complete-tasks-and-forms"},{"title":"Upload onboarding documents and secure files","icon":"file-arrow-up","href":"/user-guides/client-onboarding/upload-files"},{"title":"Hand over credentials during onboarding","icon":"key","href":"/user-guides/client-onboarding/hand-over-credentials"},{"title":"Review onboarding approvals and sign documents","icon":"signature","href":"/user-guides/client-onboarding/review-and-sign"},{"title":"Use onboarding meetings, training, surveys, and reference pages","icon":"clipboard-list","href":"/user-guides/client-onboarding/meetings-training-and-surveys"},{"title":"Quick Start","icon":"rocket","href":"/user-guides/client-onboarding/quick-start"},{"title":"Onboarding Templates","icon":"copy","href":"/user-guides/client-onboarding/templates"},{"title":"Client Pages","icon":"book-open","href":"/user-guides/client-onboarding/pages"},{"title":"Onboarding Forms","icon":"clipboard-list","href":"/user-guides/client-onboarding/forms"},{"title":"Managing Portals","icon":"bars-progress","href":"/user-guides/client-onboarding/managing-portals"},{"title":"Link an onboarding template task to a Standard","icon":"link","href":"/user-guides/client-onboarding/link-task-to-standard"},{"title":"Retrieve onboarding credentials and secure files","icon":"shield-halved","href":"/user-guides/client-onboarding/retrieve-secure-submissions"},{"title":"Custom Dates and Countdowns","icon":"stopwatch","href":"/user-guides/client-onboarding/custom-dates"},{"title":"Understand the client onboarding portal","icon":"browser","href":"/user-guides/client-onboarding/client-portal"}]},{"group":"Training","expanded":false,"pages":[{"title":"Training","icon":"graduation-cap","href":"/user-guides/training/index"},{"title":"Find and enroll in a training course","icon":"book-open","href":"/user-guides/training/find-and-enroll"},{"title":"Take a course and track progress","icon":"graduation-cap","href":"/user-guides/training/take-a-course"},{"title":"View and share a training certificate","icon":"award","href":"/user-guides/training/certificates"},{"title":"Enable training for companies and users","icon":"graduation-cap","href":"/user-guides/training/enabling-training"},{"title":"Manage learning paths","icon":"route","href":"/user-guides/training/learning-paths"},{"title":"Security awareness training","icon":"shield-check","href":"/user-guides/training/security-awareness"},{"title":"Read security awareness learner status","icon":"user-shield","href":"/user-guides/training/read-awareness-status"},{"title":"Read a Breach Secure Now learner's risk details","icon":"user-shield","href":"/user-guides/training/read-bsn-risk"},{"title":"Open your Huntress training","icon":"shield-check","href":"/user-guides/training/open-huntress-training"},{"title":"Find Huntress training assignments","icon":"graduation-cap","href":"/user-guides/training/read-huntress-assignments"},{"title":"Read a Huntress curriculum and preview episodes","icon":"book-open","href":"/user-guides/training/read-huntress-curriculum"}]},{"group":"Cloud","expanded":false,"pages":[{"title":"Cloud overview","icon":"cloud","href":"/user-guides/cloud/index"},{"title":"Read cloud security posture","icon":"shield-check","href":"/user-guides/cloud/posture"},{"title":"Find and filter posture snapshots","icon":"filter","href":"/user-guides/cloud/find-posture"},{"title":"Understand Google posture checks","icon":"calculator","href":"/user-guides/cloud/google-posture-checks"},{"title":"Read cloud user accounts","icon":"users","href":"/user-guides/cloud/users"},{"title":"Find and filter cloud users","icon":"filter","href":"/user-guides/cloud/find-users"},{"title":"Export cloud users","icon":"file-csv","href":"/user-guides/cloud/export-users"},{"title":"Read cloud groups and members","icon":"user-group","href":"/user-guides/cloud/groups"},{"title":"Find and filter cloud groups","icon":"filter","href":"/user-guides/cloud/find-groups"},{"title":"Manage client group visibility","icon":"eye-slash","href":"/user-guides/cloud/manage-group-visibility"},{"title":"Read cloud license usage","icon":"id-card","href":"/user-guides/cloud/licenses"},{"title":"Find, filter, and export licenses","icon":"filter","href":"/user-guides/cloud/filter-licenses"},{"title":"View license assignments and combinations","icon":"users","href":"/user-guides/cloud/view-license-assignments"},{"title":"Read cloud and registrar domains","icon":"globe","href":"/user-guides/cloud/domains"},{"title":"Find and export domains","icon":"filter","href":"/user-guides/cloud/filter-domains"},{"title":"Review domain renewal information","icon":"calendar","href":"/user-guides/cloud/review-domain-renewals"}]},{"group":"Microsoft 365","expanded":false,"pages":[{"title":"Read Microsoft Secure Score","icon":"shield-check","href":"/user-guides/microsoft-365/index"},{"title":"Find and filter Secure Score controls","icon":"shield-check","href":"/user-guides/microsoft-365/find-secure-score-controls"},{"title":"Read a Secure Score control","icon":"shield-check","href":"/user-guides/microsoft-365/read-secure-score-control"},{"title":"Export Secure Score controls","icon":"shield-check","href":"/user-guides/microsoft-365/export-secure-score"},{"title":"Plan work from Secure Score","icon":"list-check","href":"/user-guides/microsoft-365/plan-secure-score-work"},{"title":"Read Microsoft Current Posture","icon":"radar","href":"/user-guides/microsoft-365/posture"},{"title":"Find and read Current Posture findings","icon":"radar","href":"/user-guides/microsoft-365/find-posture-findings"},{"title":"Review and reopen Current Posture findings","icon":"radar","href":"/user-guides/microsoft-365/review-posture-findings"},{"title":"Connecting Companies to Microsoft 365","icon":"plug","href":"/user-guides/microsoft-365/connecting-companies"},{"title":"Microsoft 365 users","icon":"users","href":"/user-guides/microsoft-365/users"},{"title":"Microsoft 365 licenses","icon":"id-card","href":"/user-guides/microsoft-365/licenses"},{"title":"Microsoft 365 domains","icon":"globe","href":"/user-guides/microsoft-365/domains"}]},{"group":"Ticketing","expanded":false,"pages":[{"title":"Tickets","icon":"ticket","href":"/user-guides/ticketing/index"},{"title":"How to open a ticket","icon":"ticket","href":"/msp-guides/ticketing/open-a-ticket"},{"title":"Find and follow up on a ticket","icon":"comments","href":"/msp-guides/ticketing/follow-up-on-a-ticket"},{"title":"Time ticket work with a timer","icon":"stopwatch","href":"/user-guides/ticketing/time-work-with-timers"},{"title":"How to Create a Ticket Template","icon":"file-lines","href":"/user-guides/ticketing/how-to-create-a-ticket-template"},{"title":"Create a ticket with AI assistance","icon":"wand-magic-sparkles","href":"/msp-guides/ticketing/open-a-ticket-with-ai"},{"title":"Change Management","icon":"shield-check","href":"/user-guides/ticketing/change-management"},{"title":"Ticket approval chains","icon":"list-check","href":"/user-guides/ticketing/ticket-approval-chains"},{"title":"Flow Webhook Recipient","icon":"webhook","href":"/user-guides/ticketing/flow-webhook-recipient"},{"title":"Understand your available request templates","icon":"file-lines","href":"/msp-guides/ticketing/understand-request-templates"},{"title":"Create and preview a ticket template","icon":"file-lines","href":"/user-guides/ticketing/create-and-preview-ticket-template"}]},{"group":"Compliance","expanded":false,"pages":[{"title":"Compliance","icon":"shield-halved","href":"/user-guides/compliance/index"},{"title":"Find compliance checks and understand results","icon":"shield-halved","href":"/user-guides/compliance/find-and-read-checks"},{"title":"Read compliance guidance, evidence, and history","icon":"shield-halved","href":"/user-guides/compliance/read-evidence-and-history"},{"title":"Export the compliance check list","icon":"shield-halved","href":"/user-guides/compliance/export-checks"},{"title":"Compliance AI","icon":"sparkles","href":"/user-guides/compliance/compliance-ai"},{"title":"Risk Management","icon":"shield-halved","href":"/user-guides/compliance/risk-management"},{"title":"Liongard Compliance Metrics","icon":"gauge-high","href":"/user-guides/compliance/liongard-metrics"},{"title":"Adding CIS Benchmarks","icon":"book","href":"/user-guides/compliance/adding-cis-benchmarks"},{"title":"Add NIS2 playbooks","icon":"book","href":"/user-guides/compliance/adding-nis2-playbooks"},{"title":"Review completed compliance assessments","icon":"clock-rotate-left","href":"/user-guides/compliance/view-check-history"}]},{"group":"Playbooks","expanded":false,"pages":[{"title":"Use playbooks to prepare compliance reviews","icon":"book","href":"/user-guides/playbooks/index"}]},{"group":"Projects","expanded":false,"pages":[{"title":"Projects","icon":"folder-open","href":"/user-guides/projects/index"},{"title":"Projects and Onboarding are coming together","icon":"diagram-project","href":"/user-guides/projects/upcoming-onboarding-changes"},{"title":"Find and open a project","icon":"folder-open","href":"/user-guides/projects/find-projects"},{"title":"Filter and sort projects","icon":"filter","href":"/user-guides/projects/filter-projects"},{"title":"Native Projects: Start to Finish","icon":"folder-open","href":"/user-guides/projects/native-projects"},{"title":"Project Templates","icon":"layer-group","href":"/user-guides/projects/templates"},{"title":"Project AI, MCP, and Client Reviews","icon":"sparkles","href":"/user-guides/projects/ai-and-client-reviews"},{"title":"Project Workspace","icon":"list-check","href":"/user-guides/projects/workspace"},{"title":"Read and filter project ticket Kanban","icon":"table-columns","href":"/user-guides/projects/read-ticket-kanban"},{"title":"Read a project schedule","icon":"calendar-days","href":"/user-guides/projects/read-project-schedule"},{"title":"Filter the project schedule","icon":"filter","href":"/user-guides/projects/filter-project-schedule"},{"title":"Dispatch project work","icon":"calendar-clock","href":"/user-guides/projects/dispatch-board"},{"title":"Read the project overview","icon":"file-lines","href":"/user-guides/projects/read-project-overview"},{"title":"Read project phases and tickets","icon":"layer-group","href":"/user-guides/projects/read-project-phases"},{"title":"Use phase and ticket action menus","icon":"ellipsis","href":"/user-guides/projects/use-phase-ticket-actions"},{"title":"Project Team and Onboarding Contacts","icon":"users","href":"/user-guides/projects/read-project-team"},{"title":"Edit the project goal and description","icon":"pen-to-square","href":"/user-guides/projects/edit-project-details"},{"title":"Manage project contacts and the client sponsor","icon":"address-book","href":"/user-guides/projects/manage-project-contacts"},{"title":"Read project updates","icon":"message","href":"/user-guides/projects/read-project-updates"},{"title":"Read project milestones","icon":"calendar","href":"/user-guides/projects/read-project-timeline"},{"title":"Read deliverables and download project files","icon":"file-arrow-down","href":"/user-guides/projects/read-project-deliverables"},{"title":"Create and manage project deliverables","icon":"list-check","href":"/user-guides/projects/manage-project-deliverables"},{"title":"Upload and share deliverable documents","icon":"file-arrow-up","href":"/user-guides/projects/manage-deliverable-documents"},{"title":"Write and share project updates","icon":"pen-to-square","href":"/user-guides/projects/write-project-updates"},{"title":"Create and manage project milestones","icon":"flag-checkered","href":"/user-guides/projects/manage-project-milestones"},{"title":"Project Calendar","icon":"calendar","href":"/user-guides/projects/calendar"},{"title":"Respond to project decisions and action items","icon":"list-check","href":"/user-guides/projects/respond-to-project-actions"},{"title":"Create and manage project decisions and action items","icon":"clipboard-list","href":"/user-guides/projects/manage-project-actions"},{"title":"Export a project to Excel","icon":"file-spreadsheet","href":"/user-guides/projects/export-project-to-excel"}]},{"group":"Dashboards","expanded":false,"pages":[{"title":"Dashboards","icon":"chart-mixed","href":"/user-guides/dashboards/index"},{"title":"Read and filter a dashboard","icon":"chart-mixed","href":"/user-guides/dashboards/read-a-dashboard"},{"title":"Understand dashboard exclusions","icon":"filter","href":"/user-guides/dashboards/understand-dashboard-exclusions"},{"title":"Open an external dashboard","icon":"chart-mixed","href":"/user-guides/dashboards/open-external-dashboard"},{"title":"Inspect tickets behind dashboard metrics","icon":"chart-mixed","href":"/user-guides/dashboards/inspect-dashboard-tickets"},{"title":"Export a dashboard to PDF","icon":"chart-mixed","href":"/user-guides/dashboards/export-dashboard"},{"title":"Create and edit a dashboard","icon":"chart-mixed","href":"/user-guides/dashboards/create-and-edit-dashboard"},{"title":"Manage dashboard settings and access","icon":"sliders","href":"/user-guides/dashboards/manage-dashboard-settings"},{"title":"Configure external dashboards","icon":"chart-mixed","href":"/user-guides/dashboards/configure-external-dashboards"},{"title":"Assign external dashboard URLs to companies","icon":"chart-mixed","href":"/user-guides/dashboards/assign-external-dashboard-company-urls"},{"title":"Configure dashboard exclusions","icon":"filter","href":"/user-guides/dashboards/configure-dashboard-exclusions"}]},{"group":"Documentation","expanded":false,"pages":[{"title":"Documentation","icon":"book","href":"/user-guides/documentation/index"},{"title":"Find and read shared documents","icon":"file-lines","href":"/user-guides/documentation/find-shared-documents"},{"title":"Use the Documentation Hub","icon":"grid-2","href":"/user-guides/documentation/resource-hub"},{"title":"Use shared passwords","icon":"key","href":"/user-guides/documentation/shared-passwords"},{"title":"View shared IT records and procedures","icon":"server","href":"/user-guides/documentation/view-it-records"},{"title":"Create and maintain portal documents","icon":"file-pen","href":"/user-guides/documentation/create-portal-documents"},{"title":"Add files and links to the Documentation Hub","icon":"grid-2","href":"/user-guides/documentation/add-files-and-links-to-hub"},{"title":"Suggest related guides on new tickets","icon":"book-open","href":"/user-guides/documentation/related-guides"}]},{"group":"Devices","expanded":false,"pages":[{"title":"Devices","icon":"computer","href":"/user-guides/devices/index"},{"title":"Find and export your devices","icon":"laptop","href":"/user-guides/devices/find-devices"},{"title":"Understand device details","icon":"computer","href":"/user-guides/devices/understand-device-details"},{"title":"Add and edit device records","icon":"laptop-medical","href":"/user-guides/devices/add-and-edit-devices"},{"title":"View networks and configurations","icon":"network-wired","href":"/user-guides/devices/view-networks-and-configurations"},{"title":"Track installed software","icon":"box-open","href":"/user-guides/devices/track-software"},{"title":"Find a Device by Its Approximate IP Location","icon":"location-dot","href":"/user-guides/devices/ip-location"},{"title":"Understand Device IP Location Results","icon":"map-location-dot","href":"/user-guides/devices/ip-location-accuracy-and-privacy"}]},{"group":"Backup","expanded":false,"pages":[{"title":"Backup","icon":"shield-halved","href":"/user-guides/backup/index"},{"title":"Read the Backup Dashboard","icon":"shield-halved","href":"/user-guides/backup/read-dashboard"},{"title":"Find device backups","icon":"shield-halved","href":"/user-guides/backup/find-device-backups"},{"title":"Read Microsoft 365 backups","icon":"shield-halved","href":"/user-guides/backup/read-microsoft-365-backups"},{"title":"Read Kaseya and Spanning backup health","icon":"shield-halved","href":"/user-guides/backup/read-saas-backup-health"},{"title":"Read backup activity and device details","icon":"shield-halved","href":"/user-guides/backup/read-backup-details"},{"title":"Review backup alerts","icon":"shield-halved","href":"/user-guides/backup/review-alerts"}]},{"group":"Security","expanded":false,"pages":[{"title":"Security","icon":"shield-halved","href":"/user-guides/security/index"},{"title":"Read the Security Dashboard","icon":"shield-halved","href":"/user-guides/security/read-dashboard"},{"title":"Read Cork security compliance events","icon":"shield-halved","href":"/user-guides/security/read-cork-events"},{"title":"Find and read vulnerabilities","icon":"shield-halved","href":"/user-guides/security/read-vulnerabilities"},{"title":"Add security findings to Planner","icon":"shield-halved","href":"/user-guides/security/add-to-planner"},{"title":"Add Cork findings to a meeting agenda","icon":"shield-halved","href":"/user-guides/security/add-to-meeting"},{"title":"Read Huntress security items","icon":"shield-halved","href":"/user-guides/security/read-huntress"},{"title":"Find security endpoints","icon":"shield-halved","href":"/user-guides/security/find-endpoints"},{"title":"Read security endpoint details","icon":"shield-halved","href":"/user-guides/security/read-endpoint-details"},{"title":"Read Acronis EDR incidents","icon":"shield-halved","href":"/user-guides/security/read-edr-incidents"},{"title":"Follow up on EDR incidents","icon":"shield-halved","href":"/user-guides/security/follow-up-edr-incidents"},{"title":"Read CyberHoot company summaries","icon":"shield-check","href":"/user-guides/security/read-cyberhoot-companies"},{"title":"Review HootPhish challenges","icon":"trophy","href":"/user-guides/security/read-hootphish-challenges"},{"title":"Read HootPhish participant results","icon":"users","href":"/user-guides/security/read-hootphish-participants"}]},{"group":"Reporting","expanded":false,"pages":[{"title":"Reporting","icon":"chart-pie","href":"/user-guides/reporting/index"},{"title":"Design reporting blocks with AI","icon":"wand-magic-sparkles","href":"/user-guides/reporting/design-ai-blocks"},{"title":"Present reports as slides","icon":"presentation-screen","href":"/user-guides/reporting/present-reports"},{"title":"Design custom reporting blocks","icon":"chart-column","href":"/user-guides/reporting/custom-blocks"},{"title":"Edit a report presentation","icon":"presentation-screen","href":"/user-guides/reporting/edit-presentation"},{"title":"Reports Imports","icon":"inbox","href":"/user-guides/reporting/email-imports"},{"title":"Industry trends and software standardization","icon":"industry","href":"/user-guides/reporting/industry-insights"}]},{"group":"Licensing","expanded":false,"pages":[{"title":"Licensing","icon":"key","href":"/user-guides/licensing/index"},{"title":"Set Up Pax8 for Subscriptions and Storefront","icon":"plug","href":"/user-guides/licensing/setup"}]},{"group":"Storefront","expanded":false,"pages":[{"title":"Storefront","icon":"store","href":"/user-guides/storefront/index"},{"title":"Review your subscriptions","icon":"layer-group","href":"/user-guides/storefront/view-subscriptions"},{"title":"Review Azure usage","icon":"cloud","href":"/user-guides/storefront/view-azure-usage"}]}]},{"group":"Overview \u0026 Planning","pages":[{"group":"Company Overview","expanded":false,"pages":[{"title":"Company overview","icon":"buildings","href":"/user-guides/company-overview/index"},{"title":"Read the Company overview","icon":"chart-simple","href":"/user-guides/company-overview/read-company-overview"}]},{"group":"Calendar","expanded":false,"pages":[{"title":"Calendar","icon":"calendar","href":"/user-guides/calendar/index"},{"title":"Find events in Calendar","icon":"calendar","href":"/user-guides/calendar/find-calendar-events"},{"title":"Filter Calendar events and layers","icon":"calendar","href":"/user-guides/calendar/filter-calendar-events"},{"title":"Find your upcoming and past meetings","icon":"calendar-check","href":"/user-guides/calendar/find-my-meetings"},{"title":"Find meetings in List View","icon":"list","href":"/user-guides/calendar/find-meetings-list"},{"title":"Read a meeting workspace","icon":"calendar-check","href":"/user-guides/calendar/read-meeting-workspace"},{"title":"Read meeting agenda items and linked records","icon":"list-check","href":"/user-guides/calendar/read-meeting-agenda"},{"title":"Recurring Meeting Booking","icon":"calendar-check","href":"/user-guides/calendar/recurring-meeting-booking"},{"title":"Meeting Pages","icon":"calendar-check","href":"/user-guides/calendar/meetings"},{"title":"Present and navigate a meeting agenda","icon":"presentation-screen","href":"/user-guides/calendar/presenting"},{"title":"Meeting summaries and wrap-up","icon":"envelope","href":"/user-guides/calendar/meeting-summaries"},{"title":"Configure Calendar defaults and work hours","icon":"calendar-days","href":"/user-guides/calendar/configure-calendar-defaults"},{"title":"Create and manage Calendar freeze windows","icon":"snowflake","href":"/user-guides/calendar/manage-freeze-windows"},{"title":"Understand Calendar freeze windows","icon":"snowflake","href":"/user-guides/calendar/understand-change-freezes"},{"title":"Configure the post-meeting workflow","icon":"sliders","href":"/user-guides/calendar/configure-post-meeting"},{"title":"Manage internal meeting survey questions","icon":"clipboard-question","href":"/user-guides/calendar/manage-meeting-survey-questions"},{"title":"Draft and send a meeting summary","icon":"envelope","href":"/user-guides/calendar/send-meeting-summary"},{"title":"Complete the internal meeting survey","icon":"clipboard-question","href":"/user-guides/calendar/complete-meeting-survey"},{"title":"Add and manage a meeting transcript","icon":"file-lines","href":"/user-guides/calendar/add-meeting-transcript"},{"title":"Account Notes and QBR Log","icon":"clipboard-list","href":"/user-guides/calendar/account-notes"},{"title":"Find and read account notes","icon":"clipboard-list","href":"/user-guides/calendar/read-account-notes"},{"title":"Create and update account notes","icon":"pen-to-square","href":"/user-guides/calendar/write-account-notes"}]},{"group":"Surveys","expanded":false,"pages":[{"title":"Surveys","icon":"chart-bar","href":"/user-guides/surveys/index"},{"title":"Complete a questionnaire","icon":"clipboard-question","href":"/user-guides/surveys/complete-a-survey"},{"title":"Respond to an NPS survey","icon":"star","href":"/user-guides/surveys/respond-to-nps"},{"title":"Rate a support experience","icon":"comment-smile","href":"/user-guides/surveys/rate-your-support"},{"title":"Find surveys and read questionnaire results","icon":"clipboard-list","href":"/user-guides/surveys/view-survey-results"},{"title":"Share a survey link","icon":"link","href":"/user-guides/surveys/share-a-survey-link"},{"title":"Read NPS analytics","icon":"chart-column","href":"/user-guides/surveys/read-nps-analytics"},{"title":"Read and export support satisfaction feedback","icon":"face-smile","href":"/user-guides/surveys/read-csat-feedback"},{"title":"Review low CSAT ratings","icon":"list-check","href":"/user-guides/surveys/review-low-csat-ratings"}]},{"group":"Goals","expanded":false,"pages":[{"title":"Goals and objectives","icon":"bullseye","href":"/user-guides/goals/index"},{"title":"Find and read goals","icon":"bullseye","href":"/user-guides/goals/read-goals"},{"title":"Create or update a goal","icon":"bullseye","href":"/user-guides/goals/create-and-update-goals"},{"title":"Update several goals or delete a goal","icon":"bullseye","href":"/user-guides/goals/bulk-update-and-delete"},{"title":"Connect goals to Planner and meetings","icon":"bullseye","href":"/user-guides/goals/link-to-planner-and-meetings"}]},{"group":"Notifications","expanded":false,"pages":[{"title":"Notifications","icon":"bell","href":"/user-guides/notifications/index"},{"title":"Read and manage notifications","icon":"bell","href":"/user-guides/notifications/read-notifications"},{"title":"Review automation approvals","icon":"check-to-slot","href":"/user-guides/notifications/review-approvals"}]},{"group":"Broadcasts","expanded":false,"pages":[{"title":"Broadcasts","icon":"tower-broadcast","href":"/user-guides/broadcasts/index"}]},{"group":"Planner","expanded":false,"pages":[{"title":"Planner","icon":"calendar-days","href":"/user-guides/planner/index"},{"title":"Read the Planner timeline","icon":"calendar-days","href":"/user-guides/planner/read-timeline"},{"title":"Filter the Planner timeline","icon":"filter","href":"/user-guides/planner/filter-timeline"},{"title":"Find Planner items in List View","icon":"list","href":"/user-guides/planner/find-planner-items"},{"title":"Find archived Planner work","icon":"box-archive","href":"/user-guides/planner/find-archived-items"},{"title":"Archive, restore or delete Planner items","icon":"box-archive","href":"/user-guides/planner/archive-restore-delete"},{"title":"Update several Planner items","icon":"box-archive","href":"/user-guides/planner/update-multiple-items"},{"title":"Read a Planner item","icon":"clipboard-list","href":"/user-guides/planner/read-item-details"},{"title":"Understand Planner types and budget categories","icon":"layer-group","href":"/user-guides/planner/understand-types"},{"title":"Manage Planner types and defaults","icon":"layer-group","href":"/user-guides/planner/manage-types"},{"title":"Delete or reassign Planner types","icon":"trash-can","href":"/user-guides/planner/retire-types"},{"title":"Open records linked to Planner work","icon":"link","href":"/user-guides/planner/read-linked-records"},{"title":"Ask Planner AI about planned work","icon":"sparkles","href":"/user-guides/planner/ask-planner-ai"},{"title":"Draft or change Planner items with AI","icon":"sparkles","href":"/user-guides/planner/draft-item-with-ai"},{"title":"Import PSA opportunities into Planner","icon":"file-import","href":"/user-guides/planner/import-opportunities"},{"title":"Understand PSA-linked Planner work","icon":"file-import","href":"/user-guides/planner/understand-psa-linked-items"},{"title":"Understand Standards work in Planner","icon":"list-check","href":"/user-guides/planner/understand-standards-items"},{"title":"Read and manage Planner files","icon":"paperclip","href":"/user-guides/planner/manage-files"},{"title":"Plan costs and hours","icon":"calculator","href":"/user-guides/planner/plan-costs-and-hours"},{"title":"Create and edit Planner items","icon":"pen-to-square","href":"/user-guides/planner/create-and-edit-items"},{"title":"Link supporting records to Planner items","icon":"link","href":"/user-guides/planner/link-supporting-records"},{"title":"Create and manage Planner templates","icon":"clone","href":"/user-guides/planner/manage-templates"},{"title":"Apply a template to a Planner item","icon":"list-check","href":"/user-guides/planner/apply-template-to-item"},{"title":"Create Planner items for multiple companies","icon":"buildings","href":"/user-guides/planner/apply-templates-to-companies"},{"title":"Read and export Planner Analytics","icon":"chart-simple","href":"/user-guides/planner/read-analytics"},{"title":"Understand Planner Analytics charts","icon":"chart-pie","href":"/user-guides/planner/understand-analytics-charts"}]},{"group":"Budgets","expanded":false,"pages":[{"title":"Budgets","icon":"calculator","href":"/user-guides/budgets/index"},{"title":"Create and edit a company budget","icon":"calculator","href":"/user-guides/budgets/create-and-edit-budgets"},{"title":"Duplicate a budget","icon":"copy","href":"/user-guides/budgets/duplicate-budget"},{"title":"Delete unwanted draft budgets","icon":"trash-can","href":"/user-guides/budgets/delete-budgets"},{"title":"Add and edit budget line items","icon":"list","href":"/user-guides/budgets/edit-line-items"},{"title":"Import budget line items from Excel","icon":"file-excel","href":"/user-guides/budgets/import-excel"},{"title":"Copy recurring costs from an earlier budget","icon":"clock-rotate-left","href":"/user-guides/budgets/import-previous-year"},{"title":"Add Planner, goal and product costs to a budget","icon":"list-check","href":"/user-guides/budgets/import-planning-and-products"},{"title":"Add Microsoft 365 licensing costs to a budget","icon":"key","href":"/user-guides/budgets/import-microsoft-365-licensing"},{"title":"Read and adjust a company budget forecast","icon":"chart-line","href":"/user-guides/budgets/read-budget-forecast"},{"title":"Sync a forecast from budgets or Planner","icon":"arrows-rotate","href":"/user-guides/budgets/sync-budget-forecast"},{"title":"Find and open a budget","icon":"magnifying-glass","href":"/user-guides/budgets/find-budgets"},{"title":"Read a budget overview","icon":"calculator","href":"/user-guides/budgets/read-budget"},{"title":"Arrange budget sections","icon":"arrow-down-wide-short","href":"/user-guides/budgets/arrange-budget-sections"},{"title":"Download or print a budget","icon":"file-export","href":"/user-guides/budgets/export-and-print-budgets"},{"title":"Read a budget monthly breakdown","icon":"calendar-days","href":"/user-guides/budgets/read-monthly-breakdown"},{"title":"Adjust a budget amount for one month","icon":"calendar-pen","href":"/user-guides/budgets/edit-monthly-overrides"},{"title":"Approve and Lock a Budget","icon":"lock","href":"/user-guides/budgets/approving-and-locking-budgets"},{"title":"Track Budget Actuals","icon":"chart-line","href":"/user-guides/budgets/tracking-budget-actuals"},{"title":"Resolve Actuals Exceptions","icon":"list-check","href":"/user-guides/budgets/resolving-actuals-exceptions"},{"title":"Find and understand budget products","icon":"box","href":"/user-guides/budgets/read-product-catalog"},{"title":"Create and edit budget products","icon":"box","href":"/user-guides/budgets/manage-products"},{"title":"Bulk edit and delete budget products","icon":"box","href":"/user-guides/budgets/bulk-edit-products"},{"title":"Create budget products from Planner","icon":"box","href":"/user-guides/budgets/import-products-from-planner"},{"title":"Import and link budget products from integrations","icon":"box","href":"/user-guides/budgets/import-products-from-integrations"}]},{"group":"Invoices","expanded":false,"pages":[{"title":"Invoices","icon":"file-invoice-dollar","href":"/user-guides/invoices/index"},{"title":"Find and review invoices","icon":"file-invoice","href":"/user-guides/invoices/view-invoices"},{"title":"Where invoice data comes from","icon":"file-invoice-dollar","href":"/msp-guides/invoices/invoice-data-sources"},{"title":"Download and export invoices","icon":"download","href":"/user-guides/invoices/download-invoices"},{"title":"Use an invoice payment link","icon":"credit-card","href":"/user-guides/invoices/pay-an-invoice"},{"title":"MSP: review Pax8 invoice charges","icon":"receipt","href":"/user-guides/invoices/view-pax8-invoices"}]},{"group":"Quotes","expanded":false,"pages":[{"title":"Quotes","icon":"file-contract","href":"/user-guides/quotes/index"},{"title":"Connect and manage Quoter","icon":"plug","href":"/user-guides/quotes/setup"},{"title":"Find and open a quote","icon":"file-contract","href":"/user-guides/quotes/view-quotes"},{"title":"Read a quote’s details","icon":"file-invoice-dollar","href":"/user-guides/quotes/read-quote-details"},{"title":"Download quote documents and export the list","icon":"file-arrow-down","href":"/user-guides/quotes/download-quotes"},{"title":"Control company quote access","icon":"user-shield","href":"/user-guides/quotes/manage-company-access"},{"title":"Troubleshoot missing Quoter quotes and company links","icon":"magnifying-glass","href":"/user-guides/quotes/troubleshoot-quoter-quotes"},{"title":"Troubleshoot QuoteWerks quotes and QuoteValet links","icon":"file-invoice-dollar","href":"/user-guides/quotes/troubleshoot-quotewerks-quotes"},{"title":"Troubleshoot Salesbuildr quotes and PDFs","icon":"file-invoice-dollar","href":"/user-guides/quotes/troubleshoot-salesbuildr-quotes"}]},{"group":"Agreements and contracts","expanded":false,"pages":[{"title":"Agreements and contracts","icon":"file-signature","href":"/user-guides/agreements/index"},{"title":"Find and review an agreement","icon":"file-contract","href":"/user-guides/agreements/view-agreements"},{"title":"Understand agreement balances","icon":"clock","href":"/user-guides/agreements/read-balances"},{"title":"Open an agreement PDF","icon":"file-pdf","href":"/user-guides/agreements/download-documents"},{"title":"Upload and manage agreement PDFs","icon":"file-arrow-up","href":"/user-guides/agreements/manage-documents"}]}]},{"group":"MSP Tools","pages":[{"title":"MSP Tools","icon":"toolbox","href":"/user-guides/msp-tools/index"},{"title":"Plan vCIO workload and pricing","href":"/user-guides/msp-tools/calculators"},{"group":"Client Success","expanded":false,"pages":[{"title":"Client Health","icon":"heart-pulse","href":"/user-guides/msp-tools/client-health"},{"title":"Find companies in Client Health","icon":"heart-pulse","href":"/user-guides/msp-tools/find-client-health"},{"title":"Read a company's health details","icon":"chart-line","href":"/user-guides/msp-tools/read-client-health-details"},{"title":"Understand Client Health scoring and evidence","icon":"scale-balanced","href":"/user-guides/msp-tools/understand-health-scoring"},{"title":"Manage manual Client Health risk flags","icon":"flag","href":"/user-guides/msp-tools/manage-client-risk-flags"},{"title":"Run a Traffic Light Review","icon":"traffic-light","href":"/user-guides/msp-tools/traffic-light-review"},{"title":"Refresh Client Health scores","icon":"arrows-rotate","href":"/user-guides/msp-tools/refresh-client-health"},{"title":"Financial Reporting","icon":"dollar-sign","href":"/user-guides/msp-tools/financial-reporting"},{"title":"Where Financial Reporting data comes from","icon":"magnifying-glass-dollar","href":"/msp-guides/msp-tools/financial-reporting-data-sources"},{"title":"Account Readiness","icon":"clipboard-check","href":"/user-guides/company-overview/audit"}]},{"group":"Standards","expanded":false,"pages":[{"title":"Standards","icon":"wrench","href":"/user-guides/msp-tools/standards"},{"title":"Read the Standards matrix","icon":"table-cells","href":"/user-guides/msp-tools/read-standards-matrix"},{"title":"Update a company's Standards deployments","icon":"circle-check","href":"/user-guides/msp-tools/update-standard-deployments"},{"title":"Update Standards in bulk","icon":"table-cells","href":"/user-guides/msp-tools/bulk-update-standards"},{"title":"Exclude or include companies in Standards","icon":"eye-slash","href":"/user-guides/msp-tools/manage-standards-exclusions"}]},{"title":"Ticket Trends","icon":"chart-line","href":"/user-guides/msp-tools/ticket-trends"}]},{"group":"Administration","pages":[{"group":"Settings","expanded":false,"pages":[{"title":"Settings overview","icon":"gear","href":"/user-guides/settings/index"},{"title":"Users \u0026 Roles","icon":"users","href":"/user-guides/settings/users-roles"},{"title":"Global Team Roles","icon":"users","href":"/user-guides/settings/global-team-roles"},{"title":"Change a Company user’s permissions","icon":"user-shield","href":"/user-guides/settings/change-company-user-permissions"},{"title":"Give a parent-company user access to child companies","sidebarTitle":"Parent-company access","icon":"sitemap","href":"/user-guides/settings/parent-company-access"},{"title":"Custom Fields","icon":"table-list","href":"/user-guides/settings/custom-fields"},{"title":"Companies Settings","icon":"building","href":"/user-guides/settings/companies"},{"title":"Project Settings","icon":"gear","href":"/user-guides/settings/projects"},{"title":"Training settings","icon":"graduation-cap","href":"/user-guides/settings/training"},{"title":"Ticket settings","icon":"ticket","href":"/user-guides/settings/tickets"},{"title":"Compliance Settings","icon":"shield-check","href":"/user-guides/settings/compliance"},{"title":"Schedule compliance assessments","icon":"calendar","href":"/user-guides/settings/compliance-schedules"},{"title":"Configure compliance scoring","icon":"sliders","href":"/user-guides/settings/compliance-scoring"},{"title":"Configure risk tracking and categories","icon":"shield-alert","href":"/user-guides/settings/compliance-risk"},{"title":"Playbook settings","icon":"book","href":"/user-guides/settings/playbooks"},{"title":"External Resources Settings","icon":"link","href":"/user-guides/settings/external"},{"title":"Onboarding Settings","icon":"clipboard-check","href":"/user-guides/settings/onboarding"},{"title":"Note templates","icon":"file-lines","href":"/user-guides/settings/templates"},{"title":"Email settings","icon":"envelope","href":"/user-guides/settings/email"},{"title":"Client Health scoring settings","icon":"heart-pulse","href":"/user-guides/settings/scoring"},{"title":"Traffic Light settings","icon":"traffic-light","href":"/user-guides/settings/traffic-light-settings"},{"title":"Manage the Standards catalog","icon":"wrench","href":"/user-guides/settings/standards"},{"title":"Configure Standards tiers and deployment options","icon":"layer-group","href":"/user-guides/settings/standards-tiers"},{"title":"Choose which Standards apply","icon":"filter","href":"/user-guides/settings/standards-applicability"},{"title":"Use PSA billing to answer Standards","icon":"tags","href":"/user-guides/settings/standards-sku-automation"},{"title":"Sync Standards to companies","icon":"arrows-rotate","href":"/user-guides/settings/sync-standards"},{"title":"Retire Standards definitions","icon":"trash-can","href":"/user-guides/settings/retire-standards"},{"title":"Financial Reporting Settings","icon":"dollar-sign","href":"/user-guides/settings/financial-reporting"},{"title":"Integrations Settings","icon":"plug","href":"/user-guides/settings/integrations"},{"title":"Integration Company Mapping","icon":"diagram-project","href":"/user-guides/settings/integration-company-mapping"},{"title":"Liongard Documentation Visibility","icon":"radar","href":"/user-guides/settings/liongard-visibility"},{"group":"Automation","expanded":false,"pages":[{"title":"Automation Rules","icon":"robot","href":"/user-guides/settings/automation/index"},{"title":"Rule Wizard Walkthrough","icon":"list-check","href":"/user-guides/settings/automation/wizard"},{"title":"Bundling Automation Matches","icon":"layer-group","href":"/user-guides/settings/automation/bundling"},{"title":"Example Automation Rules","icon":"book-open","href":"/user-guides/settings/automation/examples"}]},{"title":"Import and export data","icon":"file-import","href":"/user-guides/settings/import-export"},{"title":"Tenant Settings","icon":"building-columns","href":"/user-guides/settings/tenant"},{"title":"Billing settings","icon":"credit-card","href":"/user-guides/settings/billing"}]}]},{"group":"Connect your tools","pages":[{"group":"Integration setup","expanded":false,"pages":[{"group":"Overview, imports and sync","expanded":false,"pages":[{"title":"Integration setup guides","icon":"plug","href":"/user-guides/integrations/index"},{"title":"Integration troubleshooting","icon":"plug","href":"/user-guides/integrations/faq"},{"title":"Sync Schedules","href":"/user-guides/integrations/sync-schedules"},{"title":"Import Users","icon":"plug","href":"/user-guides/integrations/import-users"},{"title":"Import Companies","icon":"plug","href":"/user-guides/integrations/import-companies"},{"title":"Import Devices","icon":"server","href":"/user-guides/integrations/import-devices"},{"title":"Clear and Resync Integrations","icon":"plug","href":"/user-guides/integrations/clear-and-resync-integrations"},{"title":"Warranty Writeback to Hudu and IT Glue Flexible Assets","icon":"shield-halved","href":"/user-guides/integrations/documentation-warranty-writeback"},{"title":"Warranty Writeback to Autotask","icon":"arrows-rotate","href":"/user-guides/integrations/autotask-warranty-writeback"},{"title":"Warranty Writeback to IT Glue Configurations","icon":"arrows-rotate","href":"/user-guides/integrations/itglue-configuration-warranty-writeback"}]},{"group":"PSA and ticketing","expanded":false,"pages":[{"title":"Configure ConnectWise Manage Integration","icon":"plug","href":"/user-guides/integrations/enable-connectwise-integration"},{"title":"Configure ConnectWise Asio Integration","icon":"plug","href":"/user-guides/integrations/enable-connectwise-asio-integration"},{"title":"Resync ConnectWise PSA Settings","icon":"arrows-rotate","href":"/user-guides/integrations/connectwise-resync-psa-settings"},{"title":"Configure Autotask PSA Integration","icon":"plug","href":"/user-guides/integrations/enable-autotask-integration"},{"title":"Configure Halo PSA Integration","icon":"plug","href":"/user-guides/integrations/enable-halo-integration"},{"title":"Create Custom Halo PSA Role and API User","icon":"user-shield","href":"/user-guides/integrations/halo-psa-custom-role-and-user"},{"title":"Configure Syncro Integration","icon":"plug","href":"/user-guides/integrations/enable-syncro-integration"},{"title":"Configure NinjaOne Integration","icon":"plug","href":"/user-guides/integrations/enable-ninjaone-integration"},{"title":"Configure NinjaOne Ticketing Integration","icon":"ticket","href":"/user-guides/integrations/enable-ninjaone-ticketing-integration"}]},{"group":"RMM and networks","expanded":false,"pages":[{"title":"Configure Addigy Integration","icon":"apple","href":"/user-guides/integrations/enable-addigy-integration"},{"title":"Configure Datto RMM Integration","icon":"plug","href":"/user-guides/integrations/enable-datto-rmm-integration"},{"title":"Configure N-able N-central Integration","icon":"server","href":"/user-guides/integrations/enable-ncentral-integration"},{"title":"Configure Action1 Integration","icon":"plug","href":"/user-guides/integrations/enable-action1-integration"},{"title":"Configure Cisco Meraki Integration","icon":"network-wired","href":"/user-guides/integrations/enable-meraki-integration"},{"title":"Configure UniFi Console Integration","icon":"wifi","href":"/user-guides/integrations/enable-unifi-integration"},{"title":"Connect Domotz and Review Network Health","icon":"network-wired","href":"/user-guides/integrations/enable-domotz-integration"},{"title":"Configure Fortinet Integration","icon":"plug","href":"/user-guides/integrations/enable-fortinet-integration"},{"title":"Neo Agent Compatibility","icon":"robot","href":"/user-guides/integrations/neo-agent"},{"title":"Connect Auvik and review network data","icon":"plug","href":"/user-guides/integrations/enable-auvik-integration"},{"title":"Provide LogicMonitor API access","icon":"plug","href":"/user-guides/integrations/enable-logicmonitor-integration"},{"title":"Connect WatchGuard Cloud","icon":"plug","href":"/user-guides/integrations/enable-watchguard-integration"}]},{"group":"Security and training","expanded":false,"pages":[{"title":"Configure Cork Integration","icon":"shield-halved","href":"/user-guides/integrations/enable-cork-integration"},{"title":"Configure Huntress Integration","icon":"shield-dog","href":"/user-guides/integrations/enable-huntress-integration"},{"title":"Configure Wirespeed Integration","icon":"shield-halved","href":"/user-guides/integrations/enable-wirespeed-integration"},{"title":"Configure Petra Security Integration","icon":"plug","href":"/user-guides/integrations/enable-petra-integration"},{"title":"Configure Bitdefender GravityZone Integration","icon":"plug","href":"/user-guides/integrations/enable-bitdefender-integration"},{"title":"Configure RoboShadow Integration","icon":"plug","href":"/user-guides/integrations/enable-roboshadow-integration"},{"title":"Configure Cyrisma Integration","icon":"plug","href":"/user-guides/integrations/enable-cyrisma-integration"},{"title":"Configure ScoutDNS Integration","icon":"plug","href":"/user-guides/integrations/enable-scoutdns-integration"},{"title":"Configure Breach Secure Now Integration","icon":"shield-halved","href":"/user-guides/integrations/enable-breach-secure-now-integration"},{"title":"Configure Phin Security Integration","icon":"shield-halved","href":"/user-guides/integrations/enable-phin-integration"},{"title":"Connect Phished.io","icon":"shield-halved","href":"/user-guides/integrations/enable-phished-integration"},{"title":"Configure CyberHoot Integration","icon":"graduation-cap","href":"/user-guides/integrations/enable-cyberhoot-integration"},{"title":"Connect Avanan and map customer tenants","icon":"plug","href":"/user-guides/integrations/enable-avanan-integration"},{"title":"Provide Blackpoint Cyber API access","icon":"plug","href":"/user-guides/integrations/enable-blackpoint-cyber-integration"},{"title":"Provide Cisco Umbrella API access","icon":"plug","href":"/user-guides/integrations/enable-cisco-umbrella-integration"},{"title":"Connect DNSFilter and map organizations","icon":"plug","href":"/user-guides/integrations/enable-dnsfilter-integration"},{"title":"Provide Mimecast API access","icon":"plug","href":"/user-guides/integrations/enable-mimecast-integration"},{"title":"Connect ThreatMate and map customers","icon":"plug","href":"/user-guides/integrations/enable-threatmate-integration"},{"title":"Provide VulScan API access","icon":"plug","href":"/user-guides/integrations/enable-vulscan-integration"}]},{"group":"Backup","expanded":false,"pages":[{"title":"Configure Cove Backup Integration","icon":"database","href":"/user-guides/integrations/enable-cove-backup-integration"},{"title":"Configure Acronis Cyber Protect Integration","icon":"cloud-arrow-down","href":"/user-guides/integrations/enable-acronis-integration"},{"title":"Configure Spanning Backup Integration","icon":"cloud-arrow-up","href":"/user-guides/integrations/enable-spanning-integration"},{"title":"Configure Kaseya SaaS Protection Integration","icon":"database","href":"/user-guides/integrations/enable-kaseya-saas-protection-integration"},{"title":"Connect Datto Backup","icon":"plug","href":"/user-guides/integrations/enable-datto-backup-integration"},{"title":"Connect NinjaOne SaaS Backup","icon":"plug","href":"/user-guides/integrations/enable-ninjaone-saas-backup-integration"},{"title":"Connect Slide Backup","icon":"plug","href":"/user-guides/integrations/enable-slide-integration"}]},{"group":"Documentation and client portals","expanded":false,"pages":[{"title":"Configure Hudu Integration","icon":"book","href":"/user-guides/integrations/enable-hudu-integration"},{"title":"Configure IT Glue Integration","icon":"book","href":"/user-guides/integrations/enable-itglue-integration"},{"title":"Sync IT Glue Document Folders","icon":"shield-halved","href":"/user-guides/integrations/itglue-sync-folders"},{"title":"Configure Liongard Integration","icon":"magnifying-glass-chart","href":"/user-guides/integrations/enable-liongard-integration"},{"title":"Configure CloudRadial Integration","icon":"cloud","href":"/user-guides/integrations/enable-cloudradial-integration"}]},{"group":"Cloud and domains","expanded":false,"pages":[{"title":"Connect rollout companies to Microsoft 365","sidebarTitle":"Connect rollout companies to Microsoft 365","icon":"cloud","href":"/user-guides/getting-started/onboarding/company-m365"},{"title":"Connect Google Workspace","description":"Connect each client to their Google Workspace tenant to sync users, groups, licenses, domains, and a daily security posture score","icon":"google","href":"/user-guides/integrations/enable-google-workspace-integration"},{"title":"Configure CIPP Integration","icon":"cloud","href":"/user-guides/integrations/enable-cipp-integration"},{"title":"Configure Pax8 Integration","description":"Connect your Pax8 distributor account to MSPortal.ai to sync subscriptions, products, and usage from the Pax8 Marketplace","icon":"boxes-stacked","href":"/user-guides/integrations/enable-pax8-integration"},{"title":"Set Up Pax8 for Subscriptions and Storefront","icon":"plug","href":"/user-guides/licensing/setup"},{"title":"Configure Sherweb Integration","icon":"cloud","href":"/user-guides/integrations/enable-sherweb-integration"},{"title":"Configure Adobe Enterprise Integration","icon":"file-pdf","href":"/user-guides/integrations/enable-adobe-enterprise-integration"},{"title":"Provide Intermedia Partner API access","icon":"plug","href":"/user-guides/integrations/enable-intermedia-integration"},{"title":"Configure DNSimple Integration","icon":"globe","href":"/user-guides/integrations/enable-dnsimple-integration"},{"title":"Configure Cloudflare Integration","icon":"plug","href":"/user-guides/integrations/enable-cloudflare-integration"},{"title":"Provide Ingram Micro API access","icon":"plug","href":"/user-guides/integrations/enable-ingram-micro-integration"},{"title":"Provide TD SYNNEX API access","icon":"plug","href":"/user-guides/integrations/enable-td-synnex-integration"}]},{"group":"Sales, payments and scheduling","expanded":false,"pages":[{"title":"Connect and manage Quoter","icon":"plug","href":"/user-guides/quotes/setup"},{"title":"Troubleshoot missing Quoter quotes and company links","icon":"magnifying-glass","href":"/user-guides/quotes/troubleshoot-quoter-quotes"},{"title":"Configure QuoteWerks Integration","icon":"file-invoice-dollar","href":"/user-guides/integrations/enable-quotewerks-integration"},{"title":"Map QuoteWerks customers to companies","icon":"file-invoice-dollar","href":"/user-guides/integrations/map-quotewerks-customers"},{"title":"Troubleshoot QuoteWerks quotes and QuoteValet links","icon":"file-invoice-dollar","href":"/user-guides/quotes/troubleshoot-quotewerks-quotes"},{"title":"Configure Salesbuildr Integration","icon":"file-invoice-dollar","href":"/user-guides/integrations/enable-salesbuildr-integration"},{"title":"Map Salesbuildr companies for quote access","icon":"file-invoice-dollar","href":"/user-guides/integrations/map-salesbuildr-companies"},{"title":"Troubleshoot Salesbuildr quotes and PDFs","icon":"file-invoice-dollar","href":"/user-guides/quotes/troubleshoot-salesbuildr-quotes"},{"title":"Configure Benji Pays Integration","icon":"credit-card","href":"/user-guides/integrations/enable-benjipays-integration"},{"title":"Configure TimeZest Integration","icon":"calendar-clock","href":"/user-guides/integrations/enable-timezest-integration"},{"title":"Configure Simplesat Integration","icon":"face-smile","href":"/user-guides/integrations/enable-simplesat-integration"},{"title":"Configure Microsoft Teams Integration","icon":"microsoft","href":"/user-guides/integrations/enable-teams-integration"},{"title":"Provide CrewHu API access","icon":"plug","href":"/user-guides/integrations/enable-crewhu-integration"},{"title":"Connect Fellow meeting notes","icon":"plug","href":"/user-guides/integrations/enable-fellow-integration"}]}]}]}]},{"tab":"API Reference","pages":[{"title":"API Reference","href":"/api-reference/budgets/list-budgets"}]},{"tab":"Release Notes","pages":[{"title":"Release Notes","href":"/release-notes"}]}]},"title":"Configure CIPP Integration - MSPortal.ai Documentation","buildId":"dpl_9DauxEjb9gzCtcuhPQFbquJvx7FJ","deploymentId":"dpl_9DauxEjb9gzCtcuhPQFbquJvx7FJ","dynamics":["07c022d89b","a74be98ba7"],"chunks":["Frame-DpBmNN95.js","DynamicMarkdown-BY_qDhTn.js","zoom-image-lightbox-D4WcYaf4.js","PlusIcon-CwhPVjTe.js","lightbox-handle-r17bVUz3.js"]}