

The Tickets interface adapts based on your PSA integration (ConnectWise, Halo PSA, Autotask, or Syncro). Some features and field names may vary depending on your connected PSA system.
Accessing Tickets
- Click Tickets in the sidebar
- The ticket list displays all tickets for the selected company
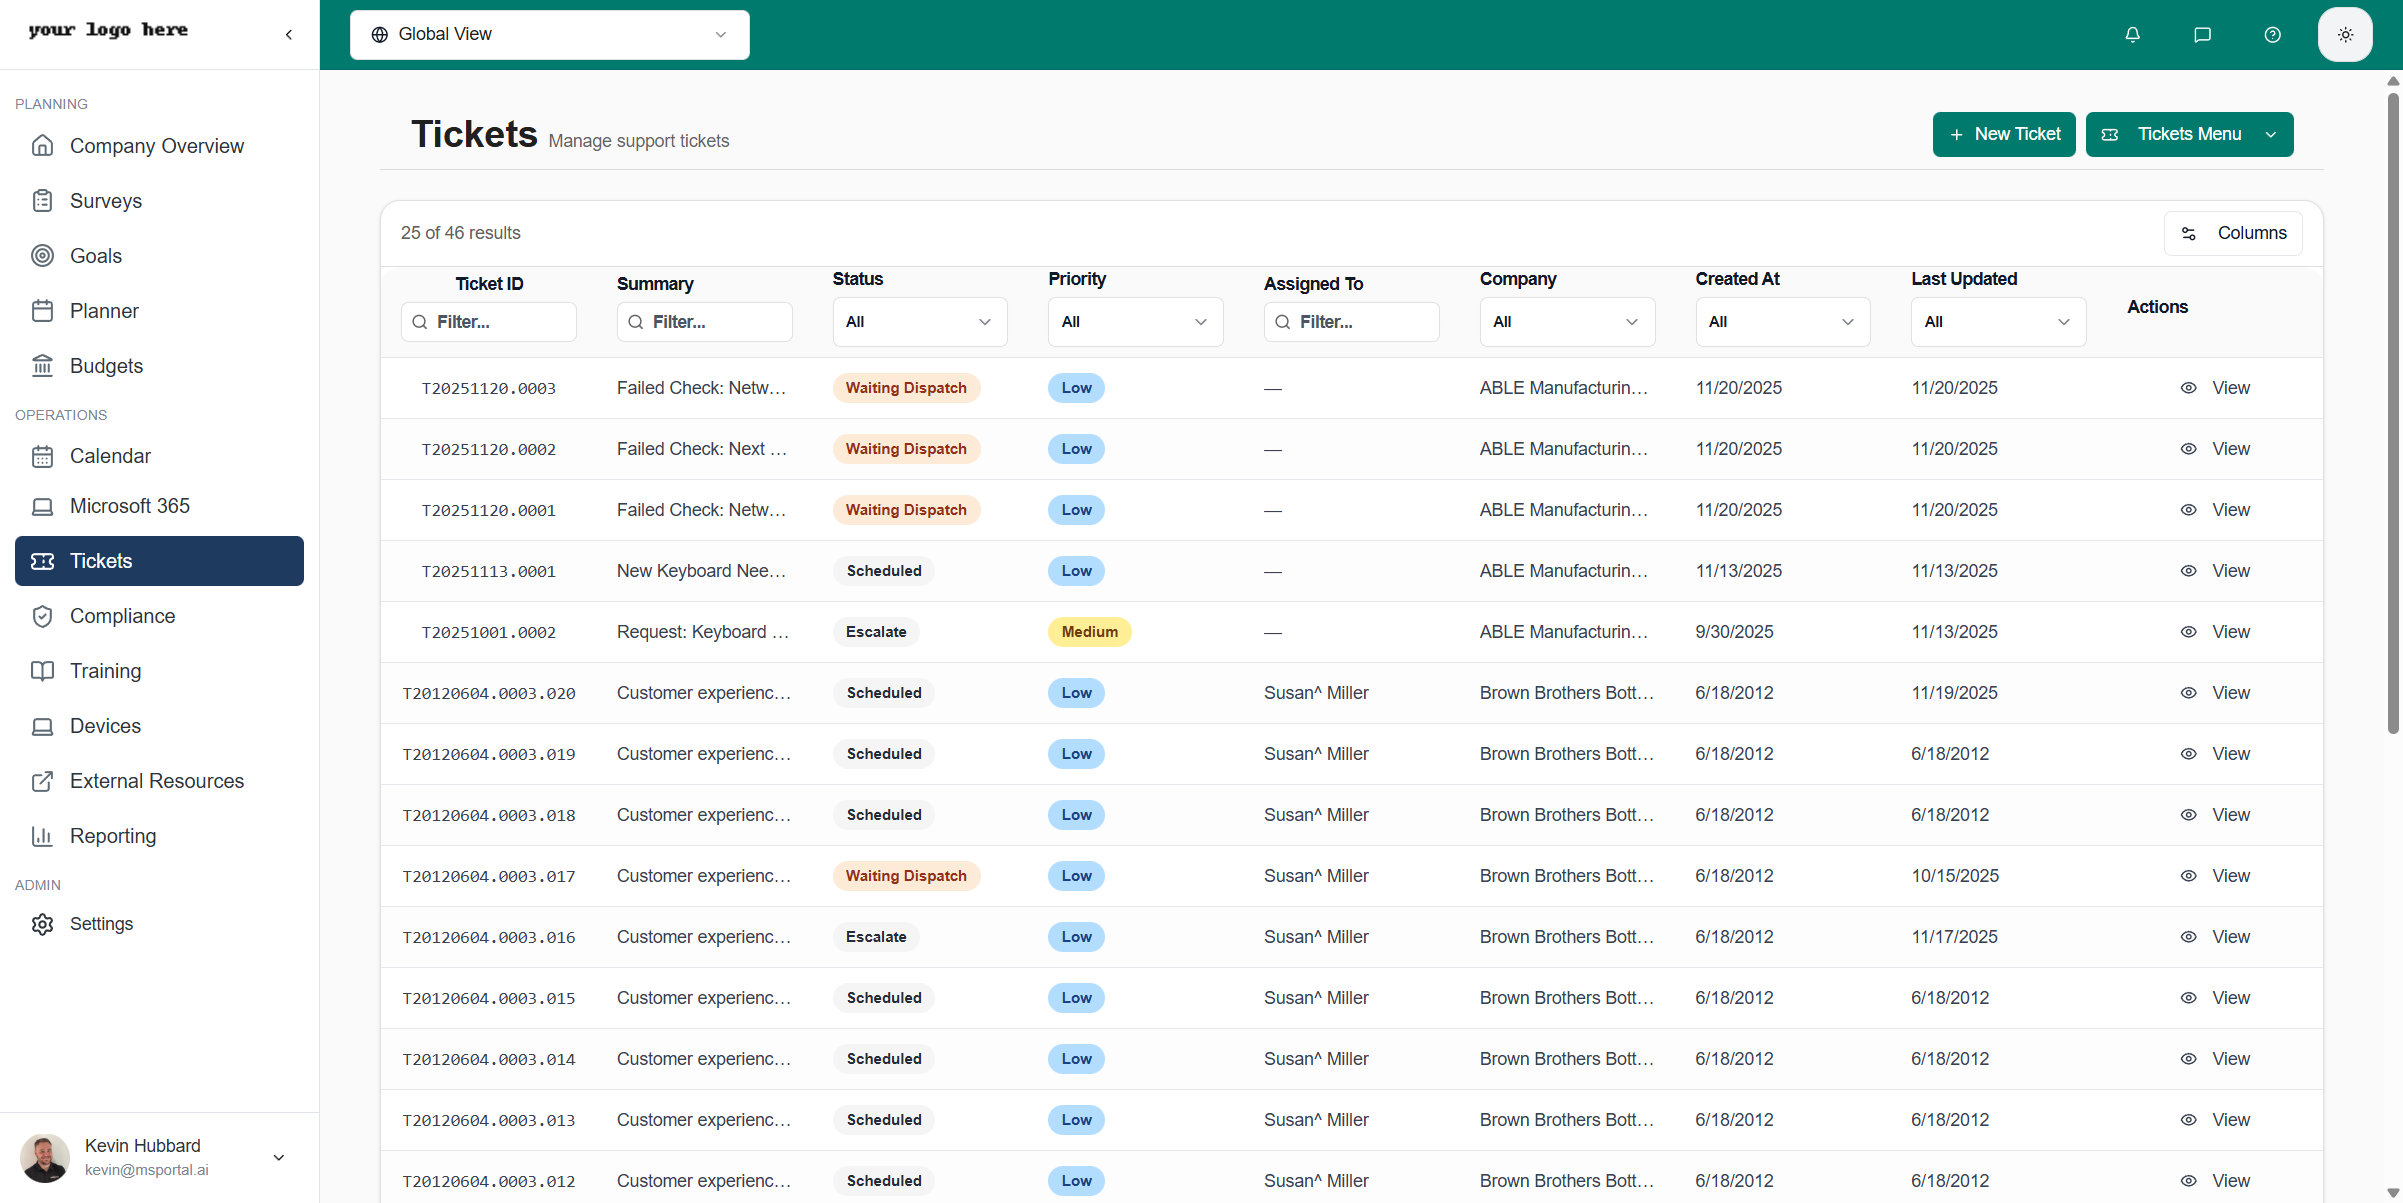
Tickets List
The ticket list displays essential information at a glance, including ticket numbers, summaries, status, priority, assigned technicians, and timestamps. Each row is color-coded by status and priority to help you quickly identify urgent issues.Menu Options
Click the Tickets Menu dropdown to switch between views: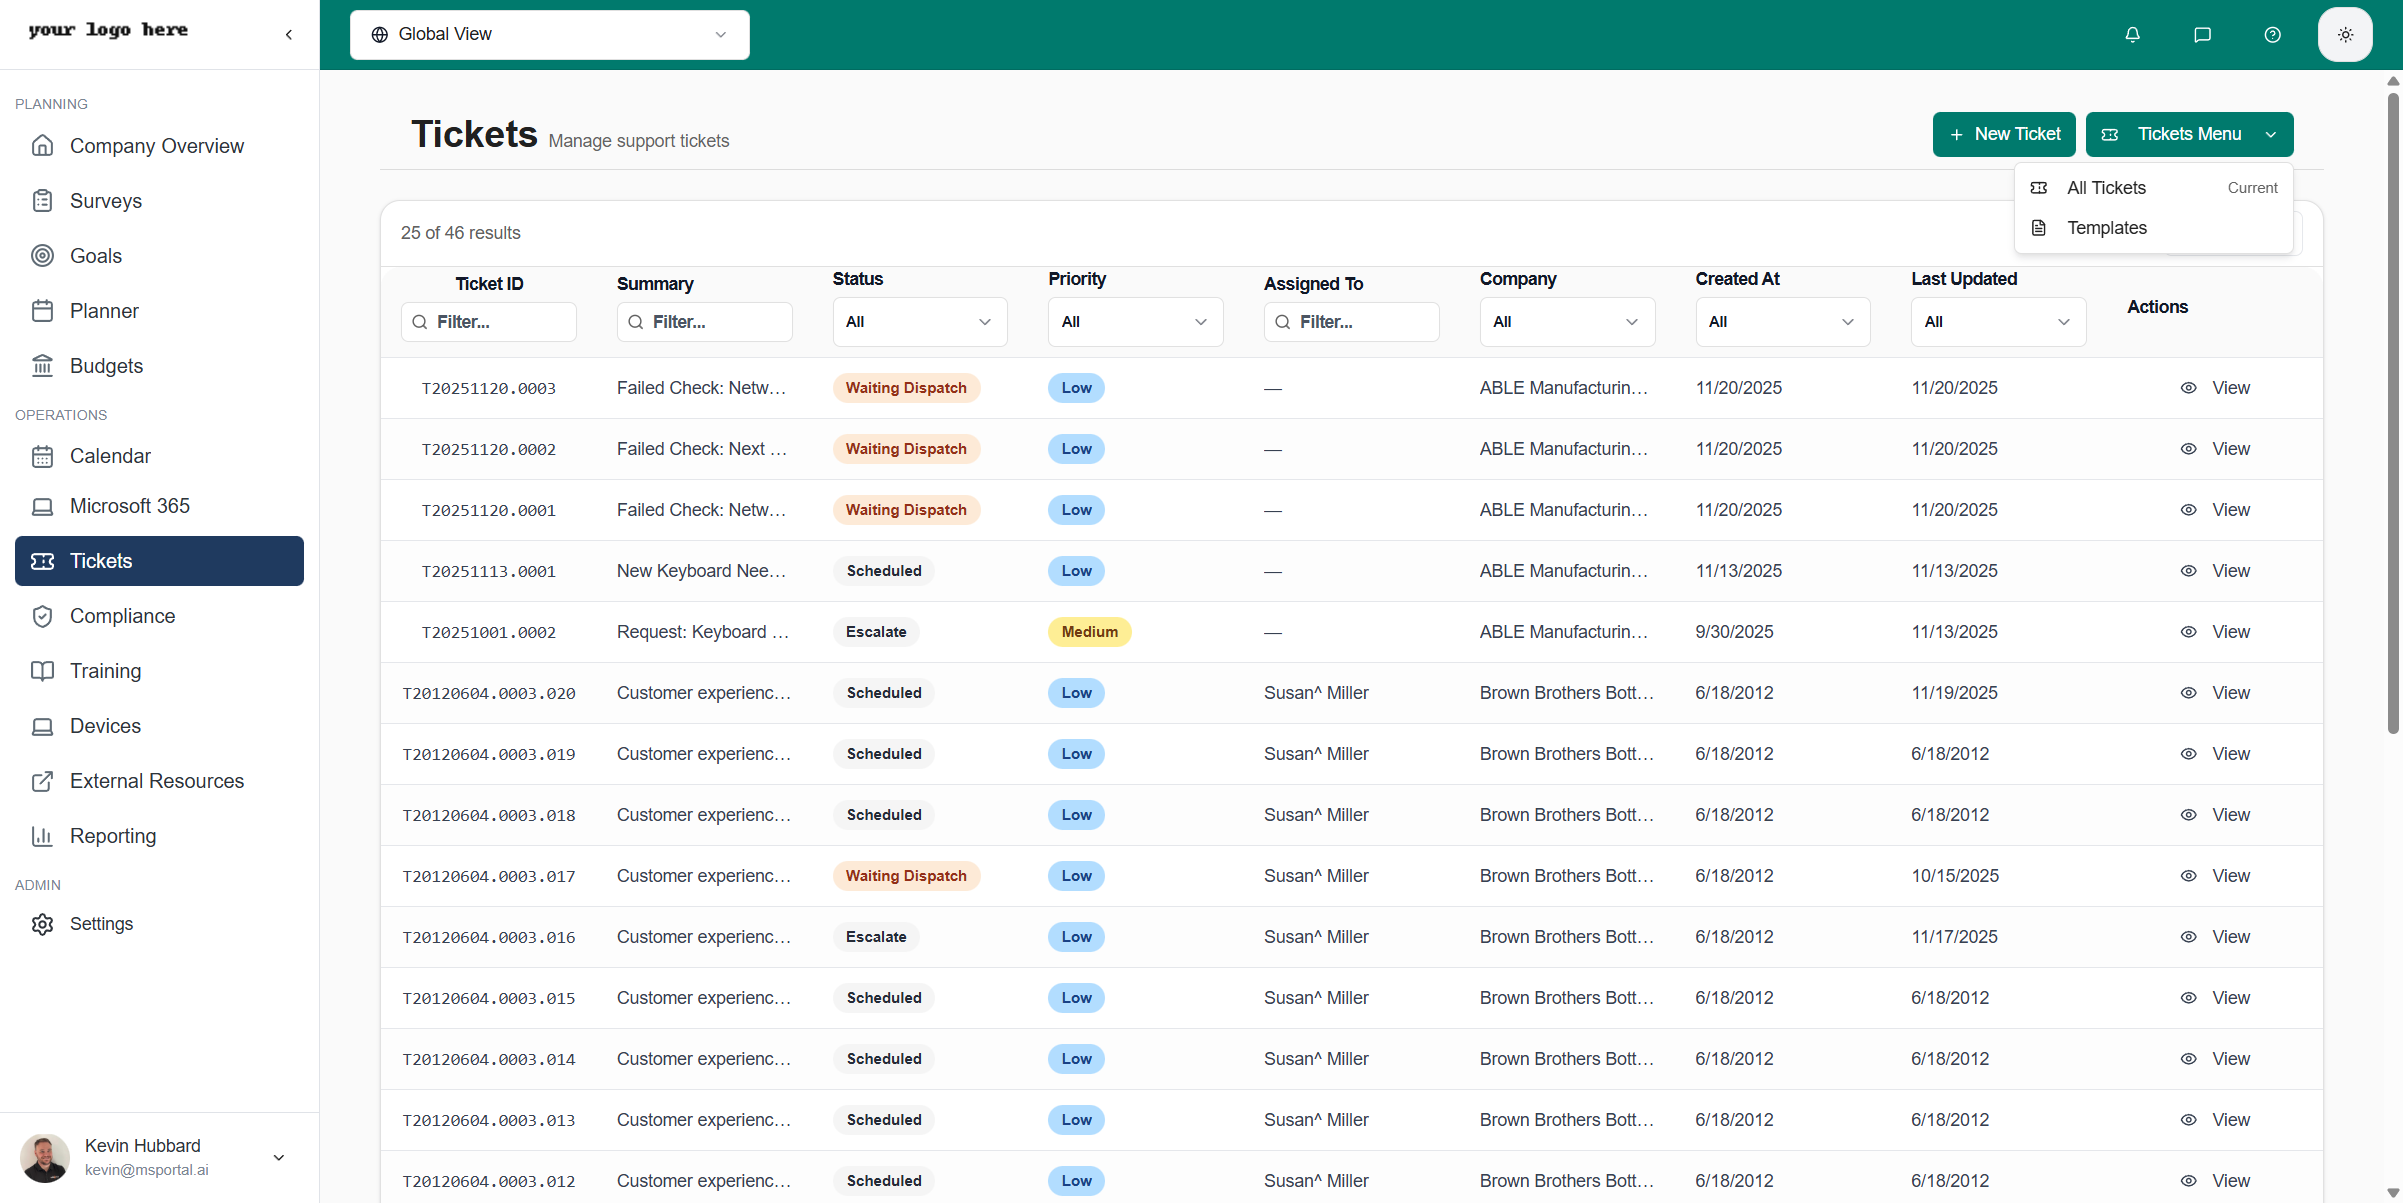
Filtering Tickets
The filter bar provides powerful search and filtering capabilities to help you find specific tickets quickly:Column Preferences
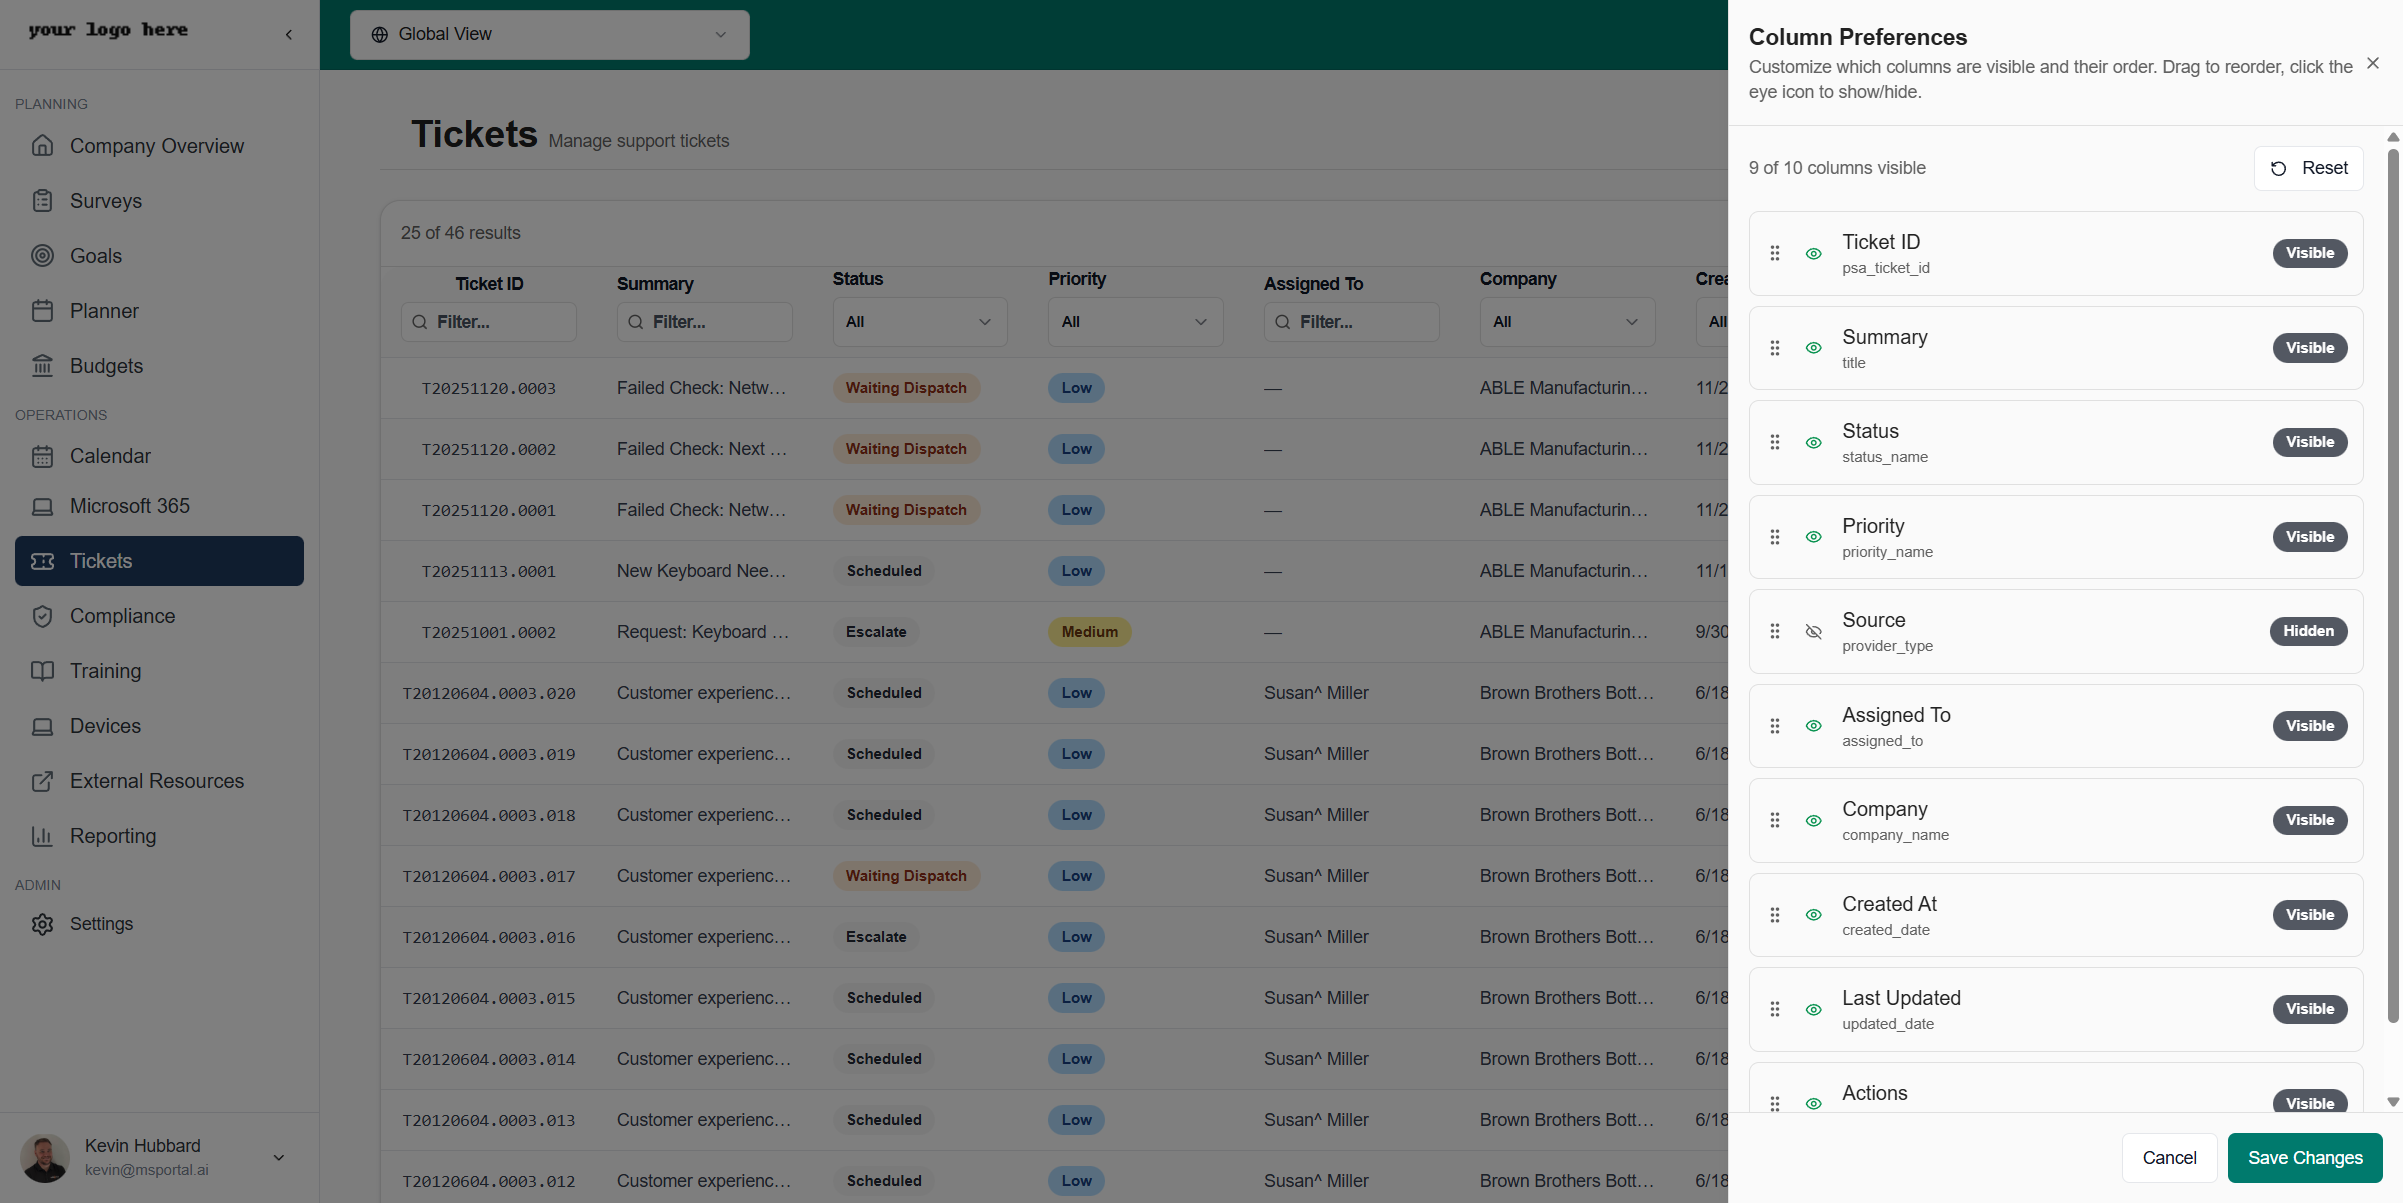
Customize which columns display in the tickets table to match your workflow:1
Click Columns Button
Click the Columns button in the toolbar above the ticket list
2
Toggle Visibility
Use the eye icons next to each column name to show or hide columns. Hidden columns are grayed out
3
Reorder Columns
Drag columns using the grip handle on the left side to reorder them according to your preference
Pagination
For organizations with many tickets, the list uses server-side pagination to ensure fast loading times. Navigation controls at the bottom of the list let you:- Jump to the first or last page
- Navigate to the next or previous page
- See your current position (e.g., “Page 2 of 15, 367 total tickets”)
Creating a New Ticket
Start with the AI Assistant on Home and follow How to open a ticket. The form workflow below is an alternative.Using the New Ticket form instead
1
Click New Ticket
Click the New Ticket button in the top right corner of the tickets page
2
Use AI Assistant (Optional)
Describe the issue in natural language in the AI Assistant panel. You can type or use voice input to dictate the issue
3
Select Template
Choose a template from the dropdown to pre-fill the form with appropriate fields, or let AI select the best template based on your description
4
Fill Details
Complete the required fields in each section. AI-populated fields are highlighted and can be edited if needed
5
Submit
Click Create Ticket to submit the ticket to your PSA system
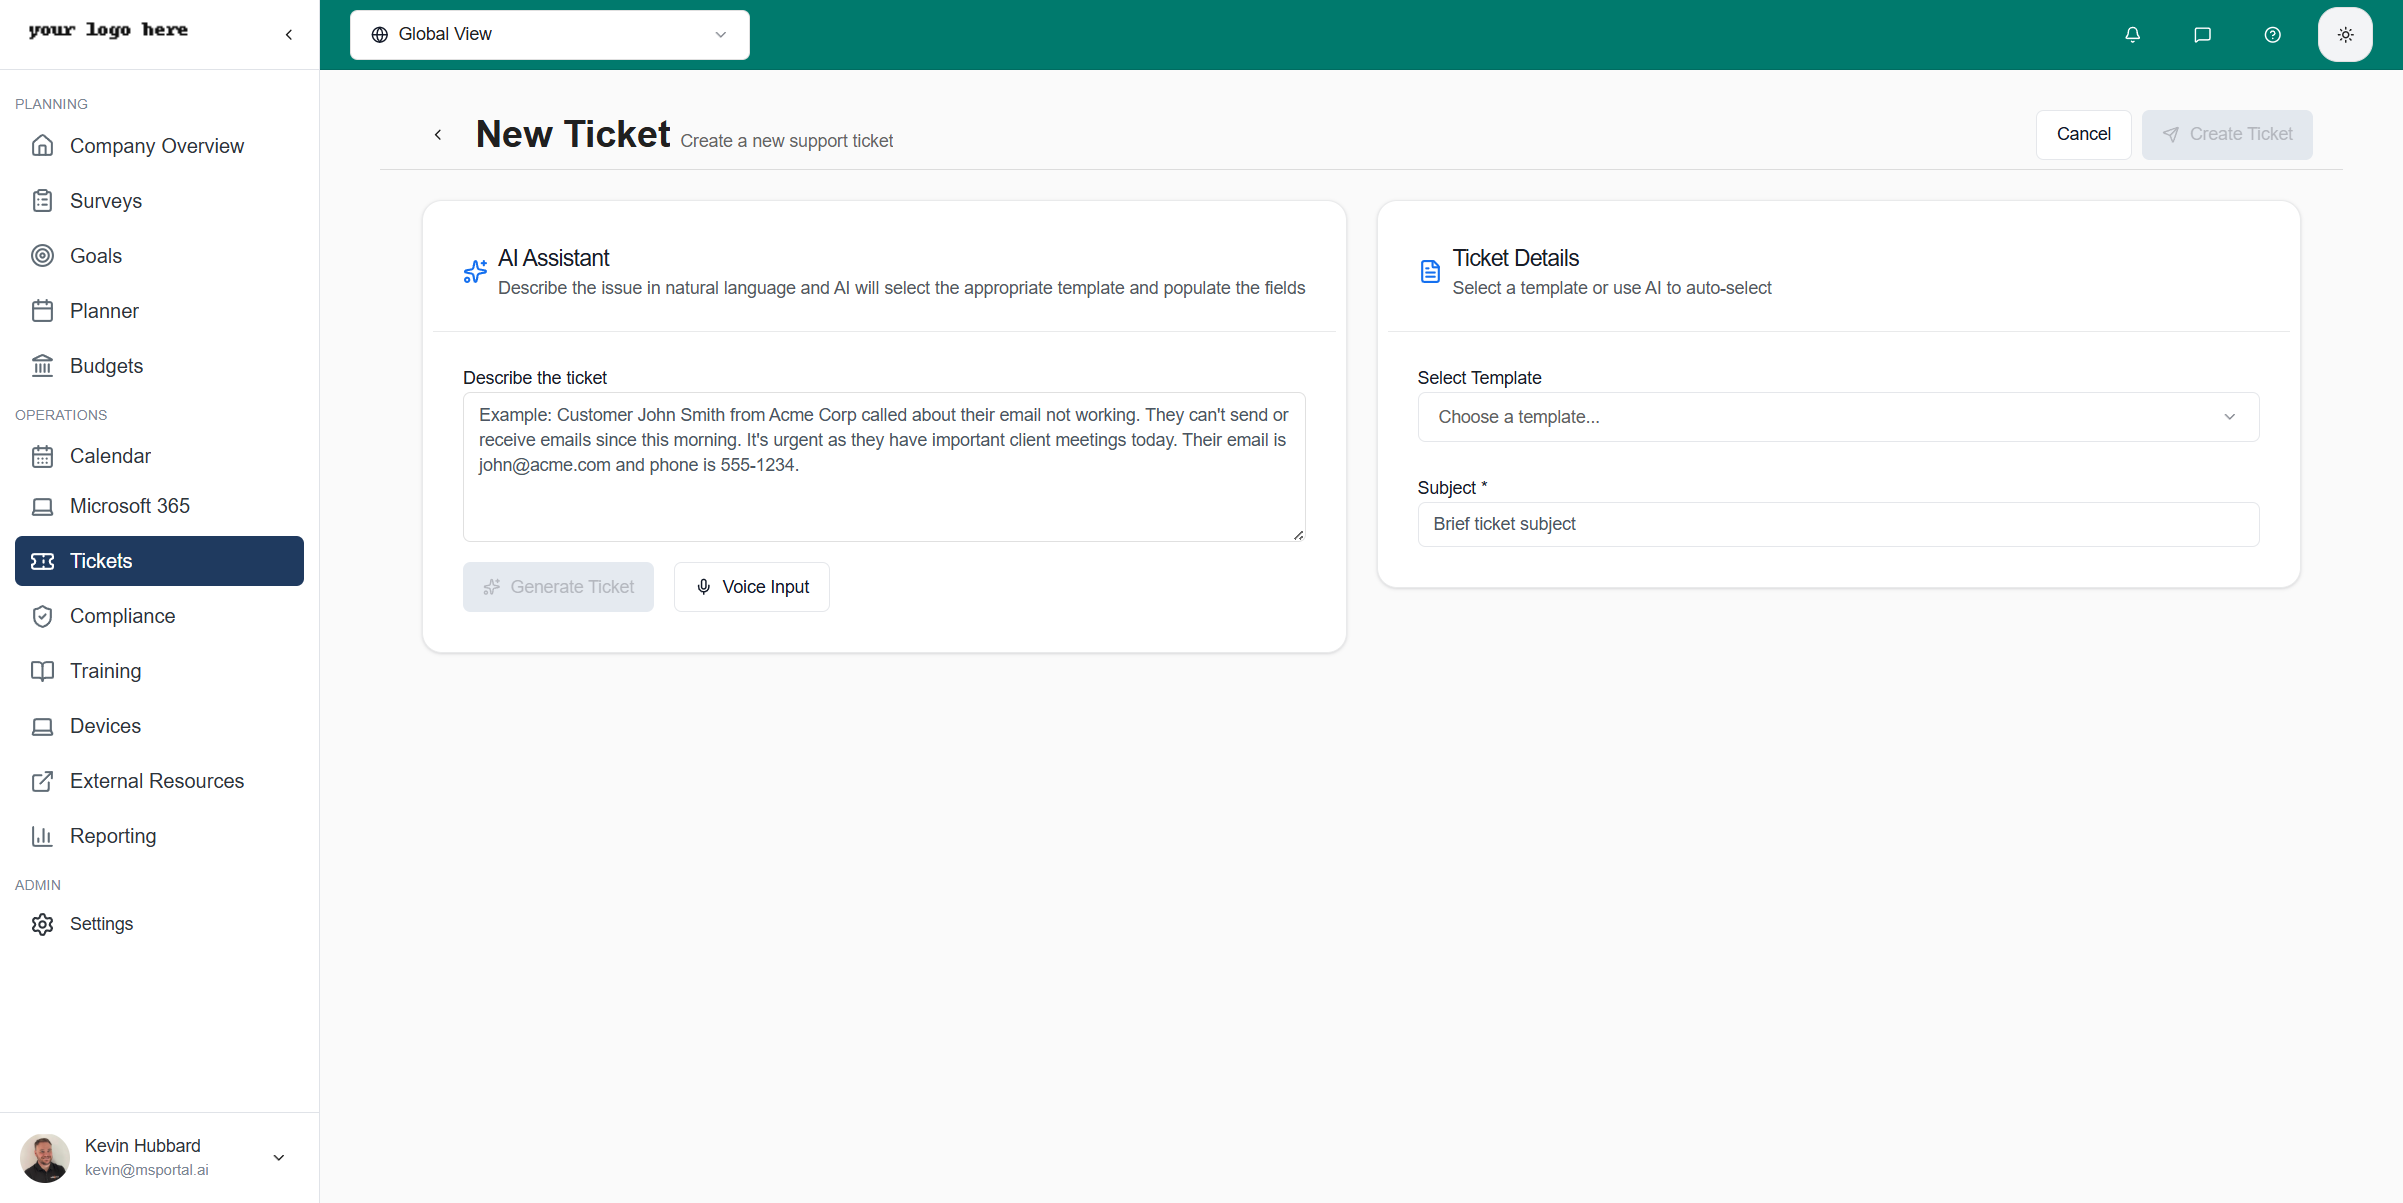
- Left Panel: AI Assistant for natural language ticket creation
- Right Panel: Template selection and field entry
AI Assistant
The AI Assistant revolutionizes ticket creation by understanding natural language descriptions and automatically populating form fields:
After AI generates the ticket details, you’ll see a summary showing:
- Fields filled: Which fields were automatically populated
- Required fields remaining: Any mandatory fields you still need to complete
- Optional fields available: Additional fields you can fill in if needed
- Follow-up questions: Suggested questions to gather more information
Using Templates
Templates provide pre-configured forms for common ticket types, ensuring consistency and capturing all necessary information: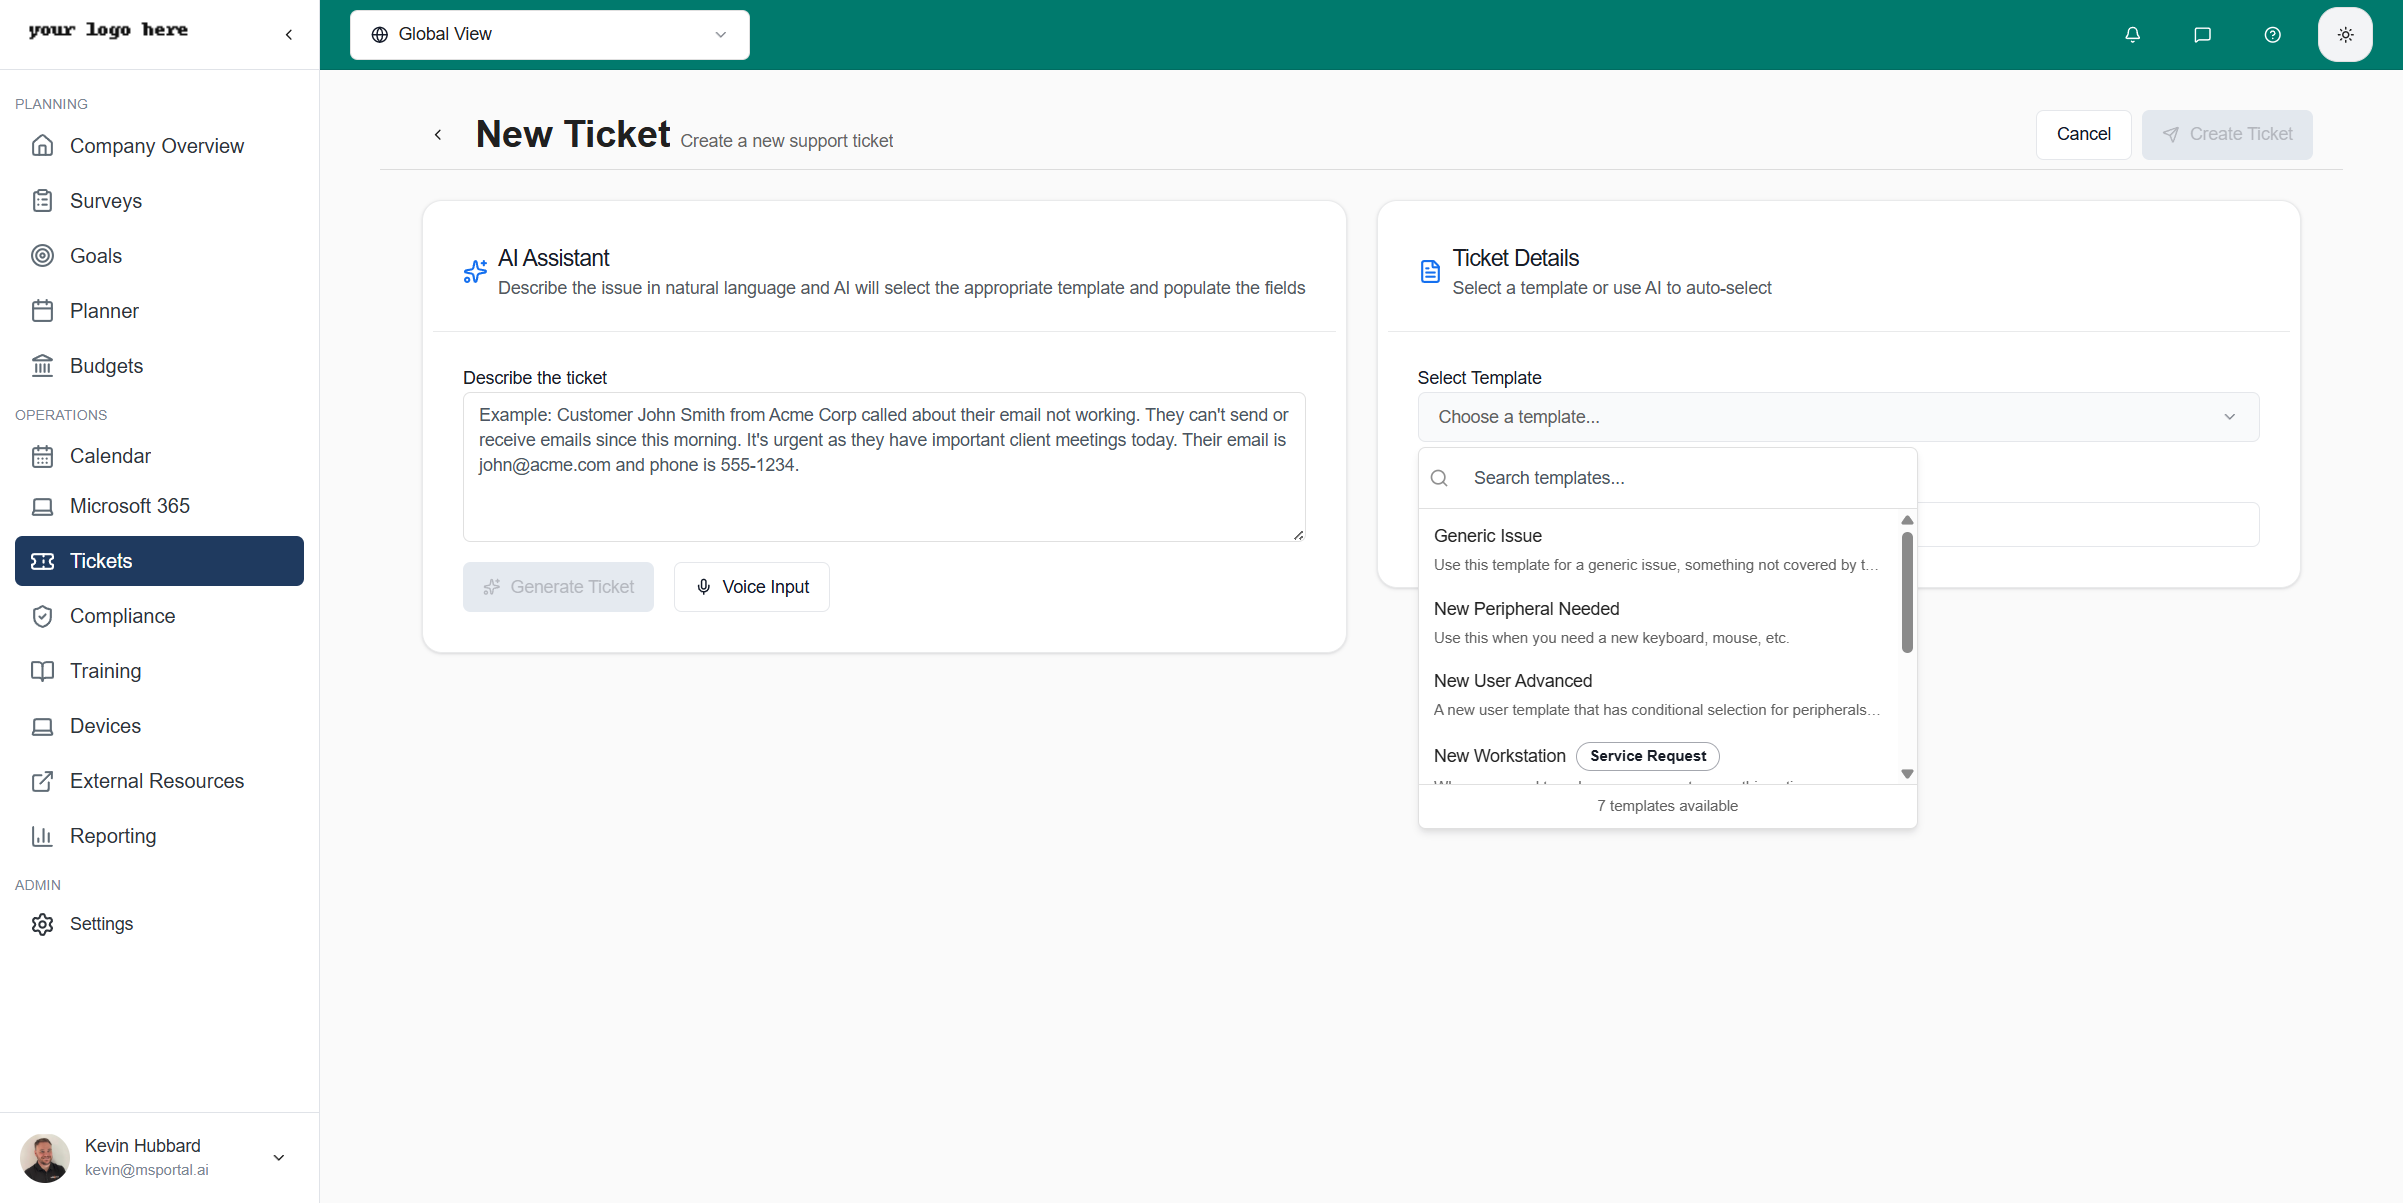
1
Click Template Dropdown
Select the Template dropdown in the ticket form header
2
Browse or Search
Browse templates by category or use the search box to find a specific template. Templates are organized by category for easy navigation
3
Select Template
Click a template to load its fields. Common templates include “Generic Issue”, “New User Setup”, “Hardware Request”, “Password Reset”, etc.
4
Complete Fields
Fill in the template-specific fields. Fields are organized into logical tabs for easy navigation
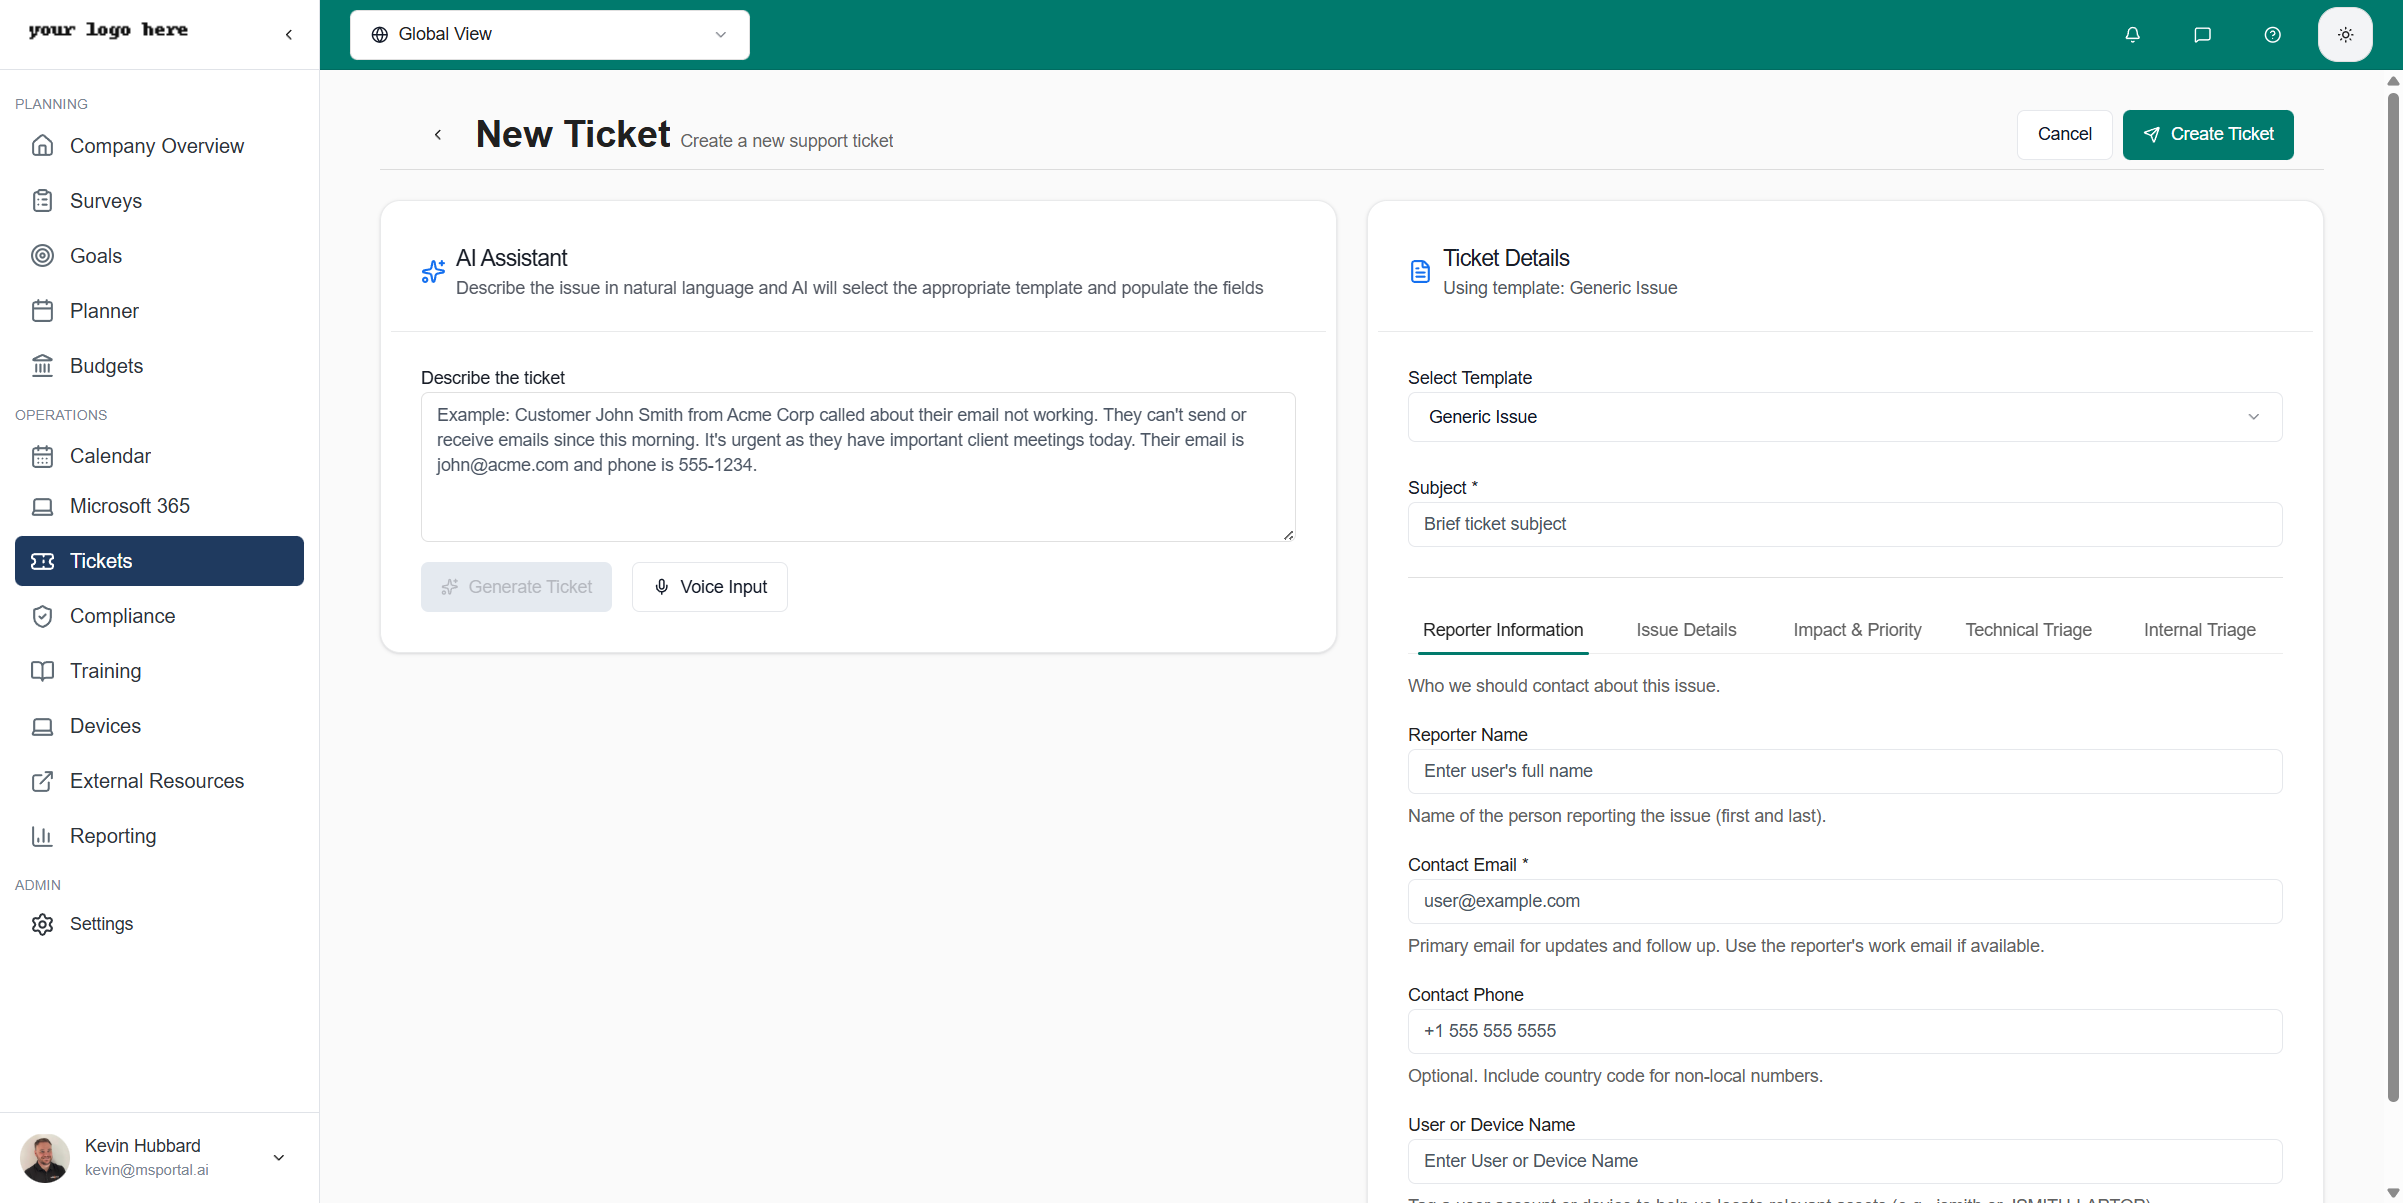
- Reporter Information - Contact name, email, phone number, and preferred contact method
- Issue Details - Problem description, symptoms, error messages, and screenshots
- Impact & Priority - Number of users affected, business impact, and urgency level
- Technical Triage - Diagnostic information, troubleshooting steps already taken, and device details
- Internal Triage - Internal notes, routing preferences, and team assignments
Required fields are marked with an asterisk (*). The Create Ticket button remains disabled until all required fields are completed.
Attaching Files
You can attach files to tickets during creation:- Screenshots captured directly in the form using the screenshot field
- File uploads for logs, documents, or other supporting materials
- Maximum 5 files, each up to 50MB
Viewing Ticket Details
Click any ticket row in the list to open the detail view in a slide-out panel: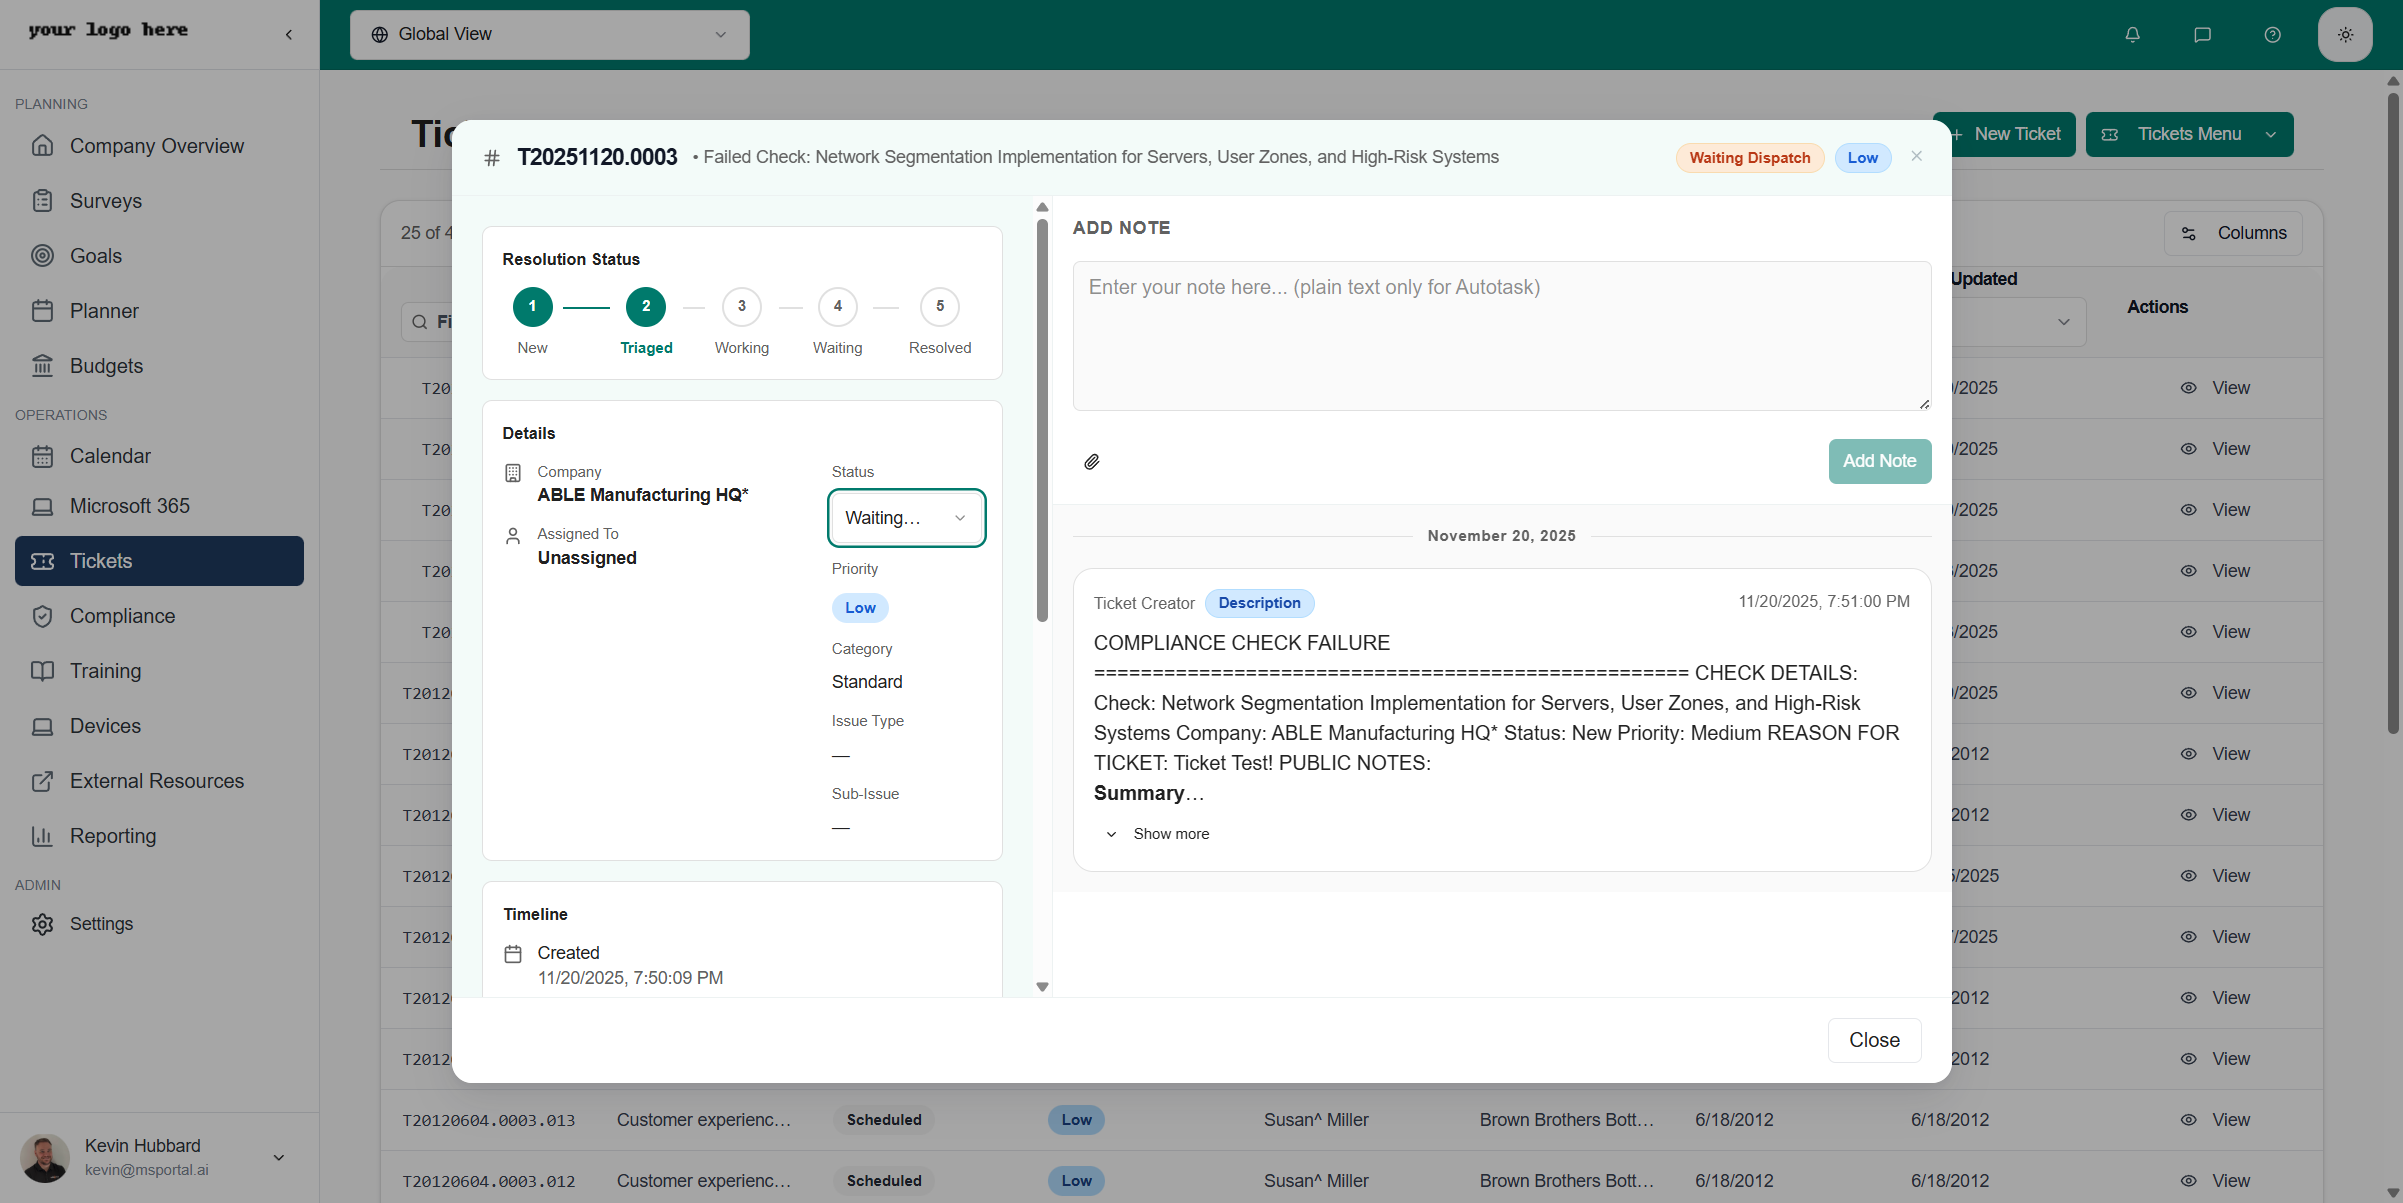
- Left Column: Ticket information, status, and PSA-specific details
- Right Column: Activity timeline and note composer
Detail Sections
Changing Ticket Status
If you have edit permissions, you can update the ticket status directly from the detail panel:- Click the Status dropdown in the ticket details section
- Select the new status from the available options
- The change syncs automatically to your PSA system
Available status options depend on your PSA configuration and the ticket’s current board or queue. Some workflows may restrict which status transitions are allowed.
Adding Notes
To add a note or update to a ticket:1
Open Ticket
Click the ticket row to open the detail panel
2
Write Your Note
Use the rich text editor at the top of the right column to compose your note. The editor supports formatting like bold, italic, and bullet lists
3
Attach Files (Optional)
Click the attachment icon to upload supporting files. Files are attached to both the note in MSPortal and synced to your PSA
4
Save Note
Click Save Note to post the update. The note appears immediately in the activity timeline and syncs to your PSA
Activity Log
The Activity section provides a complete history of ticket interactions:- Notes: All communication and updates added by technicians
- Status Changes: Audit trail of status transitions with timestamps
- Initial Description: The original ticket description appears as the first entry in the timeline
Readability Controls
Three controls in the ticket detail modal make long activity feeds easier to read, especially for tickets with rich PSA-formatted notes or extensive history.Attachments
For tickets with attachments, click the Attachments button in the header to view and download files:- See all attached documents and their file sizes
- Click to download individual files
- Attachments sync bidirectionally with your PSA system
Managing Templates
Templates are the foundation of structured ticket creation. They define what information is captured and how it maps to your PSA system.Accessing Templates
1
Open Tickets Menu
Click the Tickets Menu dropdown in the page header
2
Select Templates
Choose Templates from the menu to open the template management page
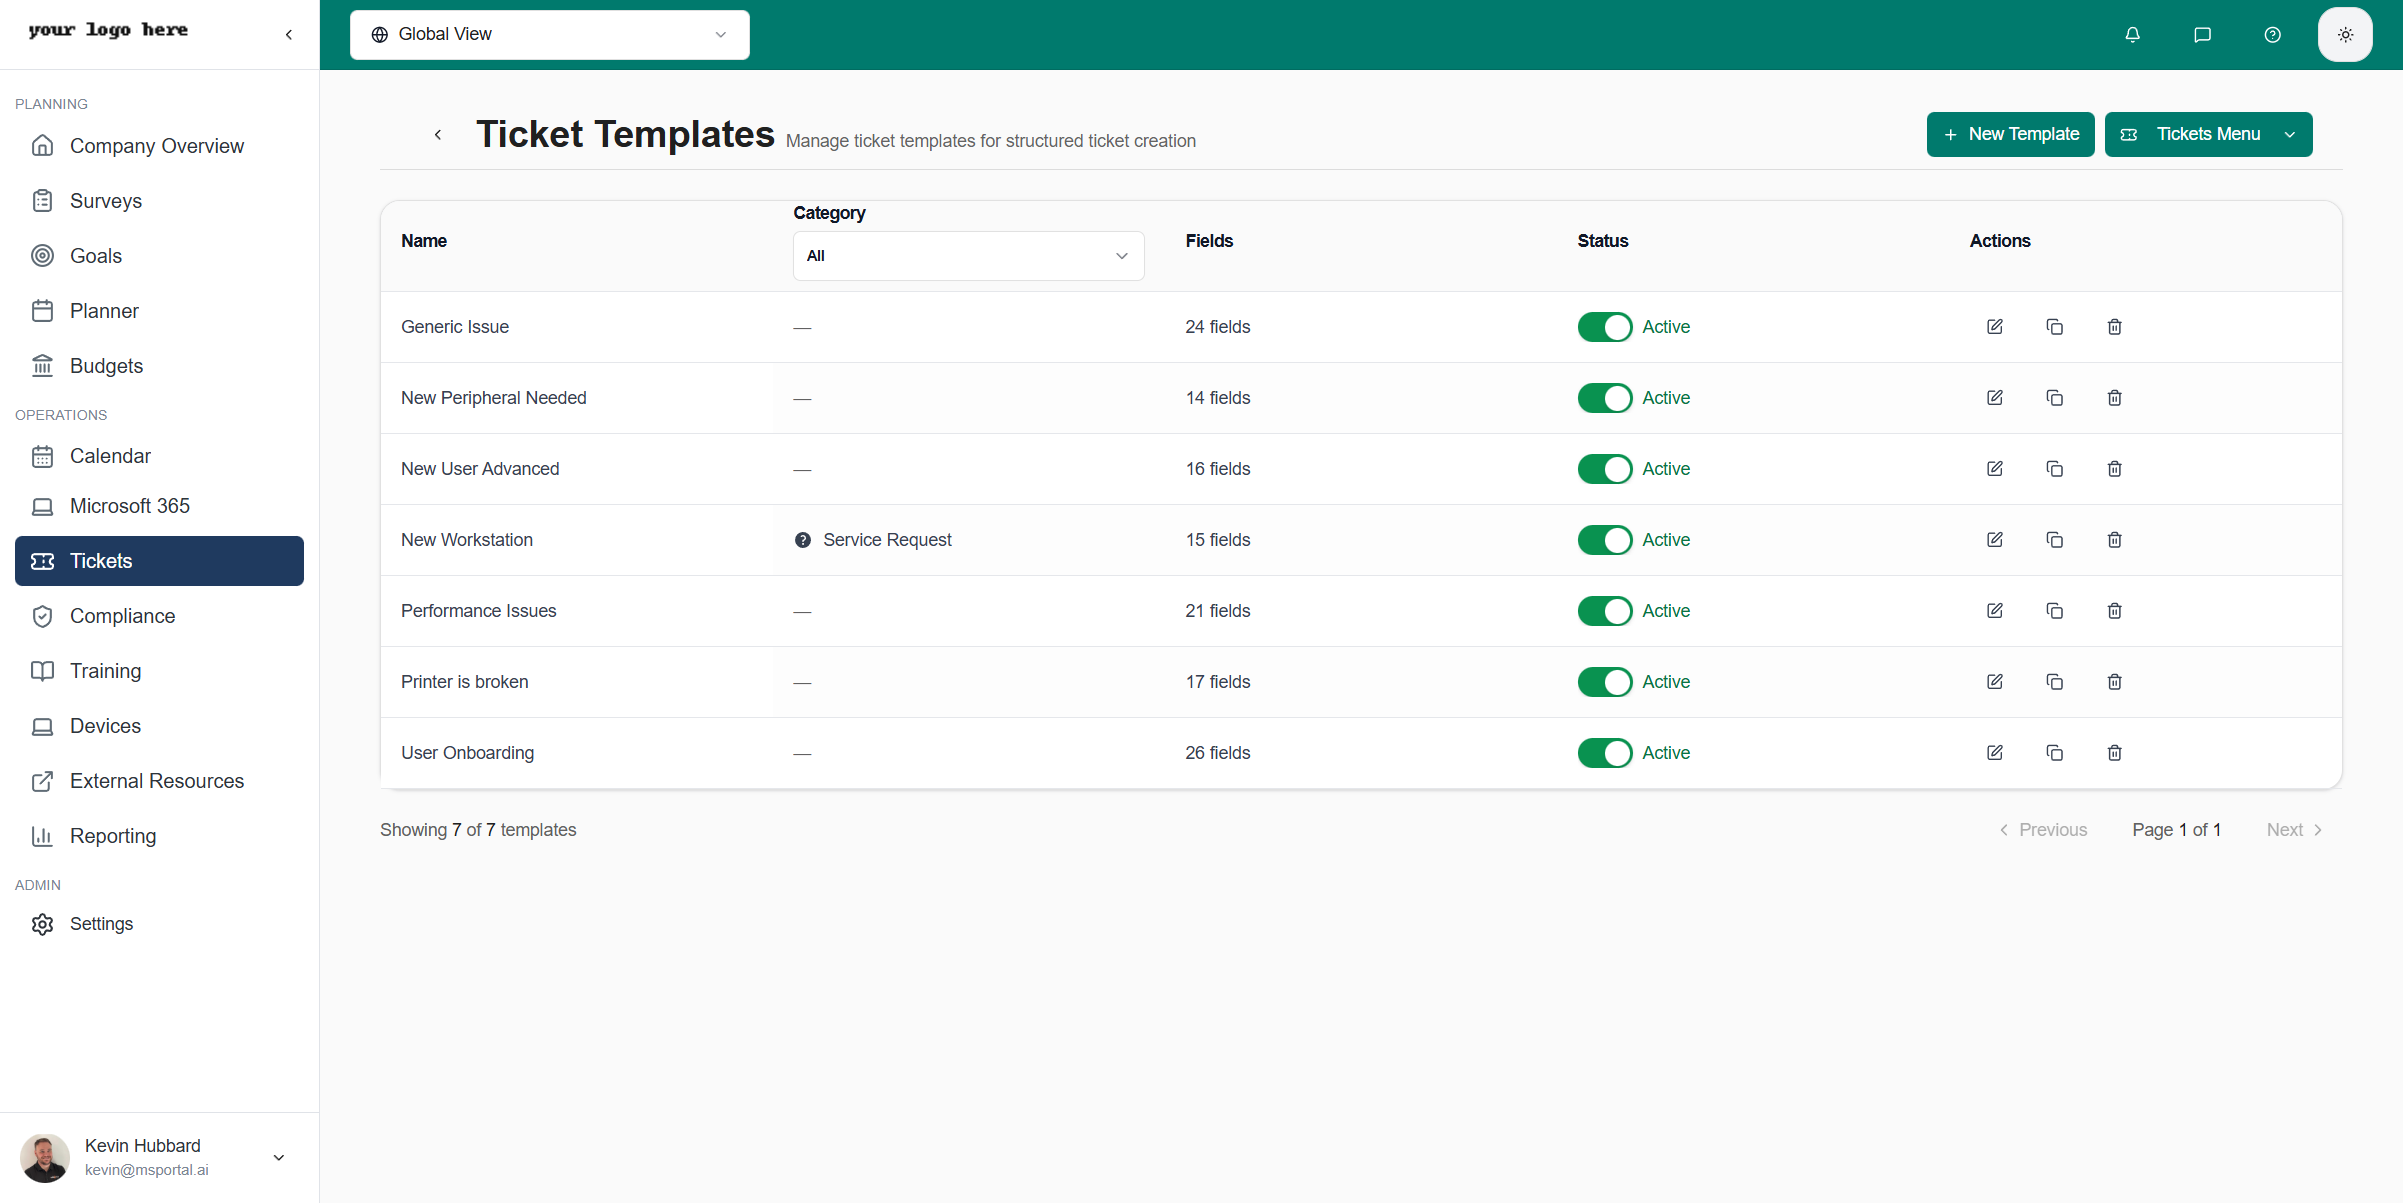
Template List
The templates list displays all your ticket templates with key information:Creating a Template
1
Click New Template
Click the New Template button in the top right corner
2
Enter Basic Details
Provide a descriptive name, select a category, and add a description explaining when to use this template
3
Add Sections
Create sections to organize related fields. Each section becomes a tab in the ticket creation form
4
Add Fields
Add fields to each section. Configure field type, label, placeholder text, and whether the field is required
5
Configure PSA Mapping
Map template fields to corresponding fields in your PSA system to ensure data syncs correctly
6
Save
Click Save Template to save your work. Toggle the Active switch to make it available for use
Template Editor
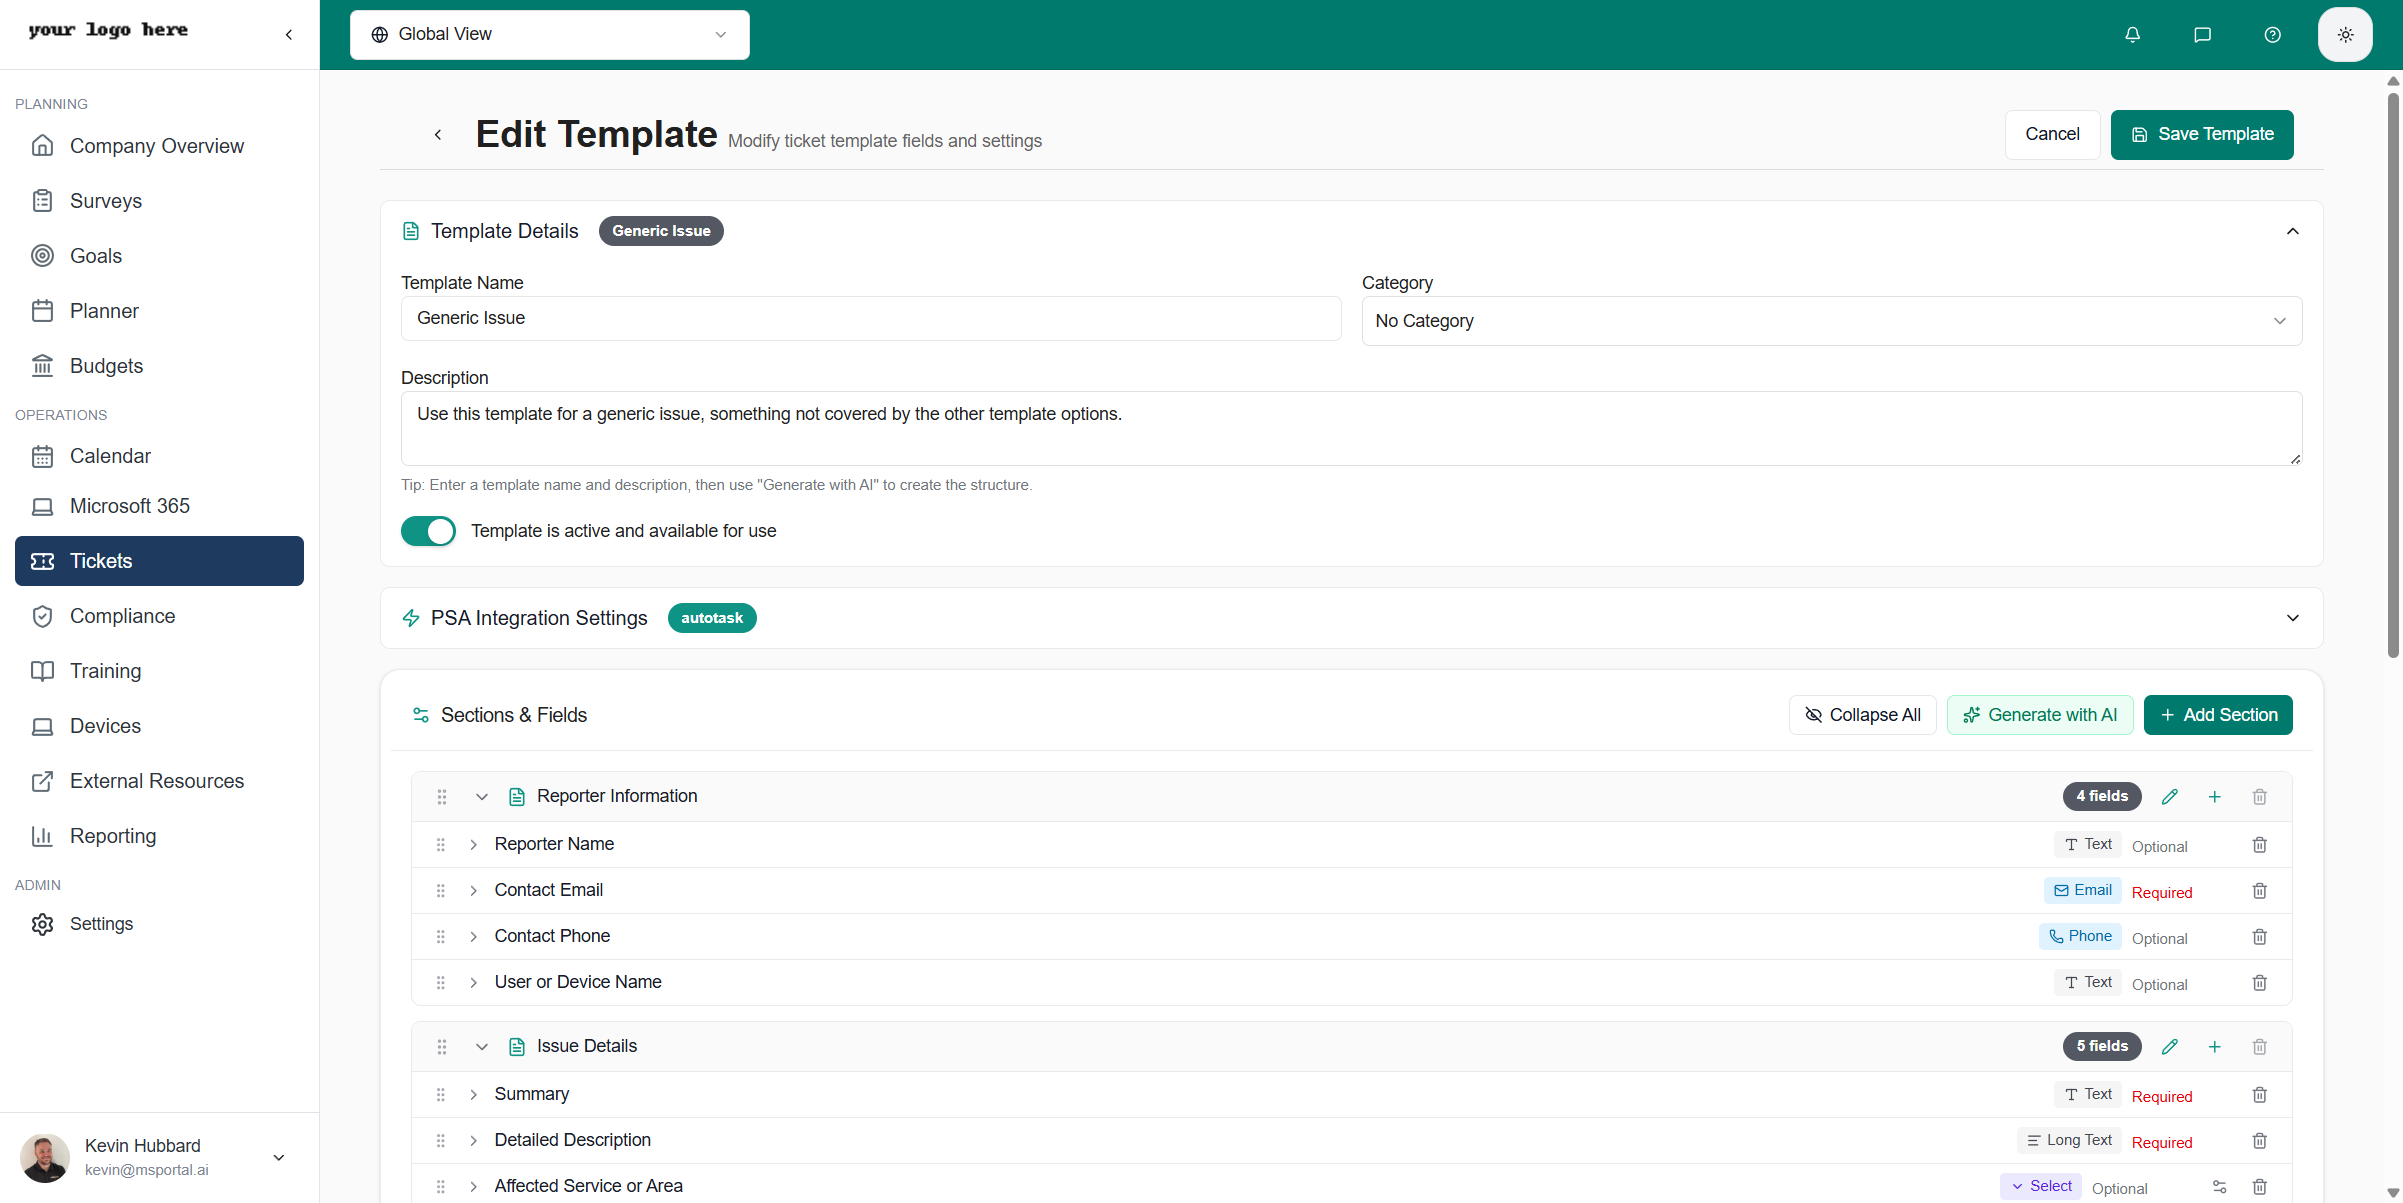
Template Details Section
PSA Integration Settings
Configure how template fields map to your PSA system:- Default Board/Queue - Pre-select the service board or queue for tickets created with this template
- Default Priority - Set a default priority level
- Default Status - Define the initial status for new tickets
- Field Mappings - Map custom template fields to PSA custom fields
PSA mapping ensures that information captured in MSPortal flows correctly to your ticketing system. Test your mappings after configuration to verify data appears correctly in your PSA.
Sections & Fields
Organize your template with sections and fields:Field Types
Choose the appropriate field type for each piece of information you need to capture:Field Properties
Each field can be configured with various properties:AI Template Generation
Generate complete template structures using AI:1
Enter Template Name
Provide a descriptive template name that indicates its purpose (e.g., “VPN Access Request”)
2
Add Description
Describe the template’s purpose, what information it should capture, and any special requirements
3
Click Generate with AI
Click the AI button (sparkle icon) to open the AI Template Designer sidebar
4
Describe Your Needs
Tell the AI what you’re trying to accomplish. Be specific about required fields, sections, and any conditional logic needed
5
Review and Customize
AI generates sections and fields based on your description. Review the structure and modify as needed
PSA Integration
MSPortal integrates with leading PSA systems to provide seamless ticket management:Supported PSA Systems
Synchronization
Tickets automatically sync with your PSA in real-time:- New tickets created in MSPortal appear immediately in your PSA
- Updates sync bidirectionally - changes made in either system reflect in both
- Notes and attachments are synchronized to maintain complete ticket history
- Status changes reflect in both systems within seconds
- Custom field mappings ensure your data flows correctly to PSA-specific fields
Sync frequency and specific features may vary by PSA provider. Contact support if you notice sync delays or missing data.
Viewing PSA Details
When viewing ticket details, PSA-specific information is displayed based on your provider: ConnectWise: Board, type, subtype, status, priority, SLA status, resources, and customer update flags Halo PSA: Team, agent, category, impact, urgency, SLA details, and actions Autotask: Queue, status, priority, issue type, and sub-issue type Syncro: Status, priority, and basic ticket informationBest Practices
- Use Templates Consistently - Create templates for common ticket types to ensure all necessary information is captured every time
- Leverage AI for Speed - Use AI Assistant for routine tickets to save time while maintaining quality
- Keep Templates Updated - Regularly review and update templates to reflect current processes and requirements
- Customize Your View - Configure column visibility and filters to match your workflow
- Add Context in Notes - When adding notes, include enough detail for other technicians to understand the situation
- Use Appropriate Priority - Accurately assess priority to ensure critical issues get attention first
- Attach Supporting Files - Include screenshots, logs, or documents that help diagnose and resolve issues faster