

Find the product and version
Open Settings > Compliance > Playbooks > Security Frameworks > CIS Benchmarks. Search for the product family, or browse the operating-system, cloud, infrastructure and browser sections. Review the displayed version and available variants. A family may offer L1, L2 or a Full entry; use the entries actually shown.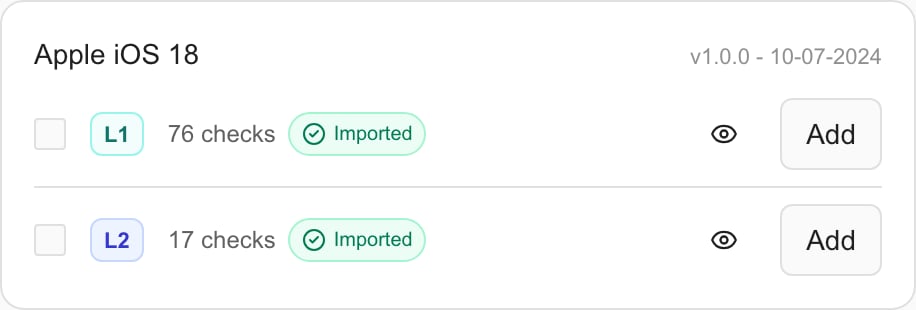
MSP example: one product family with separate L1 and L2 entries. Imported indicates an existing copy, not a completed assessment.
Review the selected checks
Use the eye control beside the intended variant to inspect details and the check list. Review its product, profile and version before selecting it. Do not assume an L2 catalog entry contains every L1 check: inspect the actual lists when deciding which variants you need. Close details after review. The details Copy action performs an immediate copy; use Add on the variant if you need the import-mapping dialog.Import with the correct mapping
- Click Add for one variant, or select the intended variants and choose Add to Tenant in the header.
- Review every Folder destination in Add Playbooks to Tenant.
- Choose a Status list for each selected playbook.
- For Device checks, inspect the suggested Device types. Selected types receive the imported group association; remove types you do not intend to target.
- Review the duplicate warning if a variant is already imported. Importing again creates another copy rather than updating the previous one.
- Click Add to Tenant to import. Wait for the result, then inspect the destination folder under Settings > Compliance > Checks and its new group under Groups.
Prepare an assessment
Review the imported checks, guidance and status list. Configure the applicable groups, runs and company/device scope through Compliance settings. Import does not harden an operating system or mark a company compliant. Keep a record of the chosen benchmark version. Compare future catalog changes with your tenant copies; a new import does not silently merge into existing customized checks.Troubleshooting
If the product is absent, clear the search and inspect the current catalog; do not substitute a different product/version merely because its name is similar. If Add is unavailable, check management permission and billing. If no status list is selected, choose one before submitting. If imported checks are missing from an assessment, inspect the folder/group and the assessment assignment separately.FAQs
Are L1 and L2 the same as IG1 and IG2?
Are L1 and L2 the same as IG1 and IG2?
No. L1/L2 are CIS Benchmark profiles; IG1/IG2/IG3 organize CIS Controls implementation priorities.
Does L2 always include every L1 check in this catalog?
Does L2 always include every L1 check in this catalog?
Do not assume that. Review the check lists for the actual variants you plan to import.
Does Add to Tenant secure the selected devices?
Does Add to Tenant secure the selected devices?
No. It imports check content and group associations; assessment and endpoint configuration are separate work.
Can I import an Imported variant again to upgrade it?
Can I import an Imported variant again to upgrade it?
A repeated import can create another group and check copies. Review existing content before importing again.
Why choose device types during import?
Why choose device types during import?
Selected device types receive the imported check-group association. Review suggested selections before submitting.
Where do the imported checks appear?
Where do the imported checks appear?
Inspect the displayed folder in Settings > Compliance > Checks and the imported group in Groups, then configure the intended assessment.