Branding controls the logos, colors, custom domains and sign-in page your clients see. The navigation style is set under Settings > Customization > Navigation. This page is for MSP staff who manage those settings.

Before you start

  • You need Branding Settings access. Read access lets you view the page. Adding, verifying and removing domains, choosing custom domain sign-in methods and the client logo switches need write access. Logos, the favicon, brand colors and the sign-in page need manage access. Launch Center managers can also change logos, colors and the sign-in page. Without the needed access, the controls are disabled.
  • Tenant Settings access alone does not open this page. Ask an administrator to give your role Branding Settings access in Users & Roles.
  • A custom domain needs access to your DNS provider.

Open Branding settings

1

Open Settings > Customization > Branding

The page header has a tab for each section: Colors, Domains, Light Mode, Dark Mode, Favicon, Reports & Certs and Sign-in Page. A Client logos tab also shows when that feature is on for your portal.
There is no page-wide save button. Each section saves on its own, as described below.

Set your brand color

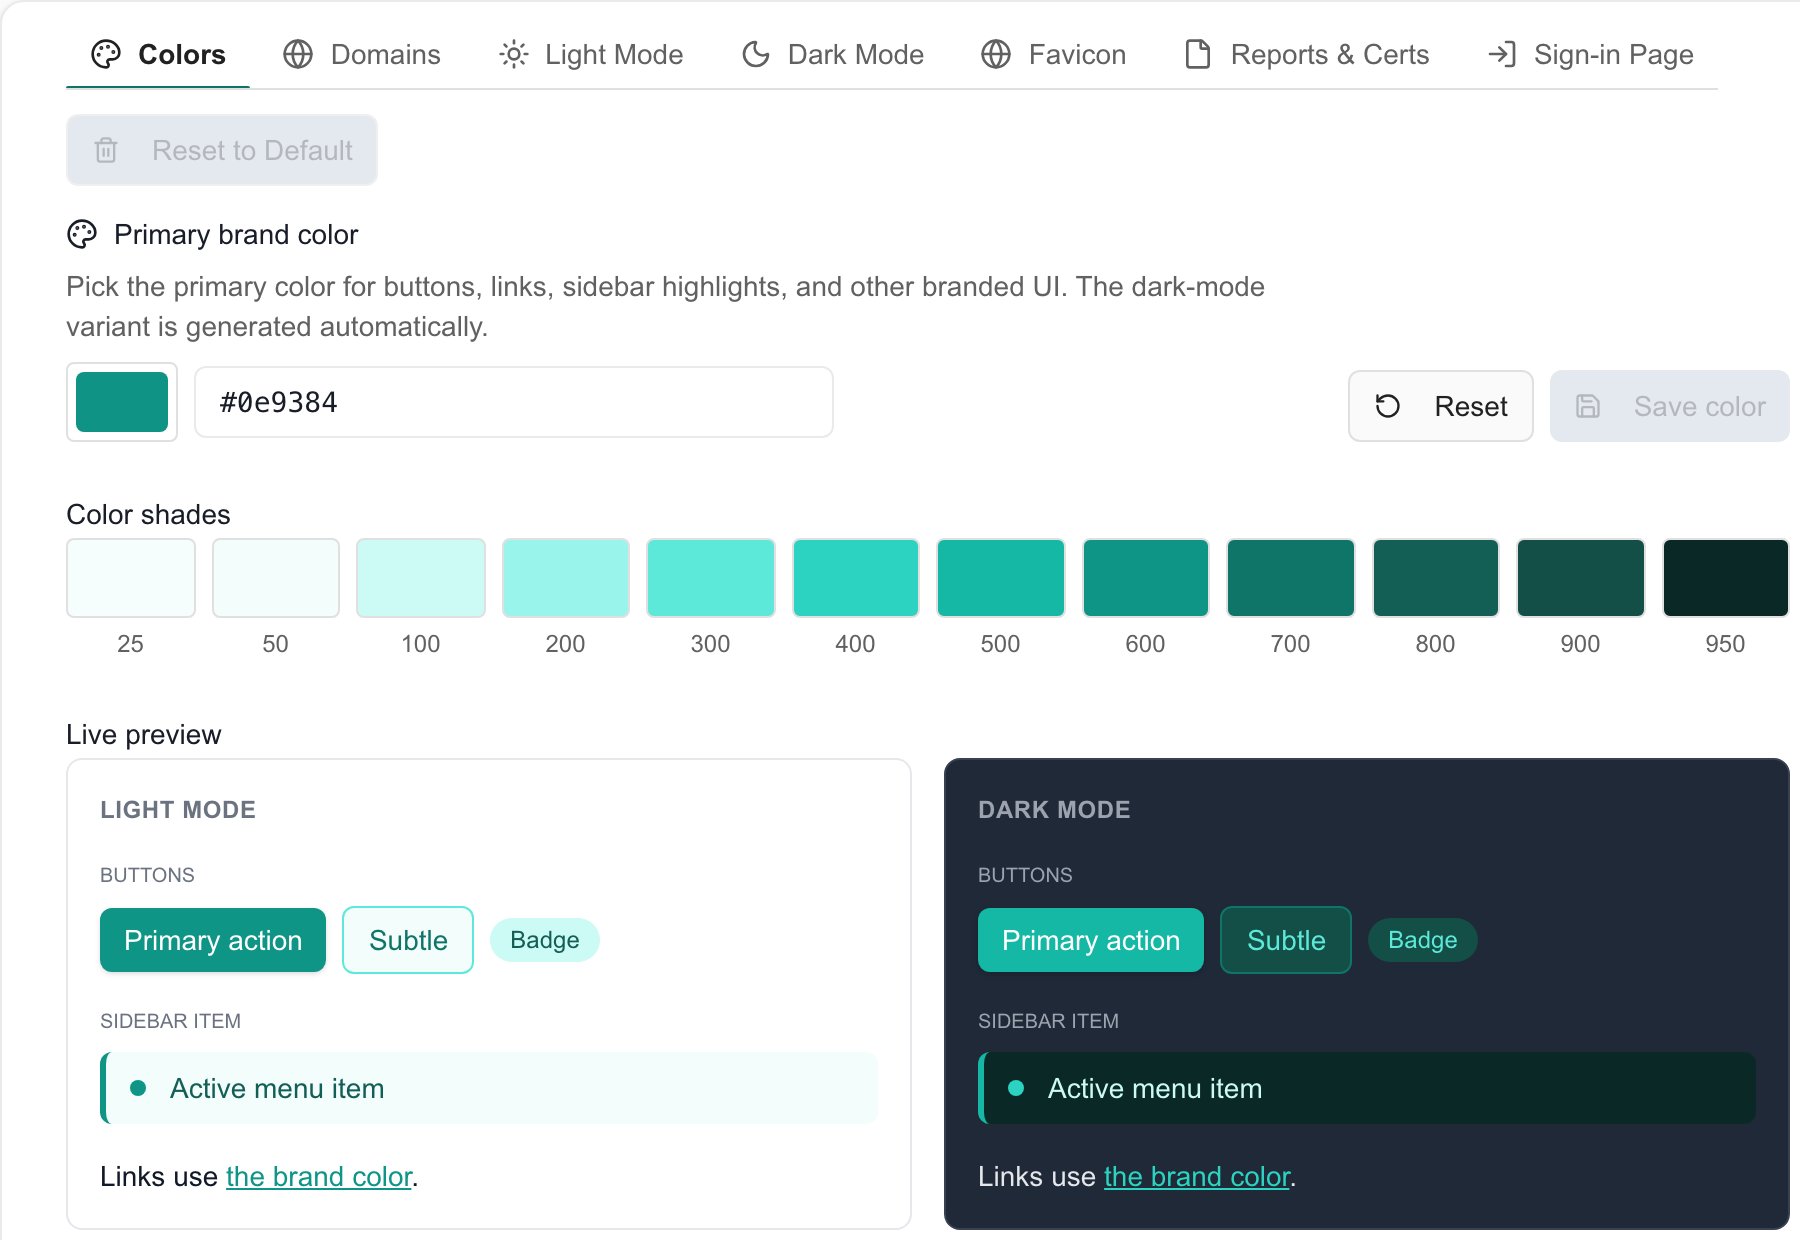
Tenant branding color controls and light/dark sample previews.

Branding colors with separate Save color and built-in light and dark previews.

1

Open the Colors tab

The brand color drives buttons, links, sidebar highlights, focus rings, chart primary color and status badges that use the brand scale.
2

Pick your color

Use the swatch picker or type a hex code. Three-digit values such as #0e9 and six-digit values such as #7c3aed both work.
3

Check the previews

The previews show buttons, sidebar items, badges and links in light and dark mode. MSPortal creates the dark variant from your color.
4

Click Save color

Wait for the Brand color saved message, then reload a portal page to check it.
Click Reset next to Save color to go back to the default MSPortal color. You confirm first, and it is saved right away. Reset is disabled until you have saved a custom color. Your brand color also applies to the public client onboarding portal. No extra setup is needed.

Add a custom domain

1

Open the Domains tab

The Project CNAME target is shown at the top with a Copy button.
2

Enter the domain

Type it into Domain, for example portal.yourcompany.com. Check Primary if this should be the primary domain.
3

Click Add

The DNS setup dialog opens when DNS records are needed. It shows the Routing record, which is a CNAME for subdomains and an A record for apex (root) domains. It also shows Verification records (TXT) that you must add.
4

Add the records at your DNS provider

Copy each record with its copy button. DNS changes can take up to 24 hours, and often finish sooner.
5

Click Re-check on the domain's row

When DNS is ready the domain becomes Active and SSL is set up automatically. If it is still waiting, a message says the domain is still verifying. Click DNS setup on the row to see the records again.
6

Set the primary domain

Click Set primary on the row you want. Domain changes save on their own. People who sign in with an emailed magic link land on your primary domain.
To remove a domain, click Remove on its row and confirm. This detaches the domain and deletes its record.

Choose sign-in methods for custom domains

1

Scroll to Custom domain login methods

It sits below the domain list on the Domains tab.
2

Check or uncheck the methods

The methods are Sign in with Microsoft, Sign in with Google and Send Magic Link. At least one must stay on, so the last checked method is locked. These choices affect your custom domains only. MSPortal domains keep every method.
3

Click Save Settings under the checkboxes

The methods have their own Save Settings and Reset buttons. Reset returns the checkboxes to their last saved values.

Upload logos and a favicon

1

Open the Light Mode or Dark Mode tab

Each tab has two upload areas. Primary Logo (Light) and Primary Logo (Dark) show in the expanded sidebar. Small Icon (Light) and Small Icon (Dark) show in the collapsed sidebar. The Live Preview on these tabs shows the logos in the desktop and mobile layouts.
2

Click Upload and choose a file

Use a PNG, JPEG or SVG file up to 1.5 MB. Recommended sizes are 140 × 32 px for primary logos and 32 × 32 px for small icons. Upload separate light and dark versions for the best result.
3

Position the image and click Save & Apply

The crop dialog lets you zoom, rotate and position the image. Closing it without Save & Apply does not save anything. A success message confirms the upload.
4

Upload a favicon on the Favicon tab

Use an ICO or PNG file under 256 KB. Other file types are rejected with Please upload an ICO or PNG image. 32 × 32 px is recommended. It shows in browser tabs when people use your custom domain. Favicons have no crop step.
5

Upload a reporting logo on the Reports & Certs tab

This logo appears on generated reports, documents and training certificates. It can be any size or aspect ratio. A high-quality PNG with a transparent background works best.
Use Reset to Default on the Light Mode, Dark Mode, Favicon or Reports & Certs tab to clear all logos, icons, the favicon and the reporting logo. You confirm first.

Custom sign-in page

This changes the sign-in page on your custom domains only. It does not change MSPortal-owned domains. Before you start, make sure you have:
  • An active custom domain.
  • Manage access to Branding Settings or Launch Center manage access.
  • A Primary Logo (Light) uploaded, if you want your logo on the sign-in card.
1

Open the Sign-in Page tab

The preview updates as you change settings.
2

Set the Logo size

Move the slider until the logo fits the card.
3

Choose a Background

Pick Default, Solid color, Gradient or Image. A solid color needs a hex value such as #0f766e. A gradient has a Gradient start and Gradient end.For an image, click Upload image and choose a PNG, JPG or WEBP file up to 3 MB. A landscape photo of 1920 × 1080 pixels or larger works best. The image crops at the edges, and the card covers the center. Avoid text or key details in it. Use Photo darkening to keep the card readable over a bright image.
4

Choose the card style

Turn on Frosted glass card for a slightly transparent card with a blur. The effect shows with a color, gradient or image background, not the default background.
5

Write the welcome message

Enter a Welcome title and Welcome subtitle. Leave a field blank to use the standard text. Add Help instructions (up to 500 characters) for support details that show below the sign-in options. Everyone who visits the sign-in page can read these, so leave out credentials and private details.
6

Click Save sign-in page

Uploading a background only prepares a draft. The page does not change until you save. Then open your custom domain in a private browser window, on a desktop and a phone, to check it.
To clear the background, card style, logo size and welcome text, click Reset to default and confirm. Your logos, favicon, brand colors and domains stay as they are. The sign-in page also uses your primary logo, favicon, brand colors and the sign-in methods you chose for custom domains.

Find client logos automatically

The Client logos tab shows only when the feature is on for your portal. Its switches need write access to Branding Settings and save as soon as you flip them.
  • Find client logos automatically looks up each active client’s logo on Logo.dev by the company’s domain. The logo shows on onboarding portals, reports, presentations and emails.
  • Replace uploaded logos also looks up clients that already have an uploaded or PSA logo, and uses the Logo.dev logo instead. The replaced logo is kept.

Troubleshooting

Frequently asked questions

Use the Save Settings button under the checkboxes on the Domains tab. At least one method must stay on.
No. It asks you to confirm and saves the default color right away. Logos, domains and the sign-in page stay as they are.
No. They apply to your custom domains only.
Branding moved to Settings > Customization > Branding. Old links to the Branding tab of Tenant Settings open the new page.