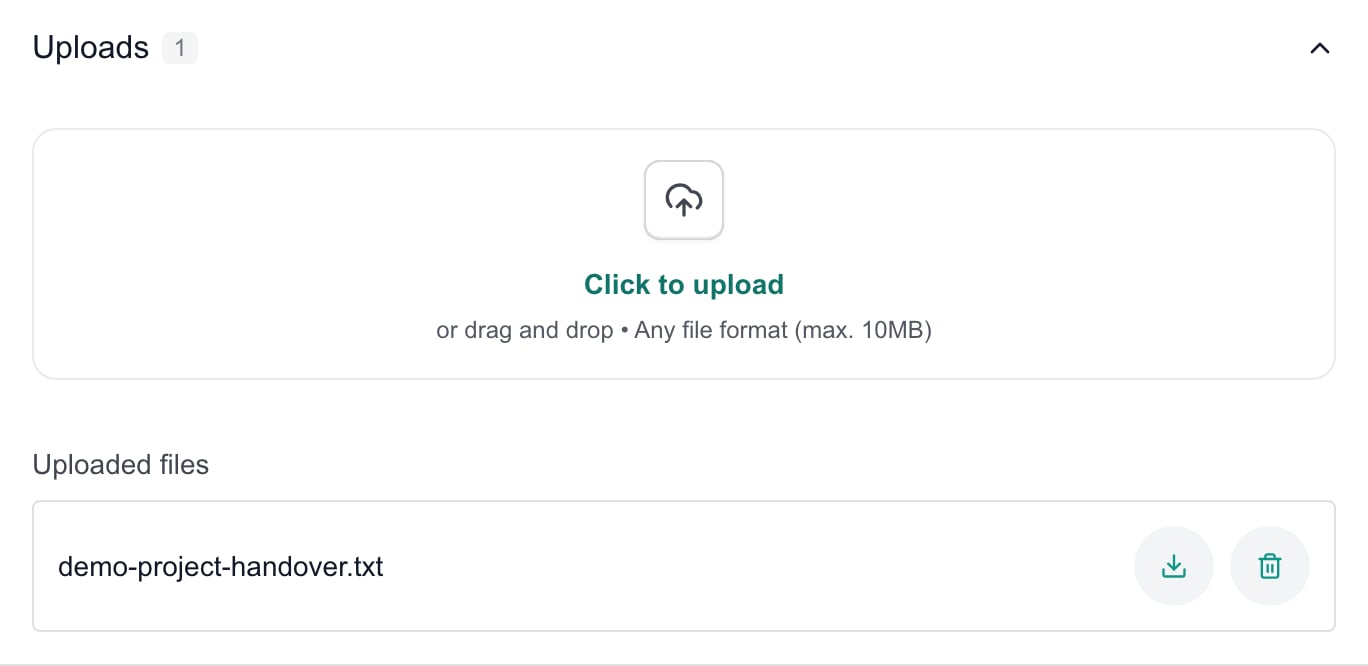
Click Click to upload, or drag files into the box. You can add several files. The box says Any file format (max. 10MB).
4
Wait for each file
Each file shows under Uploaded files when it finishes. If one fails, read its message and click Try again.
5
Confirm
Close and reopen the item. Check that the file is still listed, and download it if you need to confirm its contents.
Uploading starts the moment you choose or drop files. It does not wait for the item’s Save button. Closing the item and choosing Discard for other edits does not remove an upload that already finished.A progress percentage does not confirm the file is attached. Check the file name under Uploaded files. Removing a failed row from the progress list does not cancel a transfer that is still running. Wait for it to finish, then delete an unwanted file from the saved list.
Click the Delete button beside that file. It runs at once, with no confirmation and no Save step.
4
Confirm
Wait for the row to disappear, then reopen the item to check.
Discard does not bring back a deleted file. If you still have the original, upload it again. Deleting a file does not delete the Planner item or its relationships.
Save the new item first. Templates never have uploads.
Only Download shows
You have read access only. Ask your MSP for Write Planner.
An upload failed
Read the message, check the 10MB limit and your connection, check Uploaded files, then click Try again.
A delete failed with “You do not have permission to delete this item”
You need Manage Planner. The file stays attached. Ask your MSP to check your permission, then reopen the item and check the file name before you try again.
A delete failed for another reason, or the file is still there
Read the message, check your connection, then reopen the item and check the file name before you try again.
The file name shows but the download fails
Tell your MSP the item and the file name.
You selected several files
Check each one. One success does not mean the rest finished.
{"docsConfig":{"theme":"mint","$schema":"https://mintlify.com/docs.json","name":"MSPortal.ai Documentation","colors":{"primary":"#16A34A","light":"#07C983","dark":"#15803D"},"logo":{"light":"https://mintcdn.com/msportal/KnbwIXtZSTlVJTt6/logo/light.svg?fit=max\u0026auto=format\u0026n=KnbwIXtZSTlVJTt6\u0026q=85\u0026s=eb69f6d6bf16b2c401770aef19ade1d2","dark":"https://mintcdn.com/msportal/KnbwIXtZSTlVJTt6/logo/dark.svg?fit=max\u0026auto=format\u0026n=KnbwIXtZSTlVJTt6\u0026q=85\u0026s=03f8df7191e7a8ea7da084df57f6107f"},"favicon":"https://mintcdn.com/msportal/KjsKytvp08K0bejm/favicon-16x16.png?fit=max\u0026auto=format\u0026n=KjsKytvp08K0bejm\u0026q=85\u0026s=378df7f039bbff7885231fec799d29ac","navbar":{"links":[{"href":"https://app.msportal.ai/product-roadmap","label":"Roadmap"},{"href":"mailto:support@msportal.ai","label":"Support"}],"primary":{"type":"button","label":"Dashboard","href":"https://app.msportal.ai"}},"footer":{"socials":{"linkedin":"https://linkedin.com/company/msportal"}},"styling":{"latex":true},"navigation":{"global":{"anchors":[{"anchor":"MSPortal.ai","icon":"globe","href":"https://msportal.ai"},{"anchor":"Support","icon":"life-ring","href":"mailto:support@msportal.ai"},{"anchor":"Status","icon":"signal","href":"https://status.msportal.ai"}]},"pages":[]}},"deployment":{"deploymentMetadataValue":{"subdomain":"msportal","hasAudioNarration":false,"actualSubdomain":"msportal","customDomains":["docs.msportal.ai"],"gitSource":{"type":"github","owner":"msportal-ai","repo":"mintlify-docs","deployBranch":"main","contentDirectory":"","isPrivate":false,"mountPath":"","label":""},"chroma":{"liveDeploymentHistoryId":"6ad8d218182ff03fed6d05cc","collectionId":"09c61d36-c2f4-4933-8f58-3ef63d827cc0","schemaVersion":"v3","latestBuiltDeploymentHistoryId":"6ad8d218182ff03fed6d05cc"},"feedback":{"thumbs":true},"entitlements":{},"buildId":"6ad8d218182ff03fed6d05cc","clientVersion":"0.0.3908","searchFilterCounts":[{"language":"default","tag":"MSP Guides","count":454},{"language":"default","tag":"Service Delivery","count":165},{"language":"default","tag":"API Reference","count":111},{"language":"default","tag":"Overview \u0026 Planning","count":109},{"language":"default","tag":"Connect your tools","count":88},{"language":"default","tag":"Integration setup","count":88},{"language":"default","tag":"Administration","count":38},{"language":"default","tag":"Settings","count":38},{"language":"default","tag":"Getting Started","count":36},{"language":"default","tag":"Budgets","count":36}]},"assistantConfig":{"enableAskAiButton":false,"enableStarterQuestions":false,"enableAskAiSearchBar":true},"hasChatPermissions":false,"hasWebMcpPermissions":false,"toggles":[{"name":"kill-isr","enabled":true,"variant":{"name":"disabled","enabled":false,"feature_enabled":true},"impressionData":false},{"name":"agent-mintlify-slack","enabled":true,"variant":{"name":"disabled","enabled":false,"feature_enabled":true},"impressionData":false},{"name":"editor-v7-file-tree","enabled":true,"variant":{"name":"disabled","enabled":false,"feature_enabled":true},"impressionData":false},{"name":"agent-integrations-settings","enabled":true,"variant":{"name":"disabled","enabled":false,"feature_enabled":true},"impressionData":false},{"name":"automations-pr-grouping","enabled":true,"variant":{"name":"disabled","enabled":false,"feature_enabled":true},"impressionData":false},{"name":"custom-prefix","enabled":true,"variant":{"name":"disabled","enabled":false,"feature_enabled":true},"impressionData":false},{"name":"analytics-v7","enabled":true,"variant":{"name":"disabled","enabled":false,"feature_enabled":true},"impressionData":false},{"name":"user-flows-analytics","enabled":true,"variant":{"name":"disabled","enabled":false,"feature_enabled":true},"impressionData":false},{"name":"no-publish-flow","enabled":true,"variant":{"name":"disabled","enabled":false,"feature_enabled":true},"impressionData":false},{"name":"workos-onboarding","enabled":true,"variant":{"name":"disabled","enabled":false,"feature_enabled":true},"impressionData":false},{"name":"llms-txt-v2","enabled":true,"variant":{"name":"disabled","enabled":false,"feature_enabled":true},"impressionData":false},{"name":"pause-universal-search-reconcile","enabled":true,"variant":{"name":"disabled","enabled":false,"feature_enabled":true},"impressionData":false},{"name":"snapshot-serving-live","enabled":true,"variant":{"name":"disabled","enabled":false,"feature_enabled":true},"impressionData":false},{"name":"stripTemperatureMiddleware","enabled":true,"variant":{"name":"disabled","enabled":false,"feature_enabled":true},"impressionData":false},{"name":"per-site-search-delta","enabled":true,"variant":{"name":"disabled","enabled":false,"feature_enabled":true},"impressionData":false},{"name":"support-platform-pylon-zendesk","enabled":true,"variant":{"name":"disabled","enabled":false,"feature_enabled":true},"impressionData":false},{"name":"editor-branches-v2-autocommit","enabled":true,"variant":{"name":"disabled","enabled":false,"feature_enabled":true},"impressionData":false},{"name":"editor-branches-v2","enabled":true,"variant":{"name":"disabled","enabled":false,"feature_enabled":true},"impressionData":false},{"name":"snapshot-serving","enabled":true,"variant":{"name":"disabled","enabled":false,"feature_enabled":true},"impressionData":false},{"name":"instant-rollback","enabled":true,"variant":{"name":"disabled","enabled":false,"feature_enabled":true},"impressionData":false},{"name":"granular-notifications-server","enabled":true,"variant":{"name":"disabled","enabled":false,"feature_enabled":true},"impressionData":false},{"name":"granular-notifications","enabled":true,"variant":{"name":"disabled","enabled":false,"feature_enabled":true},"impressionData":false},{"name":"editor-private-page-search","enabled":true,"variant":{"name":"disabled","enabled":false,"feature_enabled":true},"impressionData":false},{"name":"automations-fable","enabled":true,"variant":{"name":"disabled","enabled":false,"feature_enabled":true},"impressionData":false},{"name":"fixed-ai-action-pricing","enabled":true,"variant":{"name":"disabled","enabled":false,"feature_enabled":true},"impressionData":false},{"name":"automation-resolve-merge-conflict","enabled":true,"variant":{"name":"disabled","enabled":false,"feature_enabled":true},"impressionData":false},{"name":"scoped-publishing","enabled":true,"variant":{"name":"disabled","enabled":false,"feature_enabled":true},"impressionData":false},{"name":"mintql","enabled":true,"variant":{"name":"disabled","enabled":false,"feature_enabled":true},"impressionData":false},{"name":"page-level-analytics","enabled":true,"variant":{"name":"disabled","enabled":false,"feature_enabled":true},"impressionData":false},{"name":"teamspace","enabled":true,"variant":{"name":"disabled","enabled":false,"feature_enabled":true},"impressionData":false},{"name":"editor-version-history-v2","enabled":true,"variant":{"name":"disabled","enabled":false,"feature_enabled":true},"impressionData":false},{"name":"editor-nav-generations","enabled":true,"variant":{"name":"disabled","enabled":false,"feature_enabled":true},"impressionData":false},{"name":"billing-page-v2","enabled":true,"variant":{"name":"disabled","enabled":false,"feature_enabled":true},"impressionData":false},{"name":"vite-origin","enabled":true,"variant":{"name":"disabled","enabled":false,"feature_enabled":true},"impressionData":false},{"name":"workspace-projects","enabled":true,"variant":{"name":"disabled","enabled":false,"feature_enabled":true},"impressionData":false},{"name":"assistant-v5","enabled":true,"variant":{"name":"disabled","enabled":false,"feature_enabled":true},"impressionData":false},{"name":"byok-sep-25","enabled":true,"variant":{"name":"disabled","enabled":false,"feature_enabled":true},"impressionData":false},{"name":"fork-pr-previews","enabled":true,"variant":{"name":"disabled","enabled":false,"feature_enabled":true},"impressionData":false},{"name":"revalidation-jwt","enabled":true,"variant":{"name":"disabled","enabled":false,"feature_enabled":true},"impressionData":false},{"name":"editor-agent-model-picker","enabled":true,"variant":{"name":"disabled","enabled":false,"feature_enabled":true},"impressionData":false},{"name":"client-snapshot-docs-config","enabled":true,"variant":{"name":"disabled","enabled":false,"feature_enabled":true},"impressionData":false},{"name":"hobby-abuse-scan","enabled":true,"variant":{"name":"disabled","enabled":false,"feature_enabled":true},"impressionData":false},{"name":"dashboard-inbox","enabled":true,"variant":{"name":"disabled","enabled":false,"feature_enabled":true},"impressionData":false}],"isAtlas":false,"googleFontsInlined":false},"customCss":[],"page":{"pagePath":"user-guides/planner/manage-files","slug":"/user-guides/planner/manage-files","pageMetadata":{"title":"Read and manage Planner files","description":"Find attachments, download a file and understand immediate upload and deletion behavior.","icon":"paperclip","href":"/user-guides/planner/manage-files"},"description":{"compiledSource":"\"use strict\";\nconst {jsx: _jsx} = arguments[0];\nconst {useMDXComponents: _provideComponents} = arguments[0];\nfunction _createMdxContent(props) {\n const _components = {\n p: \"p\",\n ..._provideComponents(),\n ...props.components\n };\n return _jsx(_components.p, {\n children: \"Find attachments, download a file and understand immediate upload and deletion behavior.\"\n });\n}\nfunction MDXContent(props = {}) {\n const {wrapper: MDXLayout} = {\n ..._provideComponents(),\n ...props.components\n };\n return MDXLayout ? _jsx(MDXLayout, {\n ...props,\n children: _jsx(_createMdxContent, {\n ...props\n })\n }) : _createMdxContent(props);\n}\nreturn {\n default: MDXContent\n};\n","frontmatter":{},"scope":{}},"pageType":"default","mdx":{"mdxSource":{"compiledSource":"\"use strict\";const{Fragment:_Fragment,jsx:_jsx,jsxs:_jsxs}=arguments[0];const{useMDXComponents:_provideComponents}=arguments[0];function _createMdxContent(props){const _components={a:`a`,li:`li`,p:`p`,strong:`strong`,tbody:`tbody`,td:`td`,th:`th`,thead:`thead`,tr:`tr`,ul:`ul`,..._provideComponents(),...props.components},{Accordion,AccordionGroup,Frame,Heading,OptimizedImage,Step,Steps,Table}=_components;if(!Accordion)_missingMdxReference(`Accordion`,true);if(!AccordionGroup)_missingMdxReference(`AccordionGroup`,true);if(!Frame)_missingMdxReference(`Frame`,true);if(!Heading)_missingMdxReference(`Heading`,true);if(!OptimizedImage)_missingMdxReference(`OptimizedImage`,true);if(!Step)_missingMdxReference(`Step`,true);if(!Steps)_missingMdxReference(`Steps`,true);if(!Table)_missingMdxReference(`Table`,true);return _jsxs(_Fragment,{children:[_jsx(_components.p,{children:`Attach files to a Planner item, download them and delete them. Company users and MSP staff can download. Uploading and deleting are for MSP staff.`}),`\n`,_jsx(Heading,{level:`2`,id:`before-you-start`,children:`Before you start`}),`\n`,_jsxs(_components.ul,{children:[`\n`,_jsx(_components.li,{children:`Downloading needs Planner read access to the item.`}),`\n`,_jsxs(_components.li,{children:[`Uploading needs `,_jsx(_components.strong,{children:`Write Planner`}),` or `,_jsx(_components.strong,{children:`Manage Planner`}),`.`]}),`\n`,_jsxs(_components.li,{children:[`Deleting an uploaded file needs `,_jsx(_components.strong,{children:`Manage Planner`}),`. Staff with only Write Planner can see a delete button, but the delete is refused.`]}),`\n`,_jsxs(_components.li,{children:[`Files belong to a saved item. A new, unsaved item and a Planner template have no `,_jsx(_components.strong,{children:`Uploads`}),` section.`]}),`\n`]}),`\n`,_jsx(Heading,{level:`2`,id:`download-a-file`,children:`Download a file`}),`\n`,_jsxs(Steps,{children:[_jsx(Step,{title:`Open the item`,children:_jsx(_components.p,{children:`Click the item’s title in List View or on the timeline.`})}),_jsx(Step,{title:`Expand Uploads`,children:_jsxs(_components.p,{children:[`Click `,_jsx(_components.strong,{children:`Uploads`}),` in the right column. The number beside it is the file count. When files exist, the paperclip beside the title jumps to this section.`]})}),_jsxs(Step,{title:`Click Download`,children:[_jsxs(_components.p,{children:[`Click `,_jsx(_components.strong,{children:`Download`}),` beside the file name, then open the file from your browser’s downloads.`]}),_jsx(Frame,{caption:`Example with a demo handover file. Read-only users see Download but not the upload area or Delete.`,children:_jsx(OptimizedImage,{src:`https://mintcdn.com/msportal/CuJu_16D8ZGdquKW/images/product/planner-file-controls.png?fit=max\u0026auto=format\u0026n=CuJu_16D8ZGdquKW\u0026q=85\u0026s=01f37c62515c195573f40e237d305f01`,alt:`Planner Uploads section showing a demo handover text file with Download and Delete controls.`,width:`1368`,height:`666`,\"data-og-width\":`1368`,\"data-og-height\":`666`,\"data-path\":`images/product/planner-file-controls.png`,\"data-optimize\":`true`,\"data-opv\":`3`,srcset:`https://mintcdn.com/msportal/CuJu_16D8ZGdquKW/images/product/planner-file-controls.png?w=280\u0026fit=max\u0026auto=format\u0026n=CuJu_16D8ZGdquKW\u0026q=85\u0026s=552e98327849ed1639b0e997dbd1a92c 280w, https://mintcdn.com/msportal/CuJu_16D8ZGdquKW/images/product/planner-file-controls.png?w=560\u0026fit=max\u0026auto=format\u0026n=CuJu_16D8ZGdquKW\u0026q=85\u0026s=3949d7c87efd852db7ce69afffd6ae46 560w, https://mintcdn.com/msportal/CuJu_16D8ZGdquKW/images/product/planner-file-controls.png?w=840\u0026fit=max\u0026auto=format\u0026n=CuJu_16D8ZGdquKW\u0026q=85\u0026s=7c7ad7dfe2d2aeec547f2928516da863 840w, https://mintcdn.com/msportal/CuJu_16D8ZGdquKW/images/product/planner-file-controls.png?w=1100\u0026fit=max\u0026auto=format\u0026n=CuJu_16D8ZGdquKW\u0026q=85\u0026s=197797f6efe434a563e477917e21a191 1100w, https://mintcdn.com/msportal/CuJu_16D8ZGdquKW/images/product/planner-file-controls.png?w=1650\u0026fit=max\u0026auto=format\u0026n=CuJu_16D8ZGdquKW\u0026q=85\u0026s=2a17a9239f533bb23cf2a18aae68176c 1650w, https://mintcdn.com/msportal/CuJu_16D8ZGdquKW/images/product/planner-file-controls.png?w=2500\u0026fit=max\u0026auto=format\u0026n=CuJu_16D8ZGdquKW\u0026q=85\u0026s=822a126596fcb8917dd7173639616e48 2500w`})})]})]}),`\n`,_jsx(_components.p,{children:`The list shows file names only. There is no inline preview. Planner Analytics exports and provider documents are separate from these files.`}),`\n`,_jsx(Heading,{level:`2`,id:`upload-files`,children:`Upload files`}),`\n`,_jsxs(Steps,{children:[_jsx(Step,{title:`Save the item first`,children:_jsxs(_components.p,{children:[`For a new item, click `,_jsx(_components.strong,{children:`Save`}),`, then reopen it.`]})}),_jsx(Step,{title:`Expand Uploads`,children:_jsxs(_components.p,{children:[`Click `,_jsx(_components.strong,{children:`Uploads`}),` in the right column.`]})}),_jsx(Step,{title:`Add files`,children:_jsxs(_components.p,{children:[`Click `,_jsx(_components.strong,{children:`Click to upload`}),`, or drag files into the box. You can add several files. The box says `,_jsx(_components.strong,{children:`Any file format (max. 10MB)`}),`.`]})}),_jsx(Step,{title:`Wait for each file`,children:_jsxs(_components.p,{children:[`Each file shows under `,_jsx(_components.strong,{children:`Uploaded files`}),` when it finishes. If one fails, read its message and click `,_jsx(_components.strong,{children:`Try again`}),`.`]})}),_jsx(Step,{title:`Confirm`,children:_jsx(_components.p,{children:`Close and reopen the item. Check that the file is still listed, and download it if you need to confirm its contents.`})})]}),`\n`,_jsxs(_components.p,{children:[`Uploading starts the moment you choose or drop files. It does not wait for the item’s `,_jsx(_components.strong,{children:`Save`}),` button. Closing the item and choosing `,_jsx(_components.strong,{children:`Discard`}),` for other edits does not remove an upload that already finished.`]}),`\n`,_jsxs(_components.p,{children:[`A progress percentage does not confirm the file is attached. Check the file name under `,_jsx(_components.strong,{children:`Uploaded files`}),`. Removing a failed row from the progress list does not cancel a transfer that is still running. Wait for it to finish, then delete an unwanted file from the saved list.`]}),`\n`,_jsx(Heading,{level:`2`,id:`delete-an-uploaded-file`,children:`Delete an uploaded file`}),`\n`,_jsxs(Steps,{children:[_jsx(Step,{title:`Open the saved item`,children:_jsxs(_components.p,{children:[`Expand `,_jsx(_components.strong,{children:`Uploads`}),`.`]})}),_jsx(Step,{title:`Check the file name`,children:_jsx(_components.p,{children:`Make sure it is the file you want to remove.`})}),_jsx(Step,{title:`Click Delete`,children:_jsxs(_components.p,{children:[`Click the `,_jsx(_components.strong,{children:`Delete`}),` button beside that file. It runs at once, with no confirmation and no `,_jsx(_components.strong,{children:`Save`}),` step.`]})}),_jsx(Step,{title:`Confirm`,children:_jsx(_components.p,{children:`Wait for the row to disappear, then reopen the item to check.`})})]}),`\n`,_jsxs(_components.p,{children:[_jsx(_components.strong,{children:`Discard`}),` does not bring back a deleted file. If you still have the original, upload it again. Deleting a file does not delete the Planner item or its relationships.`]}),`\n`,_jsx(Heading,{level:`2`,id:`troubleshooting`,children:`Troubleshooting`}),`\n`,_jsxs(Table,{children:[_jsx(_components.thead,{children:_jsxs(_components.tr,{children:[_jsx(_components.th,{children:`Problem`}),_jsx(_components.th,{children:`What to do`})]})}),_jsxs(_components.tbody,{children:[_jsxs(_components.tr,{children:[_jsxs(_components.td,{children:[_jsx(_components.strong,{children:`Uploads`}),` is missing`]}),_jsx(_components.td,{children:`Save the new item first. Templates never have uploads.`})]}),_jsxs(_components.tr,{children:[_jsxs(_components.td,{children:[`Only `,_jsx(_components.strong,{children:`Download`}),` shows`]}),_jsx(_components.td,{children:`You have read access only. Ask your MSP for Write Planner.`})]}),_jsxs(_components.tr,{children:[_jsx(_components.td,{children:`An upload failed`}),_jsxs(_components.td,{children:[`Read the message, check the 10MB limit and your connection, check `,_jsx(_components.strong,{children:`Uploaded files`}),`, then click `,_jsx(_components.strong,{children:`Try again`}),`.`]})]}),_jsxs(_components.tr,{children:[_jsx(_components.td,{children:`A delete failed with “You do not have permission to delete this item”`}),_jsx(_components.td,{children:`You need Manage Planner. The file stays attached. Ask your MSP to check your permission, then reopen the item and check the file name before you try again.`})]}),_jsxs(_components.tr,{children:[_jsx(_components.td,{children:`A delete failed for another reason, or the file is still there`}),_jsx(_components.td,{children:`Read the message, check your connection, then reopen the item and check the file name before you try again.`})]}),_jsxs(_components.tr,{children:[_jsx(_components.td,{children:`The file name shows but the download fails`}),_jsx(_components.td,{children:`Tell your MSP the item and the file name.`})]}),_jsxs(_components.tr,{children:[_jsx(_components.td,{children:`You selected several files`}),_jsx(_components.td,{children:`Check each one. One success does not mean the rest finished.`})]})]})]}),`\n`,_jsx(Heading,{level:`2`,id:`frequently-asked-questions`,children:`Frequently asked questions`}),`\n`,_jsxs(AccordionGroup,{children:[_jsx(Accordion,{title:`Where do I download a file attached to an item?`,id:`where-do-i-download-a-file-attached-to-an-item`,children:_jsxs(_components.p,{children:[`Open the saved item, expand `,_jsx(_components.strong,{children:`Uploads`}),` and click `,_jsx(_components.strong,{children:`Download`}),` beside the file name.`]})}),_jsx(Accordion,{title:`Can I preview an attachment in the dialog?`,id:`can-i-preview-an-attachment-in-the-dialog`,children:_jsx(_components.p,{children:`No. Download the file and open it in an app.`})}),_jsx(Accordion,{title:`Why can I not upload while creating a new item?`,id:`why-can-i-not-upload-while-creating-a-new-item`,children:_jsx(_components.p,{children:`Save the item first, then reopen it.`})}),_jsx(Accordion,{title:`Does uploading wait for Save?`,id:`does-uploading-wait-for-save`,children:_jsx(_components.p,{children:`No. It starts as soon as you choose the files.`})}),_jsx(Accordion,{title:`Does Discard remove an upload?`,id:`does-discard-remove-an-upload`,children:_jsxs(_components.p,{children:[`No. Uploads and deletions are separate from the form’s `,_jsx(_components.strong,{children:`Save`}),` and `,_jsx(_components.strong,{children:`Discard`}),`.`]})}),_jsx(Accordion,{title:`Can I add more than one file?`,id:`can-i-add-more-than-one-file`,children:_jsx(_components.p,{children:`Yes. Check each file’s result.`})}),_jsx(Accordion,{title:`What is the size limit?`,id:`what-is-the-size-limit`,children:_jsxs(_components.p,{children:[`The upload box says `,_jsx(_components.strong,{children:`Any file format (max. 10MB)`}),`.`]})}),_jsx(Accordion,{title:`Which permission deletes a file?`,id:`which-permission-deletes-a-file`,children:_jsx(_components.p,{children:`Manage Planner.`})}),_jsx(Accordion,{title:`Does deleting a file delete the item or its relationships?`,id:`does-deleting-a-file-delete-the-item-or-its-relationships`,children:_jsx(_components.p,{children:`No. Only the attachment is removed.`})})]}),`\n`,_jsx(Heading,{level:`2`,id:`related-guides`,children:`Related guides`}),`\n`,_jsxs(_components.ul,{children:[`\n`,_jsx(_components.li,{children:_jsx(_components.a,{href:`/user-guides/planner/read-item-details`,children:`Read a Planner item`})}),`\n`,_jsx(_components.li,{children:_jsx(_components.a,{href:`/user-guides/planner/create-and-edit-items`,children:`Create and edit Planner items`})}),`\n`,_jsx(_components.li,{children:_jsx(_components.a,{href:`/user-guides/planner/link-supporting-records`,children:`Link supporting records to Planner items`})}),`\n`]})]})}function MDXContent(props={}){const{wrapper:MDXLayout}={..._provideComponents(),...props.components};return MDXLayout?_jsx(MDXLayout,{...props,children:_jsx(_createMdxContent,{...props})}):_createMdxContent(props)}return{default:MDXContent};function _missingMdxReference(id,component){throw new Error(`Expected `+(component?`component`:`object`)+\" `\"+id+\"` to be defined: you likely forgot to import, pass, or provide it.\")}","frontmatter":{},"scope":{"config":{},"pageMetadata":{"title":"Read and manage Planner files","description":"Find attachments, download a file and understand immediate upload and deletion behavior.","icon":"paperclip","href":"/user-guides/planner/manage-files"}}},"mdxSourceWithNoJs":null},"mdxExtracts":{"tableOfContents":[{"title":"Before you start","slug":"before-you-start","depth":2,"children":[]},{"title":"Download a file","slug":"download-a-file","depth":2,"children":[]},{"title":"Upload files","slug":"upload-files","depth":2,"children":[]},{"title":"Delete an uploaded file","slug":"delete-an-uploaded-file","depth":2,"children":[]},{"title":"Troubleshooting","slug":"troubleshooting","depth":2,"children":[]},{"title":"Frequently asked questions","slug":"frequently-asked-questions","depth":2,"children":[]},{"title":"Related guides","slug":"related-guides","depth":2,"children":[]}],"codeExamples":{}},"jsLinks":[],"subdomain":"msportal","siteName":"MSPortal.ai Documentation","title":"Read and manage Planner files - MSPortal.ai Documentation","navMaps":{"firstHrefInVersion":{},"firstHrefInLanguage":{}},"lastModified":"2026-10-02T01:15:27.483Z","originalFileLocation":"user-guides/planner/manage-files.mdx"},"headHtml":"\u003cscript data-mint-head>(function(){var d=document.documentElement,p=null;if(!p){try{p=localStorage.getItem(\"isDarkMode\")}catch(e){}if(p==='true')p='dark';else if(p==='false')p='light';if(p!=='light'\u0026\u0026p!=='dark'\u0026\u0026p!=='system')p=\"system\"}var r=p==='system'?(matchMedia(\"(prefers-color-scheme: dark)\").matches?'dark':'light'):p;d.classList.remove(r==='dark'?'light':'dark');d.classList.add(r);d.setAttribute(\"data-theme-preference\",p)})();\u003c/script>\u003cmeta data-mint-head name=\"description\" content=\"Find attachments, download a file and understand immediate upload and deletion behavior.\">\u003cmeta data-mint-head name=\"application-name\" content=\"MSPortal.ai Documentation\">\u003cmeta data-mint-head name=\"generator\" content=\"Mintlify\">\u003clink data-mint-head rel=\"icon\" type=\"image/png\" sizes=\"192x192\" href=\"/mintlify-assets/_mintlify/favicons/msportal/MdEo74vho503Sp8Y/_generated/favicon/android-chrome-192x192.png\" media=\"(prefers-color-scheme: light)\">\u003clink data-mint-head rel=\"apple-touch-icon\" type=\"image/png\" sizes=\"180x180\" href=\"/mintlify-assets/_mintlify/favicons/msportal/MdEo74vho503Sp8Y/_generated/favicon/apple-touch-icon.png\">\u003clink data-mint-head rel=\"icon\" type=\"image/png\" sizes=\"16x16\" href=\"/mintlify-assets/_mintlify/favicons/msportal/MdEo74vho503Sp8Y/_generated/favicon/favicon-16x16.png\" media=\"(prefers-color-scheme: light)\">\u003clink data-mint-head rel=\"icon\" type=\"image/png\" sizes=\"32x32\" href=\"/mintlify-assets/_mintlify/favicons/msportal/MdEo74vho503Sp8Y/_generated/favicon/favicon-32x32.png\" media=\"(prefers-color-scheme: light)\">\u003clink data-mint-head rel=\"shortcut icon\" type=\"image/x-icon\" href=\"/mintlify-assets/_mintlify/favicons/msportal/MdEo74vho503Sp8Y/_generated/favicon/favicon.ico\" media=\"(prefers-color-scheme: light)\">\u003clink data-mint-head rel=\"icon\" type=\"image/png\" sizes=\"192x192\" href=\"/mintlify-assets/_mintlify/favicons/msportal/MdEo74vho503Sp8Y/_generated/favicon-dark/android-chrome-192x192.png\" media=\"(prefers-color-scheme: dark)\">\u003clink data-mint-head rel=\"icon\" type=\"image/png\" sizes=\"16x16\" href=\"/mintlify-assets/_mintlify/favicons/msportal/MdEo74vho503Sp8Y/_generated/favicon-dark/favicon-16x16.png\" media=\"(prefers-color-scheme: dark)\">\u003clink data-mint-head rel=\"icon\" type=\"image/png\" sizes=\"32x32\" href=\"/mintlify-assets/_mintlify/favicons/msportal/MdEo74vho503Sp8Y/_generated/favicon-dark/favicon-32x32.png\" media=\"(prefers-color-scheme: dark)\">\u003clink data-mint-head rel=\"shortcut icon\" type=\"image/x-icon\" href=\"/mintlify-assets/_mintlify/favicons/msportal/MdEo74vho503Sp8Y/_generated/favicon-dark/favicon.ico\" media=\"(prefers-color-scheme: dark)\">\u003cmeta data-mint-head property=\"og:title\" content=\"Read and manage Planner files - MSPortal.ai Documentation\">\u003cmeta data-mint-head property=\"og:description\" content=\"Find attachments, download a file and understand immediate upload and deletion behavior.\">\u003cmeta data-mint-head property=\"og:site_name\" content=\"MSPortal.ai Documentation\">\u003cmeta data-mint-head property=\"og:url\" content=\"https://docs.msportal.ai/user-guides/planner/manage-files\">\u003cmeta data-mint-head property=\"og:type\" content=\"website\">\u003cmeta data-mint-head name=\"twitter:card\" content=\"summary_large_image\">\u003cmeta data-mint-head name=\"twitter:title\" content=\"Read and manage Planner files - MSPortal.ai Documentation\">\u003cmeta data-mint-head name=\"twitter:description\" content=\"Find attachments, download a file and understand immediate upload and deletion behavior.\">\u003cmeta data-mint-head name=\"msapplication-config\" content=\"/mintlify-assets/_mintlify/favicons/msportal/MdEo74vho503Sp8Y/_generated/favicon/browserconfig.xml\">\u003cmeta data-mint-head name=\"apple-mobile-web-app-title\" content=\"MSPortal.ai Documentation\">\u003cmeta data-mint-head name=\"msapplication-TileColor\" content=\"#16A34A\">\u003clink data-mint-head rel=\"canonical\" href=\"https://docs.msportal.ai/user-guides/planner/manage-files\">\u003clink data-mint-head rel=\"alternate\" type=\"application/xml\" href=\"/sitemap.xml\">\u003clink data-mint-head rel=\"alternate\" type=\"text/markdown\" href=\"/user-guides/planner/manage-files.md\">\u003cscript data-mint-head type=\"application/ld+json\">{\"@context\":\"https://schema.org\",\"@graph\":[{\"@type\":\"Organization\",\"@id\":\"https://docs.msportal.ai/#organization\",\"name\":\"MSPortal.ai Documentation\",\"url\":\"https://docs.msportal.ai\",\"logo\":{\"@type\":\"ImageObject\",\"url\":\"https://mintcdn.com/msportal/KnbwIXtZSTlVJTt6/logo/light.svg?fit=max\u0026auto=format\u0026n=KnbwIXtZSTlVJTt6\u0026q=85\u0026s=eb69f6d6bf16b2c401770aef19ade1d2\"}},{\"@type\":\"WebSite\",\"@id\":\"https://docs.msportal.ai#website\",\"name\":\"MSPortal.ai Documentation\",\"url\":\"https://docs.msportal.ai\",\"publisher\":{\"@id\":\"https://docs.msportal.ai/#organization\"}},{\"@type\":\"WebPage\",\"@id\":\"https://docs.msportal.ai/user-guides/planner/manage-files#webpage\",\"url\":\"https://docs.msportal.ai/user-guides/planner/manage-files\",\"name\":\"Read and manage Planner files\",\"description\":\"Find attachments, download a file and understand immediate upload and deletion behavior.\",\"dateModified\":\"2026-10-02T01:15:27.483Z\",\"isPartOf\":{\"@id\":\"https://docs.msportal.ai#website\"},\"breadcrumb\":{\"@id\":\"https://docs.msportal.ai/user-guides/planner/manage-files#breadcrumb\"}},{\"@type\":\"BreadcrumbList\",\"@id\":\"https://docs.msportal.ai/user-guides/planner/manage-files#breadcrumb\",\"itemListElement\":[{\"@type\":\"ListItem\",\"position\":1,\"name\":\"Planner\",\"item\":\"https://docs.msportal.ai/user-guides/planner/read-timeline\"},{\"@type\":\"ListItem\",\"position\":2,\"name\":\"Read and manage Planner files\",\"item\":\"https://docs.msportal.ai/user-guides/planner/manage-files\"}]},{\"@type\":[\"Article\",\"TechArticle\"],\"@id\":\"https://docs.msportal.ai/user-guides/planner/manage-files#article\",\"headline\":\"Read and manage Planner files\",\"name\":\"Read and manage Planner files\",\"description\":\"Find attachments, download a file and understand immediate upload and deletion behavior.\",\"url\":\"https://docs.msportal.ai/user-guides/planner/manage-files\",\"mainEntityOfPage\":{\"@id\":\"https://docs.msportal.ai/user-guides/planner/manage-files#webpage\"},\"dateModified\":\"2026-10-02T01:15:27.483Z\",\"publisher\":{\"@id\":\"https://docs.msportal.ai/#organization\"},\"isPartOf\":{\"@id\":\"https://docs.msportal.ai#website\"}}]}\u003c/script>\u003cscript data-mint-head type=\"application/ld+json\">{\"@context\":\"https://schema.org\",\"@type\":\"WebSite\",\"name\":\"MSPortal.ai Documentation\",\"creator\":{\"@type\":\"Organization\",\"name\":\"Mintlify\",\"url\":\"https://mintlify.com\"}}\u003c/script>","siteName":"MSPortal.ai Documentation","nav":{"global":{"anchors":[{"anchor":"MSPortal.ai","icon":"globe","href":"https://msportal.ai"},{"anchor":"Support","icon":"life-ring","href":"mailto:support@msportal.ai"},{"anchor":"Status","icon":"signal","href":"https://status.msportal.ai"}]},"tabs":[{"tab":"Company Guides","groups":[{"group":"Your account","pages":[{"title":"Manage your profile and email preferences","icon":"user-gear","href":"/user-guides/account/manage-your-profile"},{"title":"Understand your role and company access","icon":"shield-halved","href":"/user-guides/account/understand-your-access"},{"title":"Arrange your personal sidebar","icon":"table-columns","href":"/user-guides/account/arrange-your-sidebar"},{"title":"Use the Home AI Assistant","icon":"sparkles","href":"/user-guides/ai-assistant/use-home-assistant"}]},{"group":"Support requests","pages":[{"title":"How to open a ticket","icon":"ticket","href":"/user-guides/ticketing/open-a-ticket"},{"title":"Find and follow up on a ticket","icon":"comments","href":"/user-guides/ticketing/follow-up-on-a-ticket"},{"title":"Create a ticket with AI assistance","icon":"wand-magic-sparkles","href":"/user-guides/ticketing/open-a-ticket-with-ai"},{"title":"Understand your available request templates","icon":"file-lines","href":"/user-guides/ticketing/understand-request-templates"},{"title":"Approve a request","icon":"circle-check","href":"/user-guides/ticketing/approve-a-request"}]},{"group":"Your training","pages":[{"title":"Training","icon":"graduation-cap","href":"/user-guides/training/index"},{"title":"Find and enroll in a training course","icon":"book-open","href":"/user-guides/training/find-and-enroll"},{"title":"Take a course and track progress","icon":"graduation-cap","href":"/user-guides/training/take-a-course"},{"title":"View and share a training certificate","icon":"award","href":"/user-guides/training/certificates"},{"title":"Open your Huntress training","icon":"shield-check","href":"/user-guides/training/open-huntress-training"},{"title":"Find Huntress training assignments","icon":"graduation-cap","href":"/user-guides/training/read-huntress-assignments"},{"title":"Read a Huntress curriculum and preview episodes","icon":"book-open","href":"/user-guides/training/read-huntress-curriculum"}]},{"group":"Documentation","pages":[{"title":"Documentation","icon":"book","href":"/user-guides/documentation/index"},{"title":"Find and read shared documents","icon":"file-lines","href":"/user-guides/documentation/find-shared-documents"},{"title":"Use the Documentation Hub","icon":"grid-2","href":"/user-guides/documentation/resource-hub"},{"title":"Use shared passwords","icon":"key","href":"/user-guides/documentation/shared-passwords"},{"title":"View shared IT records and procedures","icon":"server","href":"/user-guides/documentation/view-it-records"}]},{"group":"Notifications","pages":[{"title":"Notifications","icon":"bell","href":"/user-guides/notifications/index"},{"title":"Read and manage notifications","icon":"bell","href":"/user-guides/notifications/read-notifications"},{"title":"Review automation approvals","icon":"check-to-slot","href":"/user-guides/notifications/review-approvals"}]},{"group":"Your onboarding","pages":[{"title":"Open your onboarding portal","icon":"door-open","href":"/user-guides/client-onboarding/open-your-onboarding"},{"title":"Complete onboarding tasks and forms","icon":"list-check","href":"/user-guides/client-onboarding/complete-tasks-and-forms"},{"title":"Upload onboarding documents and secure files","icon":"file-arrow-up","href":"/user-guides/client-onboarding/upload-files"},{"title":"Hand over credentials during onboarding","icon":"key","href":"/user-guides/client-onboarding/hand-over-credentials"},{"title":"Review onboarding approvals and sign documents","icon":"signature","href":"/user-guides/client-onboarding/review-and-sign"},{"title":"Use onboarding meetings, training, surveys, and reference pages","icon":"clipboard-list","href":"/user-guides/client-onboarding/meetings-training-and-surveys"}]},{"group":"Devices","pages":[{"title":"Devices","icon":"computer","href":"/user-guides/devices/index"},{"title":"Find and export your devices","icon":"laptop","href":"/user-guides/devices/find-devices"},{"title":"Understand device details","icon":"computer","href":"/user-guides/devices/understand-device-details"},{"title":"Add and edit device records","icon":"laptop-medical","href":"/user-guides/devices/add-and-edit-devices"},{"title":"View networks and configurations","icon":"network-wired","href":"/user-guides/devices/view-networks-and-configurations"},{"title":"Track installed software","icon":"box-open","href":"/user-guides/devices/track-software"}]},{"group":"Surveys and feedback","pages":[{"title":"Complete a questionnaire","icon":"clipboard-question","href":"/user-guides/surveys/complete-a-survey"},{"title":"Respond to an NPS survey","icon":"star","href":"/user-guides/surveys/respond-to-nps"},{"title":"Rate a support experience","icon":"comment-smile","href":"/user-guides/surveys/rate-your-support"},{"title":"Find surveys and read questionnaire results","icon":"clipboard-list","href":"/user-guides/surveys/view-survey-results"},{"title":"Read NPS analytics","icon":"chart-column","href":"/user-guides/surveys/read-nps-analytics"},{"title":"Read and export support satisfaction feedback","icon":"face-smile","href":"/user-guides/surveys/read-csat-feedback"}]},{"group":"Invoices","pages":[{"title":"Invoices","icon":"file-invoice-dollar","href":"/user-guides/invoices/index"},{"title":"Find and review invoices","icon":"file-invoice","href":"/user-guides/invoices/view-invoices"},{"title":"Download and export invoices","icon":"download","href":"/user-guides/invoices/download-invoices"},{"title":"Use an invoice payment link","icon":"credit-card","href":"/user-guides/invoices/pay-an-invoice"}]},{"group":"Quotes","pages":[{"title":"Quotes","icon":"file-contract","href":"/user-guides/quotes/index"},{"title":"Find and open a quote","icon":"file-contract","href":"/user-guides/quotes/view-quotes"},{"title":"Read a quote’s details","icon":"file-invoice-dollar","href":"/user-guides/quotes/read-quote-details"},{"title":"Download quote documents and export the list","icon":"file-arrow-down","href":"/user-guides/quotes/download-quotes"},{"title":"Troubleshoot missing Quoter quotes and company links","icon":"magnifying-glass","href":"/user-guides/quotes/troubleshoot-quoter-quotes"},{"title":"Troubleshoot QuoteWerks quotes and QuoteValet links","icon":"file-invoice-dollar","href":"/user-guides/quotes/troubleshoot-quotewerks-quotes"},{"title":"Troubleshoot Salesbuildr quotes and PDFs","icon":"file-invoice-dollar","href":"/user-guides/quotes/troubleshoot-salesbuildr-quotes"}]},{"group":"Agreements and contracts","pages":[{"title":"Agreements and contracts","icon":"file-signature","href":"/user-guides/agreements/index"},{"title":"Find and review an agreement","icon":"file-contract","href":"/user-guides/agreements/view-agreements"},{"title":"Understand agreement balances","icon":"clock","href":"/user-guides/agreements/read-balances"},{"title":"Open an agreement PDF","icon":"file-pdf","href":"/user-guides/agreements/download-documents"}]},{"group":"Storefront","pages":[{"title":"Storefront","icon":"store","href":"/user-guides/storefront/index"},{"title":"Review your subscriptions","icon":"layer-group","href":"/user-guides/storefront/view-subscriptions"},{"title":"Review Azure usage","icon":"cloud","href":"/user-guides/storefront/view-azure-usage"}]},{"group":"Company overview","pages":[{"title":"Company overview","icon":"buildings","href":"/user-guides/company-overview/index"},{"title":"Read the Company overview","icon":"chart-simple","href":"/user-guides/company-overview/read-company-overview"}]},{"group":"Planner","pages":[{"title":"Read the Planner timeline","icon":"calendar-days","href":"/user-guides/planner/read-timeline"},{"title":"Filter the Planner timeline","icon":"filter","href":"/user-guides/planner/filter-timeline"},{"title":"Find Planner items in List View","icon":"list","href":"/user-guides/planner/find-planner-items"},{"title":"Find archived Planner work","icon":"box-archive","href":"/user-guides/planner/find-archived-items"},{"title":"Read a Planner item","icon":"clipboard-list","href":"/user-guides/planner/read-item-details"},{"title":"Understand Planner types and budget categories","icon":"layer-group","href":"/user-guides/planner/understand-types"},{"title":"Open records linked to Planner work","icon":"link","href":"/user-guides/planner/read-linked-records"},{"title":"Understand PSA-linked Planner work","icon":"file-import","href":"/user-guides/planner/understand-psa-linked-items"},{"title":"Understand Standards work in Planner","description":"Read technology-standard tasks shared by your MSP and understand their source, statuses and estimates.","icon":"list-check","href":"/user-guides/planner/understand-standards-items"},{"title":"Read and manage Planner files","icon":"paperclip","href":"/user-guides/planner/manage-files"},{"title":"Plan costs and hours","description":"Enter quantities, unit costs, recurring estimates, effort and probability for a Planner item.","icon":"calculator","href":"/user-guides/planner/plan-costs-and-hours"},{"title":"Read and export Planner Analytics","icon":"chart-simple","href":"/user-guides/planner/read-analytics"},{"title":"Understand Planner Analytics charts","icon":"chart-pie","href":"/user-guides/planner/understand-analytics-charts"}]},{"group":"Calendar","pages":[{"title":"Find events in Calendar","icon":"calendar","href":"/user-guides/calendar/find-calendar-events"},{"title":"Filter Calendar events and layers","icon":"calendar","href":"/user-guides/calendar/filter-calendar-events"},{"title":"Find your upcoming and past meetings","icon":"calendar-check","href":"/user-guides/calendar/find-my-meetings"},{"title":"Find meetings in List View","icon":"list","href":"/user-guides/calendar/find-meetings-list"},{"title":"Read a meeting workspace","icon":"calendar-check","href":"/user-guides/calendar/read-meeting-workspace"},{"title":"Read meeting agenda items and linked records","icon":"list-check","href":"/user-guides/calendar/read-meeting-agenda"},{"title":"Present and navigate a meeting agenda","icon":"presentation-screen","href":"/user-guides/calendar/presenting"},{"title":"Understand a meeting summary","icon":"envelope-open-text","href":"/user-guides/calendar/understand-meeting-summary"},{"title":"Understand Calendar freeze windows","icon":"snowflake","href":"/user-guides/calendar/understand-change-freezes"}]},{"group":"Goals","pages":[{"title":"Goals and objectives","icon":"bullseye","href":"/user-guides/goals/index"},{"title":"Find and read goals","icon":"bullseye","href":"/user-guides/goals/read-goals"},{"title":"Create or update a goal","icon":"bullseye","href":"/user-guides/goals/create-and-update-goals"},{"title":"Update several goals or delete a goal","icon":"bullseye","href":"/user-guides/goals/bulk-update-and-delete"},{"title":"Connect goals to Planner and meetings","icon":"bullseye","href":"/user-guides/goals/link-to-planner-and-meetings"}]},{"group":"Compliance","pages":[{"title":"Compliance","icon":"shield-halved","href":"/user-guides/compliance/index"},{"title":"Find compliance checks and understand results","icon":"shield-halved","href":"/user-guides/compliance/find-and-read-checks"},{"title":"Read compliance guidance, evidence, and history","icon":"shield-halved","href":"/user-guides/compliance/read-evidence-and-history"},{"title":"Export the compliance check list","icon":"shield-halved","href":"/user-guides/compliance/export-checks"},{"title":"Review completed compliance assessments","icon":"clock-rotate-left","href":"/user-guides/compliance/view-check-history"}]},{"group":"Backup","pages":[{"title":"Backup","icon":"shield-halved","href":"/user-guides/backup/index"},{"title":"Read the Backup Dashboard","icon":"shield-halved","href":"/user-guides/backup/read-dashboard"},{"title":"Find device backups","icon":"shield-halved","href":"/user-guides/backup/find-device-backups"},{"title":"Read Microsoft 365 backups","icon":"shield-halved","href":"/user-guides/backup/read-microsoft-365-backups"},{"title":"Read Kaseya and Spanning backup health","icon":"shield-halved","href":"/user-guides/backup/read-saas-backup-health"},{"title":"Read backup activity and device details","icon":"shield-halved","href":"/user-guides/backup/read-backup-details"},{"title":"Review backup alerts","icon":"shield-halved","href":"/user-guides/backup/review-alerts"}]},{"group":"Security","pages":[{"title":"Security","icon":"shield-halved","href":"/user-guides/security/index"},{"title":"Read the Security Dashboard","icon":"shield-halved","href":"/user-guides/security/read-dashboard"},{"title":"Read Cork security compliance events","icon":"shield-halved","href":"/user-guides/security/read-cork-events"},{"title":"Find and read vulnerabilities","icon":"shield-halved","href":"/user-guides/security/read-vulnerabilities"},{"title":"Add security findings to Planner","icon":"shield-halved","href":"/user-guides/security/add-to-planner"},{"title":"Add Cork findings to a meeting agenda","icon":"shield-halved","href":"/user-guides/security/add-to-meeting"},{"title":"Read Huntress security items","icon":"shield-halved","href":"/user-guides/security/read-huntress"},{"title":"Security awareness training","icon":"shield-check","href":"/user-guides/training/security-awareness"},{"title":"Read security awareness learner status","icon":"user-shield","href":"/user-guides/training/read-awareness-status"},{"title":"Read a Breach Secure Now learner's risk details","icon":"user-shield","href":"/user-guides/training/read-bsn-risk"},{"title":"Read CyberHoot company summaries","icon":"shield-check","href":"/user-guides/security/read-cyberhoot-companies"},{"title":"Review HootPhish challenges","icon":"trophy","href":"/user-guides/security/read-hootphish-challenges"},{"title":"Read HootPhish participant results","icon":"users","href":"/user-guides/security/read-hootphish-participants"},{"title":"Find security endpoints","icon":"shield-halved","href":"/user-guides/security/find-endpoints"},{"title":"Read security endpoint details","icon":"shield-halved","href":"/user-guides/security/read-endpoint-details"},{"title":"Read Acronis EDR incidents","icon":"shield-halved","href":"/user-guides/security/read-edr-incidents"},{"title":"Follow up on EDR incidents","icon":"shield-halved","href":"/user-guides/security/follow-up-edr-incidents"}]},{"group":"Projects","pages":[{"title":"Projects","icon":"folder-open","href":"/user-guides/projects/index"},{"title":"Projects and Onboarding are coming together","icon":"diagram-project","href":"/user-guides/projects/upcoming-onboarding-changes"},{"title":"Find and open a project","icon":"folder-open","href":"/user-guides/projects/find-projects"},{"title":"Filter and sort projects","icon":"filter","href":"/user-guides/projects/filter-projects"},{"title":"Project Workspace","icon":"list-check","href":"/user-guides/projects/workspace"},{"title":"Project Documents","icon":"folder-open","href":"/user-guides/projects/documents"},{"title":"Project Forms","icon":"clipboard-list","href":"/user-guides/projects/forms"},{"title":"Read and filter project ticket Kanban","icon":"table-columns","href":"/user-guides/projects/read-ticket-kanban"},{"title":"Read a project schedule","icon":"calendar-days","href":"/user-guides/projects/read-project-schedule"},{"title":"Filter the project schedule","icon":"filter","href":"/user-guides/projects/filter-project-schedule"},{"title":"Read the project overview","icon":"file-lines","href":"/user-guides/projects/read-project-overview"},{"title":"Read project phases and tickets","icon":"layer-group","href":"/user-guides/projects/read-project-phases"},{"title":"Read project updates","icon":"message","href":"/user-guides/projects/read-project-updates"},{"title":"Read project milestones","icon":"calendar","href":"/user-guides/projects/read-project-timeline"},{"title":"Read deliverables and download project files","icon":"file-arrow-down","href":"/user-guides/projects/read-project-deliverables"},{"title":"Respond to project decisions and action items","icon":"list-check","href":"/user-guides/projects/respond-to-project-actions"}]},{"group":"Cloud","pages":[{"title":"Read cloud security posture","icon":"shield-check","href":"/user-guides/cloud/posture"},{"title":"Find and filter posture snapshots","icon":"filter","href":"/user-guides/cloud/find-posture"},{"title":"Understand Google posture checks","icon":"calculator","href":"/user-guides/cloud/google-posture-checks"},{"title":"Read Microsoft Secure Score","icon":"shield-check","href":"/user-guides/microsoft-365/index"},{"title":"Find and filter Secure Score controls","icon":"shield-check","href":"/user-guides/microsoft-365/find-secure-score-controls"},{"title":"Read a Secure Score control","icon":"shield-check","href":"/user-guides/microsoft-365/read-secure-score-control"},{"title":"Read Microsoft Current Posture","icon":"radar","href":"/user-guides/microsoft-365/posture"},{"title":"Find and read Current Posture findings","icon":"radar","href":"/user-guides/microsoft-365/find-posture-findings"},{"title":"Read cloud user accounts","icon":"users","href":"/user-guides/cloud/users"},{"title":"Find and filter cloud users","icon":"filter","href":"/user-guides/cloud/find-users"},{"title":"Export cloud users","icon":"file-csv","href":"/user-guides/cloud/export-users"},{"title":"Read cloud groups and members","icon":"user-group","href":"/user-guides/cloud/groups"},{"title":"Find and filter cloud groups","icon":"filter","href":"/user-guides/cloud/find-groups"},{"title":"Read cloud license usage","icon":"id-card","href":"/user-guides/cloud/licenses"},{"title":"Find, filter, and export licenses","icon":"filter","href":"/user-guides/cloud/filter-licenses"},{"title":"View license assignments and combinations","icon":"users","href":"/user-guides/cloud/view-license-assignments"},{"title":"Read cloud and registrar domains","icon":"globe","href":"/user-guides/cloud/domains"},{"title":"Find and export domains","icon":"filter","href":"/user-guides/cloud/filter-domains"},{"title":"Review domain renewal information","icon":"calendar","href":"/user-guides/cloud/review-domain-renewals"}]},{"group":"Budgets","pages":[{"title":"Find and open a budget","icon":"magnifying-glass","href":"/user-guides/budgets/find-budgets"},{"title":"Create and edit a company budget","icon":"calculator","href":"/user-guides/budgets/create-and-edit-budgets"},{"title":"Duplicate a budget","icon":"copy","href":"/user-guides/budgets/duplicate-budget"},{"title":"Delete unwanted draft budgets","icon":"trash-can","href":"/user-guides/budgets/delete-budgets"},{"title":"Add and edit budget line items","icon":"list","href":"/user-guides/budgets/edit-line-items"},{"title":"Import budget line items from Excel","icon":"file-excel","href":"/user-guides/budgets/import-excel"},{"title":"Copy recurring costs from an earlier budget","icon":"clock-rotate-left","href":"/user-guides/budgets/import-previous-year"},{"title":"Add Planner, goal and product costs to a budget","icon":"list-check","href":"/user-guides/budgets/import-planning-and-products"},{"title":"Add Microsoft 365 licensing costs to a budget","icon":"key","href":"/user-guides/budgets/import-microsoft-365-licensing"},{"title":"Read and adjust a company budget forecast","icon":"chart-line","href":"/user-guides/budgets/read-budget-forecast"},{"title":"Sync a forecast from budgets or Planner","icon":"arrows-rotate","href":"/user-guides/budgets/sync-budget-forecast"},{"title":"Read a budget overview","icon":"calculator","href":"/user-guides/budgets/read-budget"},{"title":"Arrange budget sections","icon":"arrow-down-wide-short","href":"/user-guides/budgets/arrange-budget-sections"},{"title":"Download or print a budget","icon":"file-export","href":"/user-guides/budgets/export-and-print-budgets"},{"title":"Read a budget monthly breakdown","icon":"calendar-days","href":"/user-guides/budgets/read-monthly-breakdown"},{"title":"Adjust a budget amount for one month","icon":"calendar-pen","href":"/user-guides/budgets/edit-monthly-overrides"},{"title":"Approve and Lock a Budget","icon":"lock","href":"/user-guides/budgets/approving-and-locking-budgets"},{"title":"Track Budget Actuals","icon":"chart-line","href":"/user-guides/budgets/tracking-budget-actuals"},{"title":"Resolve Actuals Exceptions","icon":"list-check","href":"/user-guides/budgets/resolving-actuals-exceptions"},{"title":"Find and understand budget products","icon":"box","href":"/user-guides/budgets/read-product-catalog"},{"title":"Create and edit budget products","icon":"box","href":"/user-guides/budgets/manage-products"},{"title":"Bulk edit and delete budget products","icon":"box","href":"/user-guides/budgets/bulk-edit-products"},{"title":"Create budget products from Planner","icon":"box","href":"/user-guides/budgets/import-products-from-planner"}]},{"group":"Dashboards","pages":[{"title":"Read and filter a dashboard","icon":"chart-mixed","href":"/user-guides/dashboards/read-a-dashboard"},{"title":"Understand dashboard exclusions","icon":"filter","href":"/user-guides/dashboards/understand-dashboard-exclusions"},{"title":"Open an external dashboard","icon":"chart-mixed","href":"/user-guides/dashboards/open-external-dashboard"},{"title":"Inspect tickets behind dashboard metrics","icon":"chart-mixed","href":"/user-guides/dashboards/inspect-dashboard-tickets"},{"title":"Export a dashboard to PDF","icon":"chart-mixed","href":"/user-guides/dashboards/export-dashboard"}]}]},{"tab":"MSP Guides","groups":[{"group":"Getting Started","pages":[{"title":"MSP guides","icon":"book-open","href":"/user-guides/getting-started"},{"title":"Quick start for MSP staff","icon":"book-open","href":"/user-guides/getting-started/quick-start"},{"title":"Work through your portal launch plan","icon":"rocket","href":"/user-guides/getting-started/launch-center"},{"group":"Navigation and access","expanded":false,"pages":[{"title":"How data moves through MSPortal","icon":"diagram-project","href":"/user-guides/getting-started/data-flow"},{"title":"Find pages and records with Search","icon":"magnifying-glass","href":"/user-guides/getting-started/universal-search"},{"title":"Customize the sidebar","icon":"book-open","href":"/user-guides/getting-started/customizing-the-sidebar"},{"title":"Use keyboard shortcuts","icon":"keyboard","href":"/user-guides/getting-started/keyboard-shortcuts"},{"title":"How to Create a New User Role","icon":"shield-halved","href":"/user-guides/getting-started/how-to-create-a-new-user-role"},{"title":"Control what Company users can see","icon":"eye-slash","href":"/user-guides/getting-started/hiding-items-from-clients"}]},{"group":"MSP Setup Playbook","expanded":false,"pages":[{"title":"MSP setup playbook","sidebarTitle":"MSP setup playbook","icon":"rocket","href":"/user-guides/getting-started/onboarding/index"},{"title":"Tenant details","sidebarTitle":"Tenant details","icon":"building","href":"/user-guides/getting-started/onboarding/tenant-details"},{"title":"Support identity and AI settings","sidebarTitle":"Support identity and AI settings","icon":"sparkles","href":"/user-guides/getting-started/onboarding/ai-settings"},{"title":"Portal branding","sidebarTitle":"Portal branding","icon":"palette","href":"/user-guides/getting-started/onboarding/branding"},{"title":"Staff access groups","sidebarTitle":"Staff access groups","icon":"users","href":"/user-guides/getting-started/onboarding/tenant-roles"},{"title":"Company access groups","sidebarTitle":"Company access groups","icon":"shield","href":"/user-guides/getting-started/onboarding/company-permission-groups"},{"title":"Account teams and Team Roles","sidebarTitle":"Account teams and Team Roles","icon":"user-cog","href":"/user-guides/getting-started/onboarding/company-roles"},{"title":"Choose launch integrations","sidebarTitle":"Choose launch integrations","icon":"puzzle-piece","href":"/user-guides/getting-started/onboarding/integration-selection"},{"title":"PSA connection","sidebarTitle":"PSA connection","icon":"ticket","href":"/user-guides/getting-started/onboarding/psa-setup"},{"title":"Prepare client ticketing","sidebarTitle":"Prepare client ticketing","icon":"sliders","href":"/user-guides/getting-started/onboarding/ticket-settings"},{"title":"RMM connection","sidebarTitle":"RMM connection","icon":"desktop","href":"/user-guides/getting-started/onboarding/rmm-setup"},{"title":"Import rollout devices","sidebarTitle":"Import rollout devices","icon":"server","href":"/user-guides/getting-started/onboarding/device-import"},{"title":"Set up a sending domain","sidebarTitle":"Set up a sending domain","icon":"envelope","href":"/user-guides/getting-started/onboarding/email-domain"},{"title":"Prepare training for launch","sidebarTitle":"Prepare training for launch","icon":"graduation-cap","href":"/user-guides/getting-started/onboarding/training"},{"title":"Review billing before launch","sidebarTitle":"Review billing before launch","icon":"credit-card","href":"/user-guides/getting-started/onboarding/billing"},{"title":"Connect rollout companies to Microsoft 365","sidebarTitle":"Connect rollout companies to Microsoft 365","icon":"cloud","href":"/user-guides/getting-started/onboarding/company-m365"},{"title":"Prepare Company users","sidebarTitle":"Prepare Company users","icon":"users","href":"/user-guides/getting-started/onboarding/company-users"}]},{"group":"Your account","expanded":false,"pages":[{"title":"Manage your profile and email preferences","icon":"user-gear","href":"/msp-guides/account/manage-your-profile"},{"title":"Understand your role and company access","icon":"shield-halved","href":"/msp-guides/account/understand-your-access"},{"title":"Arrange your personal sidebar","icon":"table-columns","href":"/msp-guides/account/arrange-your-sidebar"},{"title":"Tasks and notes","icon":"list-check","href":"/user-guides/tasks/index"},{"title":"Import and add linked tasks","icon":"file-import","href":"/user-guides/tasks/import-tasks"},{"title":"Notes and AI task suggestions","icon":"notebook-pen","href":"/user-guides/tasks/notes"}]},{"group":"AI and MCP","expanded":false,"pages":[{"title":"AI Assistant","icon":"sparkles","href":"/user-guides/ai-assistant/index"},{"title":"Use the Home AI Assistant","icon":"sparkles","href":"/msp-guides/ai-assistant/use-home-assistant"},{"title":"MCP Server","icon":"plug","href":"/user-guides/mcp-server/index"},{"title":"Connect GitHub Copilot","icon":"github","href":"/user-guides/mcp-server/github-copilot"},{"title":"MCP Tools Reference","icon":"screwdriver-wrench","href":"/user-guides/mcp-server/tools-reference"}]}]},{"group":"Service Delivery","pages":[{"group":"Client Onboarding","expanded":false,"pages":[{"title":"Client Onboarding","icon":"clipboard-check","href":"/user-guides/client-onboarding/index"},{"title":"Open your onboarding portal","icon":"door-open","href":"/user-guides/client-onboarding/open-your-onboarding"},{"title":"Complete onboarding tasks and forms","icon":"list-check","href":"/user-guides/client-onboarding/complete-tasks-and-forms"},{"title":"Upload onboarding documents and secure files","icon":"file-arrow-up","href":"/user-guides/client-onboarding/upload-files"},{"title":"Hand over credentials during onboarding","icon":"key","href":"/user-guides/client-onboarding/hand-over-credentials"},{"title":"Review onboarding approvals and sign documents","icon":"signature","href":"/user-guides/client-onboarding/review-and-sign"},{"title":"Use onboarding meetings, training, surveys, and reference pages","icon":"clipboard-list","href":"/user-guides/client-onboarding/meetings-training-and-surveys"},{"title":"Quick Start","icon":"rocket","href":"/user-guides/client-onboarding/quick-start"},{"title":"Onboarding Templates","icon":"copy","href":"/user-guides/client-onboarding/templates"},{"title":"Client Pages","icon":"book-open","href":"/user-guides/client-onboarding/pages"},{"title":"Onboarding Forms","icon":"clipboard-list","href":"/user-guides/client-onboarding/forms"},{"title":"Managing Portals","icon":"bars-progress","href":"/user-guides/client-onboarding/managing-portals"},{"title":"Link an onboarding template task to a Standard","icon":"link","href":"/user-guides/client-onboarding/link-task-to-standard"},{"title":"Retrieve onboarding credentials and secure files","icon":"shield-halved","href":"/user-guides/client-onboarding/retrieve-secure-submissions"},{"title":"Custom Dates and Countdowns","icon":"stopwatch","href":"/user-guides/client-onboarding/custom-dates"},{"title":"Understand the client onboarding portal","icon":"browser","href":"/user-guides/client-onboarding/client-portal"}]},{"group":"Training","expanded":false,"pages":[{"title":"Training","icon":"graduation-cap","href":"/user-guides/training/index"},{"title":"Find and enroll in a training course","icon":"book-open","href":"/user-guides/training/find-and-enroll"},{"title":"Take a course and track progress","icon":"graduation-cap","href":"/user-guides/training/take-a-course"},{"title":"View and share a training certificate","icon":"award","href":"/user-guides/training/certificates"},{"title":"Enable training for companies and users","icon":"graduation-cap","href":"/user-guides/training/enabling-training"},{"title":"Manage learning paths","icon":"route","href":"/user-guides/training/learning-paths"},{"title":"Security awareness training","icon":"shield-check","href":"/user-guides/training/security-awareness"},{"title":"Read security awareness learner status","icon":"user-shield","href":"/user-guides/training/read-awareness-status"},{"title":"Read a Breach Secure Now learner's risk details","icon":"user-shield","href":"/user-guides/training/read-bsn-risk"},{"title":"Open your Huntress training","icon":"shield-check","href":"/user-guides/training/open-huntress-training"},{"title":"Find Huntress training assignments","icon":"graduation-cap","href":"/user-guides/training/read-huntress-assignments"},{"title":"Read a Huntress curriculum and preview episodes","icon":"book-open","href":"/user-guides/training/read-huntress-curriculum"}]},{"group":"Cloud","expanded":false,"pages":[{"title":"Cloud overview","icon":"cloud","href":"/user-guides/cloud/index"},{"title":"Read cloud security posture","icon":"shield-check","href":"/user-guides/cloud/posture"},{"title":"Find and filter posture snapshots","icon":"filter","href":"/user-guides/cloud/find-posture"},{"title":"Understand Google posture checks","icon":"calculator","href":"/user-guides/cloud/google-posture-checks"},{"title":"Read cloud user accounts","icon":"users","href":"/user-guides/cloud/users"},{"title":"Find and filter cloud users","icon":"filter","href":"/user-guides/cloud/find-users"},{"title":"Export cloud users","icon":"file-csv","href":"/user-guides/cloud/export-users"},{"title":"Read cloud groups and members","icon":"user-group","href":"/user-guides/cloud/groups"},{"title":"Find and filter cloud groups","icon":"filter","href":"/user-guides/cloud/find-groups"},{"title":"Manage client group visibility","icon":"eye-slash","href":"/user-guides/cloud/manage-group-visibility"},{"title":"Read cloud license usage","icon":"id-card","href":"/user-guides/cloud/licenses"},{"title":"Find, filter, and export licenses","icon":"filter","href":"/user-guides/cloud/filter-licenses"},{"title":"View license assignments and combinations","icon":"users","href":"/user-guides/cloud/view-license-assignments"},{"title":"Read cloud and registrar domains","icon":"globe","href":"/user-guides/cloud/domains"},{"title":"Find and export domains","icon":"filter","href":"/user-guides/cloud/filter-domains"},{"title":"Review domain renewal information","icon":"calendar","href":"/user-guides/cloud/review-domain-renewals"}]},{"group":"Microsoft 365","expanded":false,"pages":[{"title":"Read Microsoft Secure Score","icon":"shield-check","href":"/user-guides/microsoft-365/index"},{"title":"Find and filter Secure Score controls","icon":"shield-check","href":"/user-guides/microsoft-365/find-secure-score-controls"},{"title":"Read a Secure Score control","icon":"shield-check","href":"/user-guides/microsoft-365/read-secure-score-control"},{"title":"Export Secure Score controls","icon":"shield-check","href":"/user-guides/microsoft-365/export-secure-score"},{"title":"Plan work from Secure Score","icon":"list-check","href":"/user-guides/microsoft-365/plan-secure-score-work"},{"title":"Read Microsoft Current Posture","icon":"radar","href":"/user-guides/microsoft-365/posture"},{"title":"Find and read Current Posture findings","icon":"radar","href":"/user-guides/microsoft-365/find-posture-findings"},{"title":"Review and reopen Current Posture findings","icon":"radar","href":"/user-guides/microsoft-365/review-posture-findings"},{"title":"Connecting Companies to Microsoft 365","icon":"plug","href":"/user-guides/microsoft-365/connecting-companies"},{"title":"Microsoft 365 users","icon":"users","href":"/user-guides/microsoft-365/users"},{"title":"Microsoft 365 licenses","icon":"id-card","href":"/user-guides/microsoft-365/licenses"},{"title":"Microsoft 365 domains","icon":"globe","href":"/user-guides/microsoft-365/domains"}]},{"group":"Ticketing","expanded":false,"pages":[{"title":"Tickets","icon":"ticket","href":"/user-guides/ticketing/index"},{"title":"How to open a ticket","icon":"ticket","href":"/msp-guides/ticketing/open-a-ticket"},{"title":"Find and follow up on a ticket","icon":"comments","href":"/msp-guides/ticketing/follow-up-on-a-ticket"},{"title":"Time ticket work with a timer","icon":"stopwatch","href":"/user-guides/ticketing/time-work-with-timers"},{"title":"How to Create a Ticket Template","icon":"file-lines","href":"/user-guides/ticketing/how-to-create-a-ticket-template"},{"title":"Create a ticket with AI assistance","icon":"wand-magic-sparkles","href":"/msp-guides/ticketing/open-a-ticket-with-ai"},{"title":"Change Management","icon":"shield-check","href":"/user-guides/ticketing/change-management"},{"title":"Ticket approval chains","icon":"list-check","href":"/user-guides/ticketing/ticket-approval-chains"},{"title":"Flow Webhook Recipient","icon":"webhook","href":"/user-guides/ticketing/flow-webhook-recipient"},{"title":"Understand your available request templates","icon":"file-lines","href":"/msp-guides/ticketing/understand-request-templates"},{"title":"Create and preview a ticket template","icon":"file-lines","href":"/user-guides/ticketing/create-and-preview-ticket-template"}]},{"group":"Compliance","expanded":false,"pages":[{"title":"Compliance","icon":"shield-halved","href":"/user-guides/compliance/index"},{"title":"Find compliance checks and understand results","icon":"shield-halved","href":"/user-guides/compliance/find-and-read-checks"},{"title":"Read compliance guidance, evidence, and history","icon":"shield-halved","href":"/user-guides/compliance/read-evidence-and-history"},{"title":"Export the compliance check list","icon":"shield-halved","href":"/user-guides/compliance/export-checks"},{"title":"Compliance AI","icon":"sparkles","href":"/user-guides/compliance/compliance-ai"},{"title":"Risk Management","icon":"shield-halved","href":"/user-guides/compliance/risk-management"},{"title":"Liongard Compliance Metrics","icon":"gauge-high","href":"/user-guides/compliance/liongard-metrics"},{"title":"Adding CIS Benchmarks","icon":"book","href":"/user-guides/compliance/adding-cis-benchmarks"},{"title":"Add NIS2 playbooks","icon":"book","href":"/user-guides/compliance/adding-nis2-playbooks"},{"title":"Review completed compliance assessments","icon":"clock-rotate-left","href":"/user-guides/compliance/view-check-history"}]},{"group":"Playbooks","expanded":false,"pages":[{"title":"Use playbooks to prepare compliance reviews","icon":"book","href":"/user-guides/playbooks/index"}]},{"group":"Projects","expanded":false,"pages":[{"title":"Projects","icon":"folder-open","href":"/user-guides/projects/index"},{"title":"Projects and Onboarding are coming together","icon":"diagram-project","href":"/user-guides/projects/upcoming-onboarding-changes"},{"title":"Find and open a project","icon":"folder-open","href":"/user-guides/projects/find-projects"},{"title":"Filter and sort projects","icon":"filter","href":"/user-guides/projects/filter-projects"},{"title":"Native Projects: Start to Finish","icon":"folder-open","href":"/user-guides/projects/native-projects"},{"title":"Project Templates","icon":"layer-group","href":"/user-guides/projects/templates"},{"title":"Project AI, MCP, and Client Reviews","icon":"sparkles","href":"/user-guides/projects/ai-and-client-reviews"},{"title":"Project Workspace","icon":"list-check","href":"/user-guides/projects/workspace"},{"title":"Read and filter project ticket Kanban","icon":"table-columns","href":"/user-guides/projects/read-ticket-kanban"},{"title":"Read a project schedule","icon":"calendar-days","href":"/user-guides/projects/read-project-schedule"},{"title":"Filter the project schedule","icon":"filter","href":"/user-guides/projects/filter-project-schedule"},{"title":"Dispatch project work","icon":"calendar-clock","href":"/user-guides/projects/dispatch-board"},{"title":"Read the project overview","icon":"file-lines","href":"/user-guides/projects/read-project-overview"},{"title":"Read project phases and tickets","icon":"layer-group","href":"/user-guides/projects/read-project-phases"},{"title":"Use phase and ticket action menus","icon":"ellipsis","href":"/user-guides/projects/use-phase-ticket-actions"},{"title":"Project Team and Onboarding Contacts","icon":"users","href":"/user-guides/projects/read-project-team"},{"title":"Edit the project goal and description","icon":"pen-to-square","href":"/user-guides/projects/edit-project-details"},{"title":"Manage project contacts and the client sponsor","icon":"address-book","href":"/user-guides/projects/manage-project-contacts"},{"title":"Read project updates","icon":"message","href":"/user-guides/projects/read-project-updates"},{"title":"Read project milestones","icon":"calendar","href":"/user-guides/projects/read-project-timeline"},{"title":"Read deliverables and download project files","icon":"file-arrow-down","href":"/user-guides/projects/read-project-deliverables"},{"title":"Create and manage project deliverables","icon":"list-check","href":"/user-guides/projects/manage-project-deliverables"},{"title":"Upload and share deliverable documents","icon":"file-arrow-up","href":"/user-guides/projects/manage-deliverable-documents"},{"title":"Write and share project updates","icon":"pen-to-square","href":"/user-guides/projects/write-project-updates"},{"title":"Create and manage project milestones","icon":"flag-checkered","href":"/user-guides/projects/manage-project-milestones"},{"title":"Project Calendar","icon":"calendar","href":"/user-guides/projects/calendar"},{"title":"Respond to project decisions and action items","icon":"list-check","href":"/user-guides/projects/respond-to-project-actions"},{"title":"Create and manage project decisions and action items","icon":"clipboard-list","href":"/user-guides/projects/manage-project-actions"},{"title":"Export a project to Excel","icon":"file-spreadsheet","href":"/user-guides/projects/export-project-to-excel"}]},{"group":"Dashboards","expanded":false,"pages":[{"title":"Dashboards","icon":"chart-mixed","href":"/user-guides/dashboards/index"},{"title":"Read and filter a dashboard","icon":"chart-mixed","href":"/user-guides/dashboards/read-a-dashboard"},{"title":"Understand dashboard exclusions","icon":"filter","href":"/user-guides/dashboards/understand-dashboard-exclusions"},{"title":"Open an external dashboard","icon":"chart-mixed","href":"/user-guides/dashboards/open-external-dashboard"},{"title":"Inspect tickets behind dashboard metrics","icon":"chart-mixed","href":"/user-guides/dashboards/inspect-dashboard-tickets"},{"title":"Export a dashboard to PDF","icon":"chart-mixed","href":"/user-guides/dashboards/export-dashboard"},{"title":"Create and edit a dashboard","icon":"chart-mixed","href":"/user-guides/dashboards/create-and-edit-dashboard"},{"title":"Manage dashboard settings and access","icon":"sliders","href":"/user-guides/dashboards/manage-dashboard-settings"},{"title":"Configure external dashboards","icon":"chart-mixed","href":"/user-guides/dashboards/configure-external-dashboards"},{"title":"Assign external dashboard URLs to companies","icon":"chart-mixed","href":"/user-guides/dashboards/assign-external-dashboard-company-urls"},{"title":"Configure dashboard exclusions","icon":"filter","href":"/user-guides/dashboards/configure-dashboard-exclusions"}]},{"group":"Documentation","expanded":false,"pages":[{"title":"Documentation","icon":"book","href":"/user-guides/documentation/index"},{"title":"Find and read shared documents","icon":"file-lines","href":"/user-guides/documentation/find-shared-documents"},{"title":"Use the Documentation Hub","icon":"grid-2","href":"/user-guides/documentation/resource-hub"},{"title":"Use shared passwords","icon":"key","href":"/user-guides/documentation/shared-passwords"},{"title":"View shared IT records and procedures","icon":"server","href":"/user-guides/documentation/view-it-records"},{"title":"Create and maintain portal documents","icon":"file-pen","href":"/user-guides/documentation/create-portal-documents"},{"title":"Add files and links to the Documentation Hub","icon":"grid-2","href":"/user-guides/documentation/add-files-and-links-to-hub"},{"title":"Suggest related guides on new tickets","icon":"book-open","href":"/user-guides/documentation/related-guides"}]},{"group":"Devices","expanded":false,"pages":[{"title":"Devices","icon":"computer","href":"/user-guides/devices/index"},{"title":"Find and export your devices","icon":"laptop","href":"/user-guides/devices/find-devices"},{"title":"Understand device details","icon":"computer","href":"/user-guides/devices/understand-device-details"},{"title":"Add and edit device records","icon":"laptop-medical","href":"/user-guides/devices/add-and-edit-devices"},{"title":"View networks and configurations","icon":"network-wired","href":"/user-guides/devices/view-networks-and-configurations"},{"title":"Track installed software","icon":"box-open","href":"/user-guides/devices/track-software"},{"title":"Find a Device by Its Approximate IP Location","icon":"location-dot","href":"/user-guides/devices/ip-location"},{"title":"Understand Device IP Location Results","icon":"map-location-dot","href":"/user-guides/devices/ip-location-accuracy-and-privacy"}]},{"group":"Backup","expanded":false,"pages":[{"title":"Backup","icon":"shield-halved","href":"/user-guides/backup/index"},{"title":"Read the Backup Dashboard","icon":"shield-halved","href":"/user-guides/backup/read-dashboard"},{"title":"Find device backups","icon":"shield-halved","href":"/user-guides/backup/find-device-backups"},{"title":"Read Microsoft 365 backups","icon":"shield-halved","href":"/user-guides/backup/read-microsoft-365-backups"},{"title":"Read Kaseya and Spanning backup health","icon":"shield-halved","href":"/user-guides/backup/read-saas-backup-health"},{"title":"Read backup activity and device details","icon":"shield-halved","href":"/user-guides/backup/read-backup-details"},{"title":"Review backup alerts","icon":"shield-halved","href":"/user-guides/backup/review-alerts"}]},{"group":"Security","expanded":false,"pages":[{"title":"Security","icon":"shield-halved","href":"/user-guides/security/index"},{"title":"Read the Security Dashboard","icon":"shield-halved","href":"/user-guides/security/read-dashboard"},{"title":"Read Cork security compliance events","icon":"shield-halved","href":"/user-guides/security/read-cork-events"},{"title":"Find and read vulnerabilities","icon":"shield-halved","href":"/user-guides/security/read-vulnerabilities"},{"title":"Add security findings to Planner","icon":"shield-halved","href":"/user-guides/security/add-to-planner"},{"title":"Add Cork findings to a meeting agenda","icon":"shield-halved","href":"/user-guides/security/add-to-meeting"},{"title":"Read Huntress security items","icon":"shield-halved","href":"/user-guides/security/read-huntress"},{"title":"Find security endpoints","icon":"shield-halved","href":"/user-guides/security/find-endpoints"},{"title":"Read security endpoint details","icon":"shield-halved","href":"/user-guides/security/read-endpoint-details"},{"title":"Read Acronis EDR incidents","icon":"shield-halved","href":"/user-guides/security/read-edr-incidents"},{"title":"Follow up on EDR incidents","icon":"shield-halved","href":"/user-guides/security/follow-up-edr-incidents"},{"title":"Read CyberHoot company summaries","icon":"shield-check","href":"/user-guides/security/read-cyberhoot-companies"},{"title":"Review HootPhish challenges","icon":"trophy","href":"/user-guides/security/read-hootphish-challenges"},{"title":"Read HootPhish participant results","icon":"users","href":"/user-guides/security/read-hootphish-participants"}]},{"group":"Reporting","expanded":false,"pages":[{"title":"Reporting","icon":"chart-pie","href":"/user-guides/reporting/index"},{"title":"Design reporting blocks with AI","icon":"wand-magic-sparkles","href":"/user-guides/reporting/design-ai-blocks"},{"title":"Present reports as slides","icon":"presentation-screen","href":"/user-guides/reporting/present-reports"},{"title":"Design custom reporting blocks","icon":"chart-column","href":"/user-guides/reporting/custom-blocks"},{"title":"Edit a report presentation","icon":"presentation-screen","href":"/user-guides/reporting/edit-presentation"},{"title":"Reports Imports","icon":"inbox","href":"/user-guides/reporting/email-imports"}]},{"group":"Licensing","expanded":false,"pages":[{"title":"Licensing","icon":"key","href":"/user-guides/licensing/index"},{"title":"Set Up Pax8 for Subscriptions and Storefront","icon":"plug","href":"/user-guides/licensing/setup"}]},{"group":"Storefront","expanded":false,"pages":[{"title":"Storefront","icon":"store","href":"/user-guides/storefront/index"},{"title":"Review your subscriptions","icon":"layer-group","href":"/user-guides/storefront/view-subscriptions"},{"title":"Review Azure usage","icon":"cloud","href":"/user-guides/storefront/view-azure-usage"}]}]},{"group":"Overview \u0026 Planning","pages":[{"group":"Company Overview","expanded":false,"pages":[{"title":"Company overview","icon":"buildings","href":"/user-guides/company-overview/index"},{"title":"Read the Company overview","icon":"chart-simple","href":"/user-guides/company-overview/read-company-overview"}]},{"group":"Calendar","expanded":false,"pages":[{"title":"Calendar","icon":"calendar","href":"/user-guides/calendar/index"},{"title":"Find events in Calendar","icon":"calendar","href":"/user-guides/calendar/find-calendar-events"},{"title":"Filter Calendar events and layers","icon":"calendar","href":"/user-guides/calendar/filter-calendar-events"},{"title":"Find your upcoming and past meetings","icon":"calendar-check","href":"/user-guides/calendar/find-my-meetings"},{"title":"Find meetings in List View","icon":"list","href":"/user-guides/calendar/find-meetings-list"},{"title":"Read a meeting workspace","icon":"calendar-check","href":"/user-guides/calendar/read-meeting-workspace"},{"title":"Read meeting agenda items and linked records","icon":"list-check","href":"/user-guides/calendar/read-meeting-agenda"},{"title":"Recurring Meeting Booking","icon":"calendar-check","href":"/user-guides/calendar/recurring-meeting-booking"},{"title":"Meeting Pages","icon":"calendar-check","href":"/user-guides/calendar/meetings"},{"title":"Present and navigate a meeting agenda","icon":"presentation-screen","href":"/user-guides/calendar/presenting"},{"title":"Meeting summaries and wrap-up","icon":"envelope","href":"/user-guides/calendar/meeting-summaries"},{"title":"Configure Calendar defaults and work hours","icon":"calendar-days","href":"/user-guides/calendar/configure-calendar-defaults"},{"title":"Create and manage Calendar freeze windows","icon":"snowflake","href":"/user-guides/calendar/manage-freeze-windows"},{"title":"Understand Calendar freeze windows","icon":"snowflake","href":"/user-guides/calendar/understand-change-freezes"},{"title":"Configure the post-meeting workflow","icon":"sliders","href":"/user-guides/calendar/configure-post-meeting"},{"title":"Manage internal meeting survey questions","icon":"clipboard-question","href":"/user-guides/calendar/manage-meeting-survey-questions"},{"title":"Draft and send a meeting summary","icon":"envelope","href":"/user-guides/calendar/send-meeting-summary"},{"title":"Complete the internal meeting survey","icon":"clipboard-question","href":"/user-guides/calendar/complete-meeting-survey"},{"title":"Add and manage a meeting transcript","icon":"file-lines","href":"/user-guides/calendar/add-meeting-transcript"},{"title":"Account Notes and QBR Log","icon":"clipboard-list","href":"/user-guides/calendar/account-notes"},{"title":"Find and read account notes","icon":"clipboard-list","href":"/user-guides/calendar/read-account-notes"},{"title":"Create and update account notes","icon":"pen-to-square","href":"/user-guides/calendar/write-account-notes"}]},{"group":"Surveys","expanded":false,"pages":[{"title":"Surveys","icon":"chart-bar","href":"/user-guides/surveys/index"},{"title":"Complete a questionnaire","icon":"clipboard-question","href":"/user-guides/surveys/complete-a-survey"},{"title":"Respond to an NPS survey","icon":"star","href":"/user-guides/surveys/respond-to-nps"},{"title":"Rate a support experience","icon":"comment-smile","href":"/user-guides/surveys/rate-your-support"},{"title":"Find surveys and read questionnaire results","icon":"clipboard-list","href":"/user-guides/surveys/view-survey-results"},{"title":"Share a survey link","icon":"link","href":"/user-guides/surveys/share-a-survey-link"},{"title":"Read NPS analytics","icon":"chart-column","href":"/user-guides/surveys/read-nps-analytics"},{"title":"Read and export support satisfaction feedback","icon":"face-smile","href":"/user-guides/surveys/read-csat-feedback"},{"title":"Review low CSAT ratings","icon":"list-check","href":"/user-guides/surveys/review-low-csat-ratings"}]},{"group":"Goals","expanded":false,"pages":[{"title":"Goals and objectives","icon":"bullseye","href":"/user-guides/goals/index"},{"title":"Find and read goals","icon":"bullseye","href":"/user-guides/goals/read-goals"},{"title":"Create or update a goal","icon":"bullseye","href":"/user-guides/goals/create-and-update-goals"},{"title":"Update several goals or delete a goal","icon":"bullseye","href":"/user-guides/goals/bulk-update-and-delete"},{"title":"Connect goals to Planner and meetings","icon":"bullseye","href":"/user-guides/goals/link-to-planner-and-meetings"}]},{"group":"Notifications","expanded":false,"pages":[{"title":"Notifications","icon":"bell","href":"/user-guides/notifications/index"},{"title":"Read and manage notifications","icon":"bell","href":"/user-guides/notifications/read-notifications"},{"title":"Review automation approvals","icon":"check-to-slot","href":"/user-guides/notifications/review-approvals"}]},{"group":"Broadcasts","expanded":false,"pages":[{"title":"Broadcasts","icon":"tower-broadcast","href":"/user-guides/broadcasts/index"}]},{"group":"Planner","expanded":false,"pages":[{"title":"Planner","icon":"calendar-days","href":"/user-guides/planner/index"},{"title":"Read the Planner timeline","icon":"calendar-days","href":"/user-guides/planner/read-timeline"},{"title":"Filter the Planner timeline","icon":"filter","href":"/user-guides/planner/filter-timeline"},{"title":"Find Planner items in List View","icon":"list","href":"/user-guides/planner/find-planner-items"},{"title":"Find archived Planner work","icon":"box-archive","href":"/user-guides/planner/find-archived-items"},{"title":"Archive, restore or delete Planner items","icon":"box-archive","href":"/user-guides/planner/archive-restore-delete"},{"title":"Update several Planner items","icon":"box-archive","href":"/user-guides/planner/update-multiple-items"},{"title":"Read a Planner item","icon":"clipboard-list","href":"/user-guides/planner/read-item-details"},{"title":"Understand Planner types and budget categories","icon":"layer-group","href":"/user-guides/planner/understand-types"},{"title":"Manage Planner types and defaults","icon":"layer-group","href":"/user-guides/planner/manage-types"},{"title":"Delete or reassign Planner types","icon":"trash-can","href":"/user-guides/planner/retire-types"},{"title":"Open records linked to Planner work","icon":"link","href":"/user-guides/planner/read-linked-records"},{"title":"Ask Planner AI about planned work","icon":"sparkles","href":"/user-guides/planner/ask-planner-ai"},{"title":"Draft or change Planner items with AI","icon":"sparkles","href":"/user-guides/planner/draft-item-with-ai"},{"title":"Import PSA opportunities into Planner","icon":"file-import","href":"/user-guides/planner/import-opportunities"},{"title":"Understand PSA-linked Planner work","icon":"file-import","href":"/user-guides/planner/understand-psa-linked-items"},{"title":"Understand Standards work in Planner","description":"Read technology-standard tasks shared by your MSP and understand their source, statuses and estimates.","icon":"list-check","href":"/user-guides/planner/understand-standards-items"},{"title":"Read and manage Planner files","icon":"paperclip","href":"/user-guides/planner/manage-files"},{"title":"Plan costs and hours","description":"Enter quantities, unit costs, recurring estimates, effort and probability for a Planner item.","icon":"calculator","href":"/user-guides/planner/plan-costs-and-hours"},{"title":"Create and edit Planner items","icon":"pen-to-square","href":"/user-guides/planner/create-and-edit-items"},{"title":"Link supporting records to Planner items","icon":"link","href":"/user-guides/planner/link-supporting-records"},{"title":"Create and manage Planner templates","icon":"clone","href":"/user-guides/planner/manage-templates"},{"title":"Apply a template to a Planner item","icon":"list-check","href":"/user-guides/planner/apply-template-to-item"},{"title":"Create Planner items for multiple companies","icon":"buildings","href":"/user-guides/planner/apply-templates-to-companies"},{"title":"Read and export Planner Analytics","icon":"chart-simple","href":"/user-guides/planner/read-analytics"},{"title":"Understand Planner Analytics charts","icon":"chart-pie","href":"/user-guides/planner/understand-analytics-charts"}]},{"group":"Budgets","expanded":false,"pages":[{"title":"Budgets","icon":"calculator","href":"/user-guides/budgets/index"},{"title":"Create and edit a company budget","icon":"calculator","href":"/user-guides/budgets/create-and-edit-budgets"},{"title":"Duplicate a budget","icon":"copy","href":"/user-guides/budgets/duplicate-budget"},{"title":"Delete unwanted draft budgets","icon":"trash-can","href":"/user-guides/budgets/delete-budgets"},{"title":"Add and edit budget line items","icon":"list","href":"/user-guides/budgets/edit-line-items"},{"title":"Import budget line items from Excel","icon":"file-excel","href":"/user-guides/budgets/import-excel"},{"title":"Copy recurring costs from an earlier budget","icon":"clock-rotate-left","href":"/user-guides/budgets/import-previous-year"},{"title":"Add Planner, goal and product costs to a budget","icon":"list-check","href":"/user-guides/budgets/import-planning-and-products"},{"title":"Add Microsoft 365 licensing costs to a budget","icon":"key","href":"/user-guides/budgets/import-microsoft-365-licensing"},{"title":"Read and adjust a company budget forecast","icon":"chart-line","href":"/user-guides/budgets/read-budget-forecast"},{"title":"Sync a forecast from budgets or Planner","icon":"arrows-rotate","href":"/user-guides/budgets/sync-budget-forecast"},{"title":"Find and open a budget","icon":"magnifying-glass","href":"/user-guides/budgets/find-budgets"},{"title":"Read a budget overview","icon":"calculator","href":"/user-guides/budgets/read-budget"},{"title":"Arrange budget sections","icon":"arrow-down-wide-short","href":"/user-guides/budgets/arrange-budget-sections"},{"title":"Download or print a budget","icon":"file-export","href":"/user-guides/budgets/export-and-print-budgets"},{"title":"Read a budget monthly breakdown","icon":"calendar-days","href":"/user-guides/budgets/read-monthly-breakdown"},{"title":"Adjust a budget amount for one month","icon":"calendar-pen","href":"/user-guides/budgets/edit-monthly-overrides"},{"title":"Approve and Lock a Budget","icon":"lock","href":"/user-guides/budgets/approving-and-locking-budgets"},{"title":"Track Budget Actuals","icon":"chart-line","href":"/user-guides/budgets/tracking-budget-actuals"},{"title":"Resolve Actuals Exceptions","icon":"list-check","href":"/user-guides/budgets/resolving-actuals-exceptions"},{"title":"Find and understand budget products","icon":"box","href":"/user-guides/budgets/read-product-catalog"},{"title":"Create and edit budget products","icon":"box","href":"/user-guides/budgets/manage-products"},{"title":"Bulk edit and delete budget products","icon":"box","href":"/user-guides/budgets/bulk-edit-products"},{"title":"Create budget products from Planner","icon":"box","href":"/user-guides/budgets/import-products-from-planner"},{"title":"Import and link budget products from integrations","icon":"box","href":"/user-guides/budgets/import-products-from-integrations"}]},{"group":"Invoices","expanded":false,"pages":[{"title":"Invoices","icon":"file-invoice-dollar","href":"/user-guides/invoices/index"},{"title":"Find and review invoices","icon":"file-invoice","href":"/user-guides/invoices/view-invoices"},{"title":"Where invoice data comes from","icon":"file-invoice-dollar","href":"/msp-guides/invoices/invoice-data-sources"},{"title":"Download and export invoices","icon":"download","href":"/user-guides/invoices/download-invoices"},{"title":"Use an invoice payment link","icon":"credit-card","href":"/user-guides/invoices/pay-an-invoice"},{"title":"MSP: review Pax8 invoice charges","icon":"receipt","href":"/user-guides/invoices/view-pax8-invoices"}]},{"group":"Quotes","expanded":false,"pages":[{"title":"Quotes","icon":"file-contract","href":"/user-guides/quotes/index"},{"title":"Connect and manage Quoter","icon":"plug","href":"/user-guides/quotes/setup"},{"title":"Find and open a quote","icon":"file-contract","href":"/user-guides/quotes/view-quotes"},{"title":"Read a quote’s details","icon":"file-invoice-dollar","href":"/user-guides/quotes/read-quote-details"},{"title":"Download quote documents and export the list","icon":"file-arrow-down","href":"/user-guides/quotes/download-quotes"},{"title":"Control company quote access","icon":"user-shield","href":"/user-guides/quotes/manage-company-access"},{"title":"Troubleshoot missing Quoter quotes and company links","icon":"magnifying-glass","href":"/user-guides/quotes/troubleshoot-quoter-quotes"},{"title":"Troubleshoot QuoteWerks quotes and QuoteValet links","icon":"file-invoice-dollar","href":"/user-guides/quotes/troubleshoot-quotewerks-quotes"},{"title":"Troubleshoot Salesbuildr quotes and PDFs","icon":"file-invoice-dollar","href":"/user-guides/quotes/troubleshoot-salesbuildr-quotes"}]},{"group":"Agreements and contracts","expanded":false,"pages":[{"title":"Agreements and contracts","icon":"file-signature","href":"/user-guides/agreements/index"},{"title":"Find and review an agreement","icon":"file-contract","href":"/user-guides/agreements/view-agreements"},{"title":"Understand agreement balances","icon":"clock","href":"/user-guides/agreements/read-balances"},{"title":"Open an agreement PDF","icon":"file-pdf","href":"/user-guides/agreements/download-documents"},{"title":"Upload and manage agreement PDFs","icon":"file-arrow-up","href":"/user-guides/agreements/manage-documents"}]}]},{"group":"MSP Tools","pages":[{"title":"MSP Tools","icon":"toolbox","href":"/user-guides/msp-tools/index"},{"title":"Plan vCIO workload and pricing","href":"/user-guides/msp-tools/calculators"},{"group":"Client Success","expanded":false,"pages":[{"title":"Client Health","icon":"heart-pulse","href":"/user-guides/msp-tools/client-health"},{"title":"Find companies in Client Health","icon":"heart-pulse","href":"/user-guides/msp-tools/find-client-health"},{"title":"Read a company's health details","icon":"chart-line","href":"/user-guides/msp-tools/read-client-health-details"},{"title":"Understand Client Health scoring and evidence","icon":"scale-balanced","href":"/user-guides/msp-tools/understand-health-scoring"},{"title":"Manage manual Client Health risk flags","icon":"flag","href":"/user-guides/msp-tools/manage-client-risk-flags"},{"title":"Run a Traffic Light Review","icon":"traffic-light","href":"/user-guides/msp-tools/traffic-light-review"},{"title":"Refresh Client Health scores","icon":"arrows-rotate","href":"/user-guides/msp-tools/refresh-client-health"},{"title":"Financial Reporting","icon":"dollar-sign","href":"/user-guides/msp-tools/financial-reporting"},{"title":"Where Financial Reporting data comes from","icon":"magnifying-glass-dollar","href":"/msp-guides/msp-tools/financial-reporting-data-sources"},{"title":"Account Readiness","icon":"clipboard-check","href":"/user-guides/company-overview/audit"}]},{"group":"Standards","expanded":false,"pages":[{"title":"Standards","icon":"wrench","href":"/user-guides/msp-tools/standards"},{"title":"Read the Standards matrix","icon":"table-cells","href":"/user-guides/msp-tools/read-standards-matrix"},{"title":"Update a company's Standards deployments","icon":"circle-check","href":"/user-guides/msp-tools/update-standard-deployments"},{"title":"Update Standards in bulk","icon":"table-cells","href":"/user-guides/msp-tools/bulk-update-standards"},{"title":"Exclude or include companies in Standards","icon":"eye-slash","href":"/user-guides/msp-tools/manage-standards-exclusions"}]},{"title":"Ticket Trends","icon":"chart-line","href":"/user-guides/msp-tools/ticket-trends"}]},{"group":"Administration","pages":[{"group":"Settings","expanded":false,"pages":[{"title":"Settings overview","icon":"gear","href":"/user-guides/settings/index"},{"title":"Users \u0026 Roles","icon":"users","href":"/user-guides/settings/users-roles"},{"title":"Global Team Roles","icon":"users","href":"/user-guides/settings/global-team-roles"},{"title":"Change a Company user’s permissions","icon":"user-shield","href":"/user-guides/settings/change-company-user-permissions"},{"title":"Give a parent-company user access to child companies","sidebarTitle":"Parent-company access","icon":"sitemap","href":"/user-guides/settings/parent-company-access"},{"title":"Custom Fields","icon":"table-list","href":"/user-guides/settings/custom-fields"},{"title":"Companies Settings","icon":"building","href":"/user-guides/settings/companies"},{"title":"Project Settings","icon":"gear","href":"/user-guides/settings/projects"},{"title":"Training settings","icon":"graduation-cap","href":"/user-guides/settings/training"},{"title":"Ticket settings","icon":"ticket","href":"/user-guides/settings/tickets"},{"title":"Compliance Settings","icon":"shield-check","href":"/user-guides/settings/compliance"},{"title":"Schedule compliance assessments","icon":"calendar","href":"/user-guides/settings/compliance-schedules"},{"title":"Configure compliance scoring","icon":"sliders","href":"/user-guides/settings/compliance-scoring"},{"title":"Configure risk tracking and categories","icon":"shield-alert","href":"/user-guides/settings/compliance-risk"},{"title":"Playbook settings","icon":"book","href":"/user-guides/settings/playbooks"},{"title":"External Resources Settings","icon":"link","href":"/user-guides/settings/external"},{"title":"Onboarding Settings","icon":"clipboard-check","href":"/user-guides/settings/onboarding"},{"title":"Note templates","icon":"file-lines","href":"/user-guides/settings/templates"},{"title":"Email settings","icon":"envelope","href":"/user-guides/settings/email"},{"title":"Client Health scoring settings","icon":"heart-pulse","href":"/user-guides/settings/scoring"},{"title":"Traffic Light settings","icon":"traffic-light","href":"/user-guides/settings/traffic-light-settings"},{"title":"Manage the Standards catalog","icon":"wrench","href":"/user-guides/settings/standards"},{"title":"Configure Standards tiers and deployment options","icon":"layer-group","href":"/user-guides/settings/standards-tiers"},{"title":"Choose which Standards apply","icon":"filter","href":"/user-guides/settings/standards-applicability"},{"title":"Use PSA billing to answer Standards","icon":"tags","href":"/user-guides/settings/standards-sku-automation"},{"title":"Sync Standards to companies","icon":"arrows-rotate","href":"/user-guides/settings/sync-standards"},{"title":"Retire Standards definitions","icon":"trash-can","href":"/user-guides/settings/retire-standards"},{"title":"Financial Reporting Settings","icon":"dollar-sign","href":"/user-guides/settings/financial-reporting"},{"title":"Integrations Settings","icon":"plug","href":"/user-guides/settings/integrations"},{"title":"Integration Company Mapping","icon":"diagram-project","href":"/user-guides/settings/integration-company-mapping"},{"title":"Liongard Documentation Visibility","icon":"radar","href":"/user-guides/settings/liongard-visibility"},{"group":"Automation","expanded":false,"pages":[{"title":"Automation Rules","icon":"robot","href":"/user-guides/settings/automation/index"},{"title":"Rule Wizard Walkthrough","icon":"list-check","href":"/user-guides/settings/automation/wizard"},{"title":"Bundling Automation Matches","icon":"layer-group","href":"/user-guides/settings/automation/bundling"},{"title":"Example Automation Rules","icon":"book-open","href":"/user-guides/settings/automation/examples"}]},{"title":"Import and export data","icon":"file-import","href":"/user-guides/settings/import-export"},{"title":"Tenant Settings","icon":"building-columns","href":"/user-guides/settings/tenant"},{"title":"Billing settings","icon":"credit-card","href":"/user-guides/settings/billing"}]}]},{"group":"Connect your tools","pages":[{"group":"Integration setup","expanded":false,"pages":[{"group":"Overview, imports and sync","expanded":false,"pages":[{"title":"Integration setup guides","icon":"plug","href":"/user-guides/integrations/index"},{"title":"Integration troubleshooting","icon":"plug","href":"/user-guides/integrations/faq"},{"title":"Sync Schedules","href":"/user-guides/integrations/sync-schedules"},{"title":"Import Users","icon":"plug","href":"/user-guides/integrations/import-users"},{"title":"Import Companies","icon":"plug","href":"/user-guides/integrations/import-companies"},{"title":"Import Devices","icon":"server","href":"/user-guides/integrations/import-devices"},{"title":"Clear and Resync Integrations","icon":"plug","href":"/user-guides/integrations/clear-and-resync-integrations"},{"title":"Warranty Writeback to Hudu and IT Glue Flexible Assets","icon":"shield-halved","href":"/user-guides/integrations/documentation-warranty-writeback"},{"title":"Warranty Writeback to Autotask","icon":"arrows-rotate","href":"/user-guides/integrations/autotask-warranty-writeback"},{"title":"Warranty Writeback to IT Glue Configurations","icon":"arrows-rotate","href":"/user-guides/integrations/itglue-configuration-warranty-writeback"}]},{"group":"PSA and ticketing","expanded":false,"pages":[{"title":"Configure ConnectWise Manage Integration","icon":"plug","href":"/user-guides/integrations/enable-connectwise-integration"},{"title":"Configure ConnectWise Asio Integration","icon":"plug","href":"/user-guides/integrations/enable-connectwise-asio-integration"},{"title":"Resync ConnectWise PSA Settings","icon":"arrows-rotate","href":"/user-guides/integrations/connectwise-resync-psa-settings"},{"title":"Configure Autotask PSA Integration","icon":"plug","href":"/user-guides/integrations/enable-autotask-integration"},{"title":"Configure Halo PSA Integration","icon":"plug","href":"/user-guides/integrations/enable-halo-integration"},{"title":"Create Custom Halo PSA Role and API User","icon":"user-shield","href":"/user-guides/integrations/halo-psa-custom-role-and-user"},{"title":"Configure Syncro Integration","icon":"plug","href":"/user-guides/integrations/enable-syncro-integration"},{"title":"Configure NinjaOne Integration","icon":"plug","href":"/user-guides/integrations/enable-ninjaone-integration"},{"title":"Configure NinjaOne Ticketing Integration","icon":"ticket","href":"/user-guides/integrations/enable-ninjaone-ticketing-integration"}]},{"group":"RMM and networks","expanded":false,"pages":[{"title":"Configure Addigy Integration","icon":"apple","href":"/user-guides/integrations/enable-addigy-integration"},{"title":"Configure Datto RMM Integration","icon":"plug","href":"/user-guides/integrations/enable-datto-rmm-integration"},{"title":"Configure N-able N-central Integration","icon":"server","href":"/user-guides/integrations/enable-ncentral-integration"},{"title":"Configure Action1 Integration","icon":"plug","href":"/user-guides/integrations/enable-action1-integration"},{"title":"Configure Cisco Meraki Integration","icon":"network-wired","href":"/user-guides/integrations/enable-meraki-integration"},{"title":"Configure UniFi Console Integration","icon":"wifi","href":"/user-guides/integrations/enable-unifi-integration"},{"title":"Connect Domotz and Review Network Health","icon":"network-wired","href":"/user-guides/integrations/enable-domotz-integration"},{"title":"Configure Fortinet Integration","icon":"plug","href":"/user-guides/integrations/enable-fortinet-integration"},{"title":"Neo Agent Compatibility","icon":"robot","href":"/user-guides/integrations/neo-agent"},{"title":"Connect Auvik and review network data","icon":"plug","href":"/user-guides/integrations/enable-auvik-integration"},{"title":"Provide LogicMonitor API access","icon":"plug","href":"/user-guides/integrations/enable-logicmonitor-integration"},{"title":"Connect WatchGuard Cloud","icon":"plug","href":"/user-guides/integrations/enable-watchguard-integration"}]},{"group":"Security and training","expanded":false,"pages":[{"title":"Configure Cork Integration","icon":"shield-halved","href":"/user-guides/integrations/enable-cork-integration"},{"title":"Configure Huntress Integration","icon":"shield-dog","href":"/user-guides/integrations/enable-huntress-integration"},{"title":"Configure Wirespeed Integration","icon":"shield-halved","href":"/user-guides/integrations/enable-wirespeed-integration"},{"title":"Configure Petra Security Integration","icon":"plug","href":"/user-guides/integrations/enable-petra-integration"},{"title":"Configure Bitdefender GravityZone Integration","icon":"plug","href":"/user-guides/integrations/enable-bitdefender-integration"},{"title":"Configure RoboShadow Integration","icon":"plug","href":"/user-guides/integrations/enable-roboshadow-integration"},{"title":"Configure Cyrisma Integration","icon":"plug","href":"/user-guides/integrations/enable-cyrisma-integration"},{"title":"Configure ScoutDNS Integration","icon":"plug","href":"/user-guides/integrations/enable-scoutdns-integration"},{"title":"Configure Breach Secure Now Integration","icon":"shield-halved","href":"/user-guides/integrations/enable-breach-secure-now-integration"},{"title":"Configure Phin Security Integration","icon":"shield-halved","href":"/user-guides/integrations/enable-phin-integration"},{"title":"Connect Phished.io","icon":"shield-halved","href":"/user-guides/integrations/enable-phished-integration"},{"title":"Configure CyberHoot Integration","icon":"graduation-cap","href":"/user-guides/integrations/enable-cyberhoot-integration"},{"title":"Connect Avanan and map customer tenants","icon":"plug","href":"/user-guides/integrations/enable-avanan-integration"},{"title":"Provide Blackpoint Cyber API access","icon":"plug","href":"/user-guides/integrations/enable-blackpoint-cyber-integration"},{"title":"Provide Cisco Umbrella API access","icon":"plug","href":"/user-guides/integrations/enable-cisco-umbrella-integration"},{"title":"Connect DNSFilter and map organizations","icon":"plug","href":"/user-guides/integrations/enable-dnsfilter-integration"},{"title":"Provide Mimecast API access","icon":"plug","href":"/user-guides/integrations/enable-mimecast-integration"},{"title":"Connect ThreatMate and map customers","icon":"plug","href":"/user-guides/integrations/enable-threatmate-integration"},{"title":"Provide VulScan API access","icon":"plug","href":"/user-guides/integrations/enable-vulscan-integration"}]},{"group":"Backup","expanded":false,"pages":[{"title":"Configure Cove Backup Integration","icon":"database","href":"/user-guides/integrations/enable-cove-backup-integration"},{"title":"Configure Acronis Cyber Protect Integration","icon":"cloud-arrow-down","href":"/user-guides/integrations/enable-acronis-integration"},{"title":"Configure Spanning Backup Integration","icon":"cloud-arrow-up","href":"/user-guides/integrations/enable-spanning-integration"},{"title":"Configure Kaseya SaaS Protection Integration","icon":"database","href":"/user-guides/integrations/enable-kaseya-saas-protection-integration"},{"title":"Connect Datto Backup","icon":"plug","href":"/user-guides/integrations/enable-datto-backup-integration"},{"title":"Connect NinjaOne SaaS Backup","icon":"plug","href":"/user-guides/integrations/enable-ninjaone-saas-backup-integration"},{"title":"Connect Slide Backup","icon":"plug","href":"/user-guides/integrations/enable-slide-integration"}]},{"group":"Documentation and client portals","expanded":false,"pages":[{"title":"Configure Hudu Integration","icon":"book","href":"/user-guides/integrations/enable-hudu-integration"},{"title":"Configure IT Glue Integration","icon":"book","href":"/user-guides/integrations/enable-itglue-integration"},{"title":"Sync IT Glue Document Folders","icon":"shield-halved","href":"/user-guides/integrations/itglue-sync-folders"},{"title":"Configure Liongard Integration","icon":"magnifying-glass-chart","href":"/user-guides/integrations/enable-liongard-integration"},{"title":"Configure CloudRadial Integration","icon":"cloud","href":"/user-guides/integrations/enable-cloudradial-integration"}]},{"group":"Cloud and domains","expanded":false,"pages":[{"title":"Connect rollout companies to Microsoft 365","sidebarTitle":"Connect rollout companies to Microsoft 365","icon":"cloud","href":"/user-guides/getting-started/onboarding/company-m365"},{"title":"Connect Google Workspace","icon":"google","href":"/user-guides/integrations/enable-google-workspace-integration"},{"title":"Configure CIPP Integration","icon":"cloud","href":"/user-guides/integrations/enable-cipp-integration"},{"title":"Configure Pax8 Integration","icon":"boxes-stacked","href":"/user-guides/integrations/enable-pax8-integration"},{"title":"Set Up Pax8 for Subscriptions and Storefront","icon":"plug","href":"/user-guides/licensing/setup"},{"title":"Configure Sherweb Integration","icon":"cloud","href":"/user-guides/integrations/enable-sherweb-integration"},{"title":"Configure Adobe Enterprise Integration","icon":"file-pdf","href":"/user-guides/integrations/enable-adobe-enterprise-integration"},{"title":"Provide Intermedia Partner API access","icon":"plug","href":"/user-guides/integrations/enable-intermedia-integration"},{"title":"Configure DNSimple Integration","icon":"globe","href":"/user-guides/integrations/enable-dnsimple-integration"},{"title":"Configure Cloudflare Integration","icon":"plug","href":"/user-guides/integrations/enable-cloudflare-integration"},{"title":"Provide Ingram Micro API access","icon":"plug","href":"/user-guides/integrations/enable-ingram-micro-integration"},{"title":"Provide TD SYNNEX API access","icon":"plug","href":"/user-guides/integrations/enable-td-synnex-integration"}]},{"group":"Sales, payments and scheduling","expanded":false,"pages":[{"title":"Connect and manage Quoter","icon":"plug","href":"/user-guides/quotes/setup"},{"title":"Troubleshoot missing Quoter quotes and company links","icon":"magnifying-glass","href":"/user-guides/quotes/troubleshoot-quoter-quotes"},{"title":"Configure QuoteWerks Integration","icon":"file-invoice-dollar","href":"/user-guides/integrations/enable-quotewerks-integration"},{"title":"Map QuoteWerks customers to companies","icon":"file-invoice-dollar","href":"/user-guides/integrations/map-quotewerks-customers"},{"title":"Troubleshoot QuoteWerks quotes and QuoteValet links","icon":"file-invoice-dollar","href":"/user-guides/quotes/troubleshoot-quotewerks-quotes"},{"title":"Configure Salesbuildr Integration","icon":"file-invoice-dollar","href":"/user-guides/integrations/enable-salesbuildr-integration"},{"title":"Map Salesbuildr companies for quote access","icon":"file-invoice-dollar","href":"/user-guides/integrations/map-salesbuildr-companies"},{"title":"Troubleshoot Salesbuildr quotes and PDFs","icon":"file-invoice-dollar","href":"/user-guides/quotes/troubleshoot-salesbuildr-quotes"},{"title":"Configure Benji Pays Integration","icon":"credit-card","href":"/user-guides/integrations/enable-benjipays-integration"},{"title":"Configure TimeZest Integration","icon":"calendar-clock","href":"/user-guides/integrations/enable-timezest-integration"},{"title":"Configure Simplesat Integration","icon":"face-smile","href":"/user-guides/integrations/enable-simplesat-integration"},{"title":"Configure Microsoft Teams Integration","icon":"microsoft","href":"/user-guides/integrations/enable-teams-integration"},{"title":"Provide CrewHu API access","icon":"plug","href":"/user-guides/integrations/enable-crewhu-integration"},{"title":"Connect Fellow meeting notes","icon":"plug","href":"/user-guides/integrations/enable-fellow-integration"}]}]}]}]},{"tab":"API Reference","pages":[{"title":"API Reference","href":"/api-reference/budgets/list-budgets"}]},{"tab":"Release Notes","pages":[{"title":"Release Notes","href":"/release-notes"}]}]},"title":"Read and manage Planner files - MSPortal.ai Documentation","buildId":"dpl_CUnGQP1HgFUzoxatVC37y4zP83Vx","deploymentId":"dpl_CUnGQP1HgFUzoxatVC37y4zP83Vx","dynamics":["07c022d89b","a74be98ba7"],"chunks":["Frame-BCFzRGe_.js","DynamicMarkdown-BUuAYxJE.js","zoom-image-lightbox-DQ5W4Q2v.js","PlusIcon-jZ8vgk6R.js","lightbox-handle-r17bVUz3.js"]}